Tips on Making the Elven Circlets
We going to list a number of ways that our folk have made the circlets.
Many of these can be seen in the Scrapbook section, but there are even more
tips there that we haven't listed, check out the Elven sections
For ultimate basics, check Wireworking
Introduction
Getting started bending wire
Many hardware stores or farm co-op stores supply 16 gauge aluminum
fencing wire that isn't bad for doing this kind of work. I think there's a
number of links in the "maille" section of the website. It's not a bad
substitute for silver for costume appearance.
After being bent into the appropriate curves you can hammer flat the wire
with a small (4 or 6 oz.) hammer on a small anvil (10 lb. anvils are also
available at a lot of hardware stores for less than $15). The wire flattens
out and keeps it's curve. You can overlap wires and hammer them in the same
position... they'll stay in place due to the groove the wires imprint into
each other to get that net overlapping knotwork look. I'd suggest practicing
on some very cheap 18 or 20 gauge copper wire sold for picture hanging. If
you can master a smooth hammered flat curve on the small wire, the 16 or 14
gauge aluminum will be a piece of cake ;-).
== Adam
I made the circlet out of electrical wire (round sort of flexible
wire) spray painted metallic silver and telephone line (the flat non coiled
kind) spray painted gold. Advantages: cheap, flexible (you can fit it
to your head without worry of cutting or being uncomfortable), you can play
around with it until you've got the look you want. Disadvantages: even
though it looks pretty real it may not be the level of authenticity you're
after, paint might smudge a bit.
== Jen / Laughing Magpie
See her
scrapbook entry. There's a whole page of construction details
Weaving Wire and Crystal
You
need:
- some craft wire (it comes on a spool)
- some small beads
- some jewels (pear shaped Austrian crystals...anything
that can be suspended from wire)
- two ornate flat fasteners to attach to your hair
- needle nose pliers (tweezers if you are in a pinch)
- A few large stick pins
Now if you know some ornate braids this is where you can
go wild...fishtail and stuff. I chose a simple 3 strand braid. Make a
nice long length of the braid, but be careful, don't plan to cut off more
wire than you can handle in your hands for a braid. Braid evenly. cut off
the length you will need for each piece of your design and using a stick pin
to pry some of the braid apart stick the raw in that gap to attach the
pieces. Using your pliers fold over the excess to attach.
You can put beading on the braid depending on the braid
thickness. You can either attached your jewels as you go or you can
attach them last using little round things called Jump rings. They are in
the jewelry section of craft stores.
== Gab
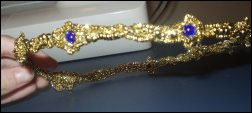
Christmas wire and beads
I decided to make Eowyn's funeral circlet because it was so leafy and
filigree looking. I figured it'd be less difficult to sculpt than
something that had to be made out of metal. The first thing I did was take
a trip to Michael's (any craft store would do) and had no ideas in mind
except for something gold and bendable. I stumbled upon some wired
Christmas trim that looked like gold cord, but had a bumpy texture. It
looked fabulous for the foundation. One roll of anything you find should
do it.
 I
then got gold craft wire, a big pack of tiny gold beads, and a pack of
blue tiger eye beads (to simulate the lapis lazuli). I also got four gold
filigrees to cover up where I would be winding the wire in the back.
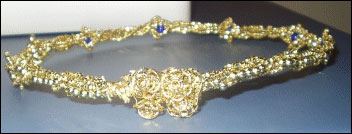
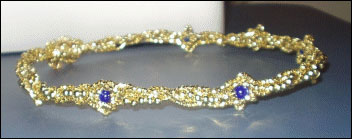
First I cut a length of gold craft wire and wound it around my head,
fastening in the back. I used this a guide to the shape of the actual
circlet. Then I took three lengths of the gold wired cording (measured
using the guide circlet) and braided them together, winding the excess
around the back of the circlet and trimming it. I then cut a length of
gold craft wire and wove it into the braid I made - every inch or so I
strung on five small gold beads to add texture to the circlet. Then at 2"
apart sections I strung on a blue bead to simulate the flower "stations".
I did this all the way around the circlet but still wasn't satisfied - I
needed something to make the flower shapes around the blue beads. I then
cut another longer length of the gold wired cord and wove it into what I
had already done, and when I got to the blue beads, I wound the cord
around the bead several times, going in and out of the circlet for
sturdiness, and using my fingers to pinch the top and bottom of the circle
I had created to give it a pointy flowered look. Once finished I wound the
excess cord around the back where the others were finished off, cut off
some gold craft wire, strung my filigrees to cover the messy cords and
"pretty it up". Then you have a finished circlet! It's quite time
consuming but very rewarding, so be patient :)
== kat
 |
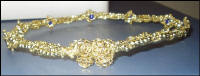 |
| Front |
Back |
Step by Step on Galadriel's Crown....
is on a separate page <here>
LOTR Home | Up | Wire Intro | Joining Tips | Wire Circlets | Crown Tips | Making It Real | Galadriel's Circlet Pattern | Butterfly Crown - Tin | Butterfly Crown - Clay | Copper Foil Arwen Crown | Dwarf Beard Crimps | Cleaning Silver Jewlry | Weta Techniques
LOTR Home | Pattern Modification & Tips | Fabric Techniques | Fabric Embellishment | All About Armor | Leather Working | Vambraces to Gloves | Weapon Tips | Shoe Tips | Metalwork and Crowns | Working with Clay | Casting Belt Buckle | Casting Small Props | Pipe Making Tips
This page was last updated
04/22/08
|