|
|
|
|
|
|
Casting small props with Epoxy Resin
There are numerous bit of the costumes that that you may wish to create from your own molds. I made a Fellowship pin. These same techniques can be used to create quite a few other small props including buttons, bits of jewelry, etc. This method does require a fair number of supplies... but it you want to do it right... Just looking for a quick method?? Check Quick Pins This came out seeming rather complicated when written out. ^_^; It's really not all that hard. I promise. This is just how I made mine and reflects what I've learned from messing around. I'm no expert. If anyone has anything to add or has a question, feel free to ask me. Materials Needed
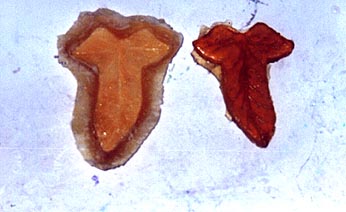
* = Generally available at hard ware stores. + = Generally available at hobby stores. # = Generally available at multi-merchandise stores. Step 1 - Sculpting and MoldingI used the picture of the brooch in my Nobel Collection catalog as a reference. It will help immensely to have it handy during construction. First, you want to make a leaf shape out of your clay. There's really no way to teach sculpting except by doing, so just use the sculpting tools or old knives, and have fun. :) Once you have a leaf shape you're happy with, it's time to make veins. For the veins, roll the clay into thin strings. How fine they'll get depends on the type of clay used and personal desires. Cut small pieces from the string and lay them onto the clay leaf to mimic veins. Press down gently on them to make sure there's no air underneath, but don't make them flat. You want them to be round and stand out from the surface Ta-da! One mallorn leaf in clay. If you use Sculpey or other polymer clay, you don't have to bake it when you're done. That way you can use it for something else later. Next, place your clay sculpture on a hard, flat surface where it won't be disturbed. (An old plate is a good choice.) Using a small brush or sponge, cover the entire sculpture in a layer of liquid latex to form a skin. Be sure to paint the latex off the sculpture onto the surface it's sitting on to form "flash" about half an inch to an inch wide all around the clay. Clean the brush with soap and warm water between each coat. Allow the latex to dry between coats. Four to six layers is probably all you'll need, but the more layers, the stronger the mold will be. To strengthen the mold and reduce the number of coats of latex applied, place small pieces of gauze on a wet layer of latex, then paint more latex over that and allow to dry. Cut the gauze into small triangles to ensure that they'll lay flat over all surfaces. When the latex has dried thoroughly, you have the option of using the Plaster of Paris to make a "mother mold". This plaster cast will support the latex mold during casting. It's not always necessary, but it does help. If you choose to make a mother mold, mix up some Plaster of Paris to the consistency of pudding and pour that over the clay and latex. Smooth the top of the plaster while it's wet so there's a flat spot for the plaster cast to stand on when turned over. When the plaster had dried, gently remove it from the sculpture and set aside. Then peel the latex off the clay. Save the clay for making doo-dads in the future, and put the latex skin into the plaster mother mold. Now you have everything you need to cast as many leaves as you want. Step 2 - CastingFirst, a few notes about resin. Above all else, read the directions that come with it. All of them! Second, resin gives off a lot of putrid fumes. It should only be used in a well ventilated area, or even better, outside. A good rule of thumb is that if you can smell it at all, you don't have enough ventilation. It sounds extreme, but it will save your brain cells and spare you feeling bad. Wear gloves to protect your skin, and possibly a light face mask. Resin also gives off a great deal of chemical heat while it cures. Don't touch the mold or the curing resin. If you spill some on your clothes or skin, clean it up quickly with acetone. This chemical heat may also cause your latex mold to shrink, but this is less of a problem when you layer gauze into it. Have all your materials within arms reach before you start. This includes molds, resin, catalyst, mixing utensils, and acetone (for clean-up). If you have a set of measuring spoons you don't love anymore, you can use them to measure out the resin. Or you can eyeball it. Once you have the amount of resin you plan to use in your mixing cup, it's time to add the catalyst. This is the stuff that kicks off the chemical reaction that makes the resin hard. Generally, the ratio is 14 drops of catalyst per one ounce of resin. Adjust as needed. Using too much catalyst will reduce your working time and may cause the cast to crack. Using too little may keep the resin from curing properly. Once you've added the catalyst, stir the resin for about fifteen to twenty seconds to make sure everything's mixed. Tap the sides of the cup gently to help any air bubbles rise to the top so they won't weaken your cast. The resin is then ready to pour into the latex mold. Since resin often won't go into very small channels in the mold, like the veins of the leaf, without help there are two things you can do. If you like you can thin the resin before adding catalyst by adding a drop or two of acetone. Don't add more than a couple of drops though, or the resin will not cure properly and you'll have a mess. You can also pour a very small amount of catalyzed resin into the mold and then stretch the mold to help the resin work itself into the small channels. It may take a couple of imperfect casts before you get one that captures all the veins. When you're satisfied that all the veins are filled, slowly pour in the remaining resin until it just touches the "brim" of the mold. Don't worry too much about over-spills; they can be sanded off later. Leave the resin to cure. This can take anywhere from ten minutes to half an hour. Just tap the surface of the resin with your gloved finger to see if it's hard. When it is, you can peel the resin cast out of the latex mold.
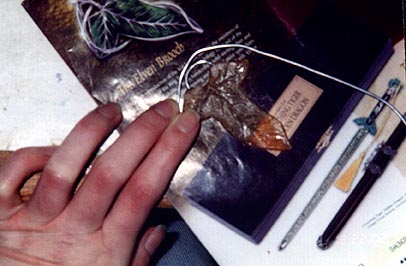
Afterwards, you can dust the cast and mold with baby powder to remove any residual stickiness from the resin, and make your fiberglass baby fresh. ^_^ Step 3 - Adding the wireIf there's anything on your cast that looks like it needs to be sanded off, do so now with the sand paper or Dremel tool. Any time you sand or drill your brooch, do it outside of your home and wearing a dust mask approved for use around fiberglass and something to protect your eyes. Now it's time to work with the wire. Keep your finished cast and a picture handy for fitting and reference. Cut three pieces of the 16-gauge wire as long as you think you'll need. Using the pliers, shape the different pieces into the "stem" curve, the "bridge" piece, and the "curl" that goes towards to bottom of the leaf. This takes practice. To prevent your pliers from leaving nicks in the wire, wrap the tips with tape before you start.
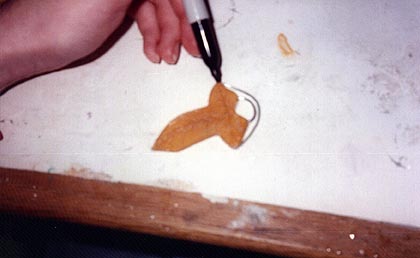
Once you have the wire pieces shaped to your satisfaction, fit them against your cast and make any final adjustments. When the fit feels good, mark on the cast where the ends of the wire should enter the cast to mimic the attachment in the picture.
With the Dremel tool or drill, carefully drill small holes or depressions in the cast at the spots you've marked. Wear your dust mask and eye protection while doing this. Start small and widen/deepen the holes as needed to make sure the wire fits against the cast snugly. When you're satisfied with your work, get out the epoxy resin. This comes in a double-barreled plunger and doesn't have much smell, so you can get away with using it indoors. Protect your work area and clean up any dribbles with acetone. Mix up a small amount of epoxy and use it to glue the appropriate wire piece in the appropriate spot. If needed and possible, weight or clamp things down until the epoxy dries. I attached one piece of wire at a time and let each dry overnight, so it took three days to get all the wire bits attached. If you've come this far, congratulations! The hard part's over! ^_^ Step 4 - Finishing and painting.Once the epoxy has dried hard, you can sand off any lumps or drops that may have happened and smooth any parts of the cast that look rough. Hobby stores often carry pen shaped detail sanders in the model section that are useful for this. Both primer and silver paint come in brush and spray-on forms. Which you use is up to you, but if you don't want to get paint on the wire, brush-on is the way to go. Check the back to see if you can clean up with water or if you'll need paint thinner. (Or use disposable brushes.) When you're finished with any sanding, you can paint the brooch with primer, if desired. It helps paint to stick, but isn't always needed. After the primer dries, paint the cast with silver paint. When that dries, grab your picture and your green enamel or paint. Don't get spray paint for this part. Fill in the area of the leaf between the veins, being careful not to cover up the veins. Once the green is dried you can coat the whole thing in clear sealant, if desired. Attach the pin back to the back of the brooch using the epoxy, and your brooch is done.
This page was last updated 04/22/08 |
|||||||