|
v ----- Advertisement -----v
^ -----Advertisement ----- ^
|
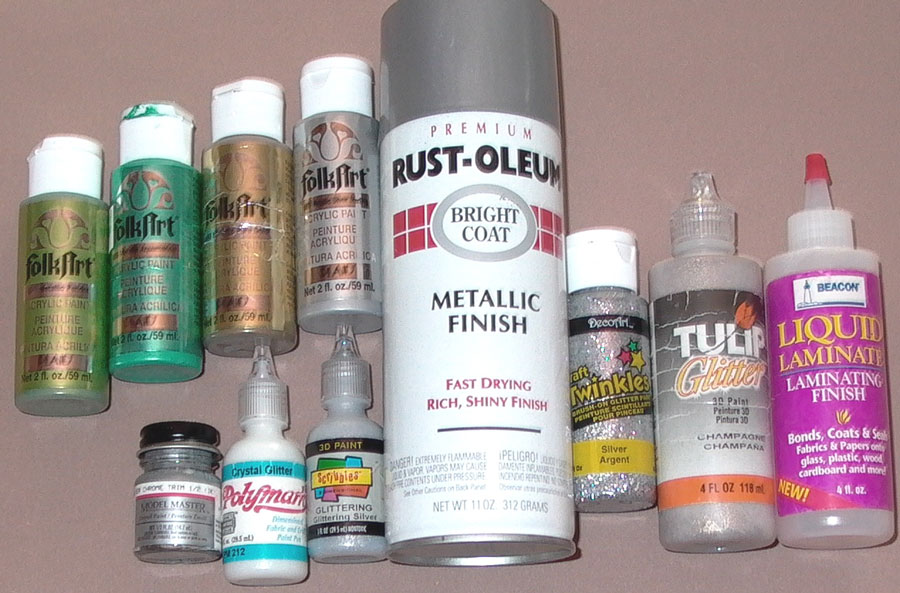
Supplies
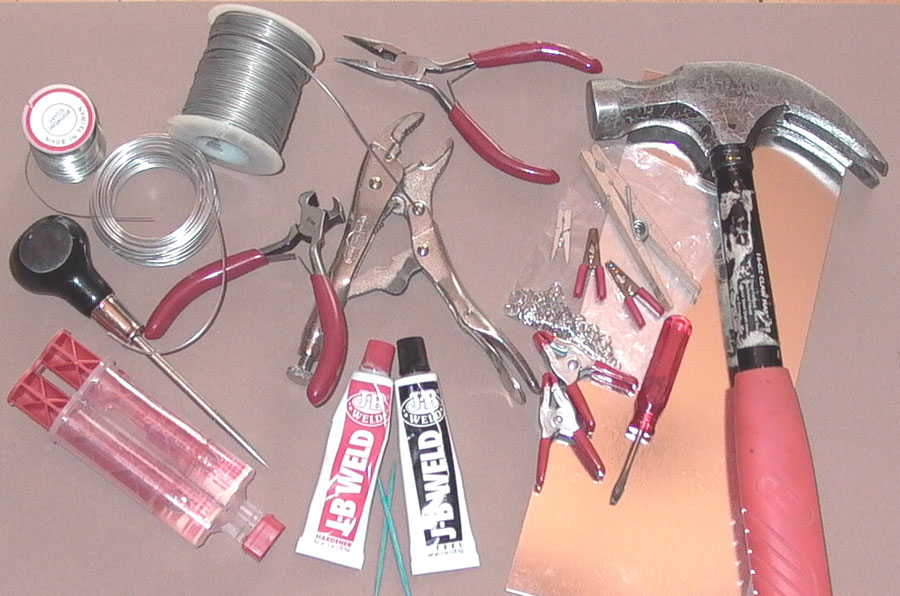
Pattern UsedHead over to our crown pattern page for details. Tools Used
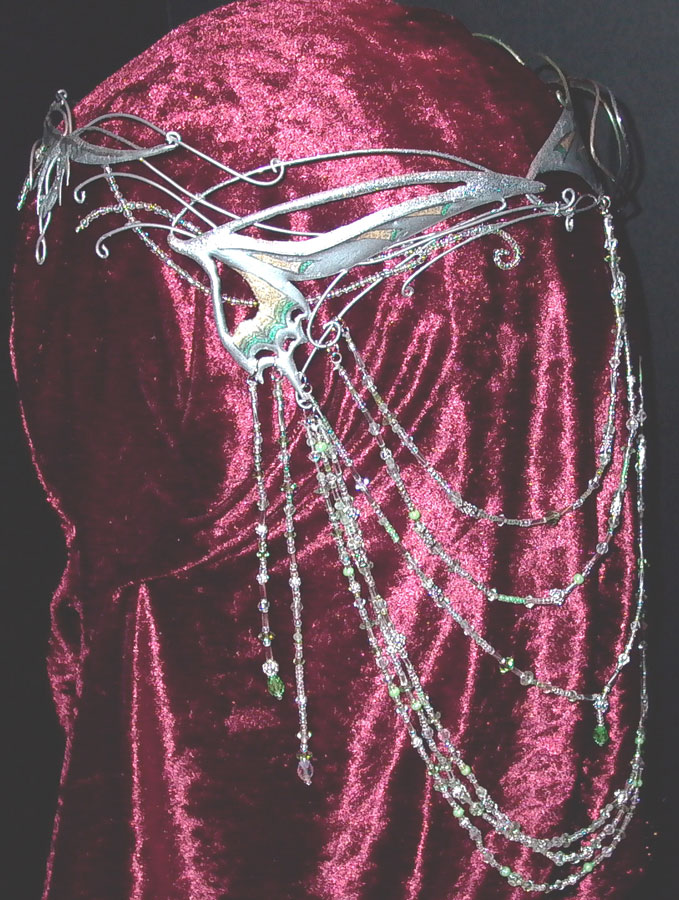
ProcedurePreliminary research and choices:I began by studying as many pictures of the original crown, from as many
different angles, as possible. I also made a project board with printed
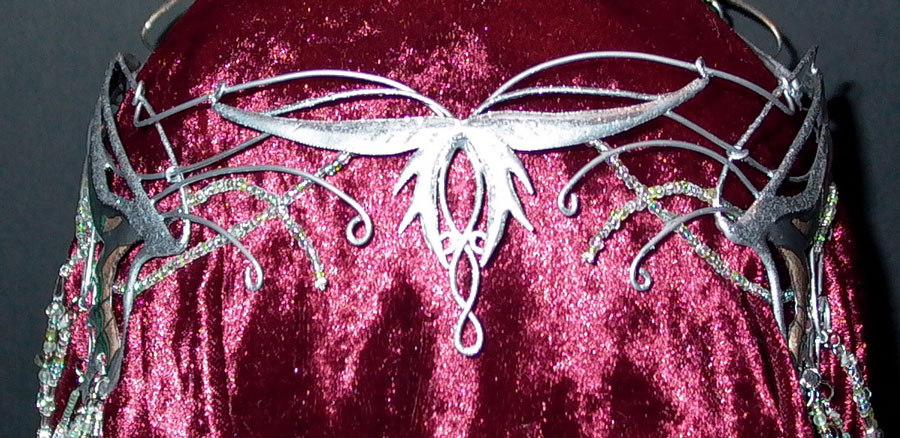
pics for easy/quick reference. My favorite and most helpful resource was: Main Butterfly Crown SectionHere's how I did the metal work: Using the beautiful art work / patterns by Elisabeth, I taped the pattern securely on the tin, then etched it into the tin with a scribing tool - following the outline & inner lines of the patterns. Anything sharp will work for etching: a seam ripper / ice pick / stiff wire piece. Just proceed carefully, as it's kind of hard to continue the project with a sharp object imbedded in your hand. <g> I slightly widened some of the slimmer areas - just for a little added strength.
After the pattern was transferred, I used medical sheers to cut the outer shape of the butterfly pieces and the front forehead piece. Next, I used a hammer and a flathead screwdriver, with scrap wood underneath the tin, to punch out the delicate inner areas of the butterfly wing pieces. [This is done by placing the tip of the tool along the line of the piece to be punched (cut) out, and hammering the top of the tool until it pierces the tin. Overlap each cut, continuing to follow the line of the pattern.] I tried using a straight metal punch at first, but the tool was too big for the delicate inner cut outs. I then resorted to a very small (4 inch tall) flat head screwdriver. This was a very slow process, but worked well. Be sure to wear gloves & eye protection! Occasionally, I turned the piece over and hammered it flat - especially
after I was done punching (cutting) out the inner, small pieces of the
butterfly wings. I gently bent or curved all the butterfly wing pieces and the front forehead piece, using the shape of my head in the positions where they'd be placed. *NOTE* - it's important to do this *before* applying the epoxy resin, as it may crack or peel off - if you bend the tin afterwards. To do the epoxy surface layer: I mixed the 2 part epoxy (*make sure the
work area is well ventilated), let it sit for a minute to thicken up, then
spread it on the surface of the tin with a popsicle/craft stick - like
icing a cake. The glue's set up time gauges how fast you
have to work. I hand held the pieces (by the pre-glued wire) until they
had cured enough to set them on a surface without the glue running off the
edges. Then, I placed the pieces in a safe spot to cure. I cut and curved all the wire pieces, placing them over the pattern, as I proceeded, to get the proper curves. Then I clamped and glued these to the main tin butterfly pieces & forehead piece. To securely attach the wire to the main butterfly pieces & the forehead piece, I used JB Weld Metal Epoxy. I couldn't have done this project without it! It worked great!! I attempted to solder the wire to the tin butterfly pieces, at first. However, the tin conducts heat very well, and my first solder joints, which were close together, came apart. I choose, in the beginning stages, to use epoxies. *Note* - you shouldn't use solder and epoxies in close proximity, together. The heat ruins the nature of the epoxy, and weakens it; if not destroying it all together.
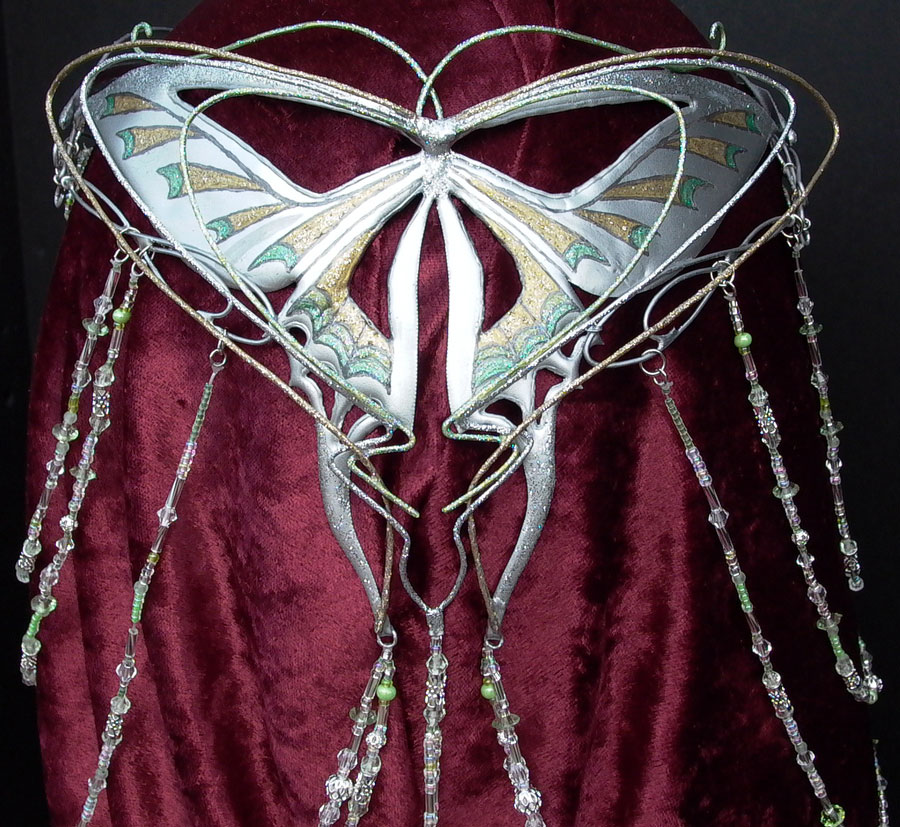
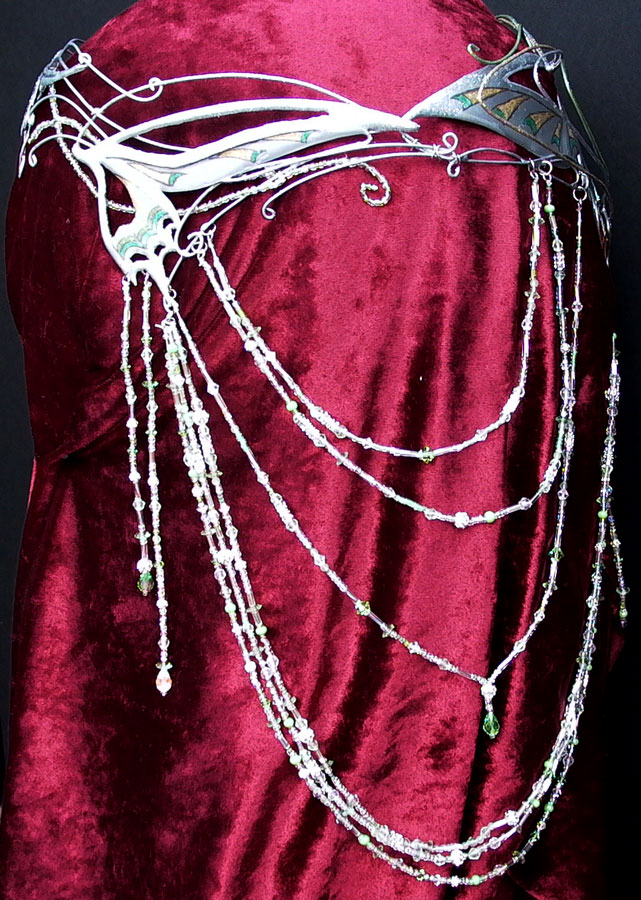
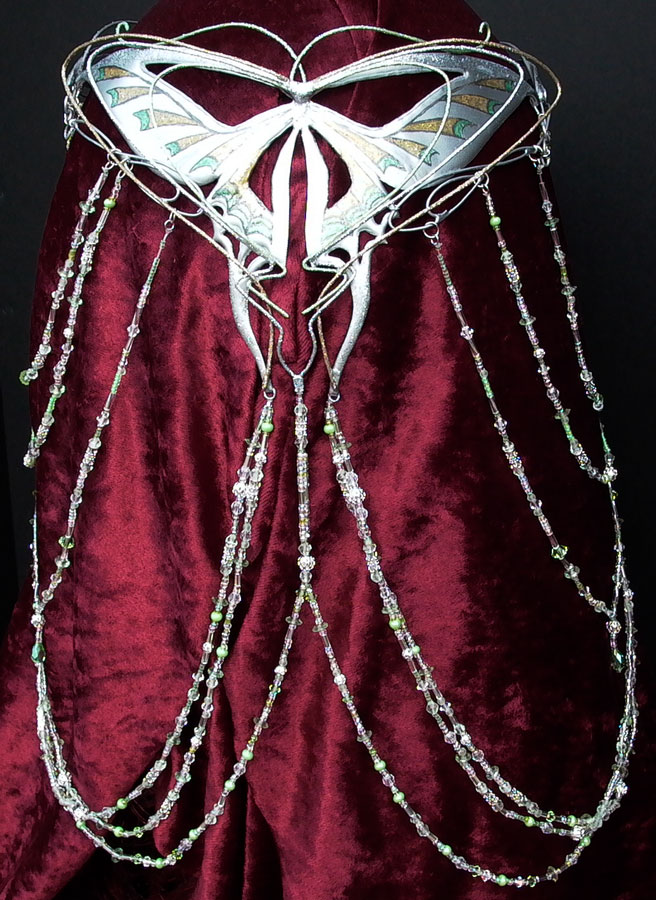
The inside of the crown isn't very pretty, but the metal epoxy holds everything together quite well. *After the JB Weld is dry, put an extra layer (or 2) over all glued parts on the inside of the crown. This provides added strength and durability. Two Main Crown PiecesAt this point I had two pieces: the front/side piece & the back butterfly piece. After all the epoxies had dried, and my butterfly sections were completed - structure wise - (except for the beaded wire on the front section), I spray painted them with an aluminum / silver colored spray paint. There are some other *highly metallic* spray paints that you can buy, but I was using some I had on hand. If I were to do this project over again, I would use silver leaf, instead of paint. After drying, over night, I began the hand painting - detailing the butterfly look. Again using Elisabeth's sketch as a guide, I used the Metallic Gold, Metallic Peridot, & Metallic Aquamarine for the colored parts of the wings. For the outer "peacock" looking colored section - I squeezed out a small amount of Metallic Aquamarine (pea size) and added a drop of the Metallic Gold paint, then mixed well. That gave me a beautiful metallic Peacock Blue color. Painting the details was another slow process, as you need to let the paint dry between colors and outlining. I used acrylics, but if you go with enamels (or nail polish) - a little longer dry time. For some extra sparkle, I added the Champagne/Gold colored glitter paint over the Metallic Gold painted sections of the butterfly wings and Crystal over the Metallic Peridot & Peacock colored painted sections. On the back butterfly section, I painted the two top antenna Metallic Peridot, and, when dry, added several coats of Crystal paint. Allowing to dry between coats. The wires that are over the back butterfly section, in the same shape as the butterfly wings, were also painted. From outer to inner: Metallic Gold, Metallic Sterling Silver, Metallic Peridot. When dry, I added the Champagne/Gold glitter paint over the Metallic Gold painted wire, Glittering Silver paint over the Metallic Sterling Silver painted wire, and Crystal paint over the Metallic Peridot painted wire.
I saved the beaded wires on the crown head piece for last. Using 28 gauge silver craft/jewelry wire, I followed the pattern to get the shape, then added small glass seed beads in silver, crystal, & peridot. I clamped these *carefully* into place, and applied clear epoxy glue to secure them. Next, I glued a silver crimp, using JB Weld, to the two silver butterfly shaped wires that come down and meet at the bottom middle of the back section. The crimp has a circle at the end, which I used later to connect the middle upside down "Y" shaped bead line. Using a Styrofoam wig head [$2.99 @ Sally's Beauty Supply], I measured the circumference of my head, and built it up with a knit cap to match my head size. This could be made more permanent with paper mache or duct tape. I put a wig on it, and attached the front and back sections of the crown together, using several 6mm sized jump rings on each side. *This could also be glued with JB Weld, if you want it to permanently stay the same size. I left mine attached with only jump rings, so I can adjust the fit, if needed. At this stage, I added a little more sparkle with the DecoArt Craft Twinkles - Silver. Using a small paintbrush, I painted the top edges of all the butterfly sections, and the bottom tail of the back butterfly section. I also highlighted some of the wires with the Twinkles. I embellished the front forehead piece with the Glittering Silver paint for a "filigree" look.
Using the Liquid Laminate, I painted over the outer, painted, surface all the butterfly wing pieces, and the glittered wire pieces. This adds shine, and protects the paint and glitter. Allow to dry.
Using the Gossamer Floss, I began beading the two front lines. I did the bead lines symmetrically - the same for each line on each side. Give yourself an extra three inches, per line, of the Gossamer Floss, enough to easily tie off to the 4mm jump rings. Connect the bead lines, w/4mm jump rings already attached to the ends, to the crown with the 6mm jump rings. Multiple bead strands can be connected to the same 6mm jump ring.
For the middle back bottom bead line, which forms an upside down "Y" shape, I doubled the Gossamer Floss, pushed it through the hole in the silver crimp, then brought both ends of the lines back up and through the loop. That formed a secure knot with two lines coming through. I put both lines through about 1" of beads, then began beading the two lines separately, but with the same types of beads on each side. The double beaded line continued down about 2". I brought the two lines together, again, and beaded with both pieces of floss as one single line about 1/2". At this point, I separated the lines once more - forming the upside down "Y", which branched out and connected to the bottom side butterfly wing pieces of the crown. I beaded these, and connected them in the front - behind the 2nd front straight line. The only other unusual line is the 3rd side "U" shaped line. This also forms a "Y" shape (upright). For these lines, I ran the line through a small bead, brought it together, and ran through a Swarovski Peridot Crystal Teardrop Bead, as well as other small beads (about 1" from the bottom bead to the branch off). Then the lines branch out into two separate beaded lines. After each line was beaded, and tied off to a jump ring, I connected it with the 6mm jump rings to the crown. *NOTE* - After tying off the Gossamer Floss to the jump rings, I dabbed the knot with a tiny bit of fabric glue. This is an optional step, but I wanted to add a little extra security to my knots. Tips
Very Important - whether you layer the top of the tin with epoxy. or glue layers of tin together for thickness - make sure that the tin is bent to the curved shape that you want/need to fit your head - before using the epoxy!!!! It will crack if you bend it too far after it has cured onto the tin. Or, it will peel off your project at the edge, if you bend the tin. So, just be sure to have the tin the way you want it to stay before using any epoxy or JB Wield. Shape everything 1st (including your wire) - glue 2nd. Don't let this project intimidate you! It may *look* IMPOSSIBLE, but just take it one step at a time. Also check out how to make the crown with a clay base. v ----- Advertisement -----v
^ -----Advertisement ----- ^
This page was last updated 04/22/08 |
|||||||