


v ----- Advertisement -----v
^ -----Advertisement ----- ^
|
|
Continuous Roll Collar
-- by Naomi
We have seen rolled collars in a few outfits now:
Here we present the way to modify your pattern to do these colors.
Instructions recommended for intermediate and advanced sewing. (If
you're a novice... please work with these will a full muslin first.)
Illustrations are numbered - instructions correspond directly. I am
giving one set of basic instructions, then individual outfits have their own
notes and diagrams.
Suggestion for pattern prep... before you begin your collar:
|
Keep in mind that you're doing pattern modification here.
Before you start your collar, make sure that your basic bodice pattern
fits.
My best suggestion would be to get your bodice pattern, even before
you do a toile, (muslin) and trace it onto some Vilene (not the fusible
kind, tracing Vilene is cheap, soft and flexible, you can see through
it, and unlike fabric, it doesn't fray...) and get someone to help you
pin it together on you or a dummy. If you can't get a hold of that...
you can work with anything from muslin to old sheets.
TIP: cut really generous seam allowances, two or three inches,
not right on the lines, or you won't be able to alter it.. .This
will help you find glitches in the design. Note - don't muck around
with collars yet...this is just for stuff like position of shoulder
seams, correct shoulder width, and gaping at back neck or arms. Once
you are sure that the basic bodice itself is ok, add on the collar
extension, also in the Vilene, (You can recut the whole front, or just
pin on an extra bit, or if you're really good, leave enough extra
Vilene in your 'seam allowance' that you can cut it out later...)
Repin and check for fit.
The main difficulty with putting pattern alterations on the site is
that it's just a guide... every bought pattern is going to vary in the
curve of the collar, the neckline and the depth of the neckline also,
dependant on the original collar/neckline/style/size. This is why we
have added the recommendation that it's for more experienced sewers.
Individual outfits' collar patterns are simply shape recommendations,
but to make it fit each persons pattern will require some tweaking.
However, the method remains the same for all, and that's the key point
of having it.
Neckline shape:
It may be necessary to alter the back neckline to allow the collar to
sit flat. It may be dipping too low, in which case you can add a little
height to the CB and try that. Try 1/4" at a time, hard to say without
seeing the pattern... The puckering could be caused by a number of
things... if it's extra width in the collar or the neckline, you need to
measure the curve very carefully before stitching your CB seam on the
collar (like matching armholes to sleeves... can be tricky). If it's
due to the dip in the neckline pulling everything out of whack, raise
the back neck as I mentioned above so its less curved.
Once you have your pattern worked out in Vilene, you then transfer
the markings from the bought pattern where applicable and you have a new
pattern for future use. (Doesn't tear like paper, long-lasting and easy
to use!)
Step Two - using your new, modified pattern pieces, do the whole
thing, including sleeves and skirt, in the muslin and instead of just
pinning, stitch it up and move around in it. Obviously without
interfacing the collar won't stay up properly but you should get the
general look. This will tell you where any more problem areas are...
|
The Collar Modifications
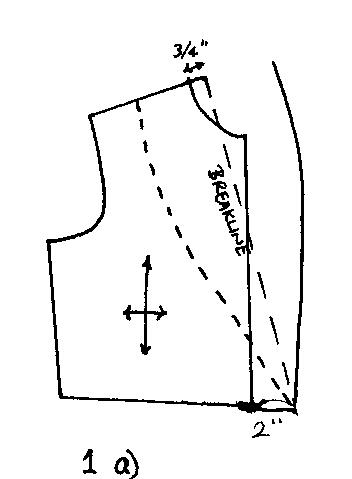
1. How to draft a Continuous Roll Collar on any basic bodice:
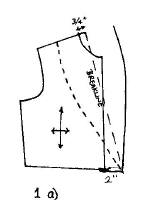 a)
Extend C.F. of bodice pattern for the buttonstand (overlap). Width may
vary. a)
Extend C.F. of bodice pattern for the buttonstand (overlap). Width may
vary.
On Bodice Front draw shape of collar as desired. (See individual
outfits for designs..)
Mark 3/4" out from the shoulder at the neck.
Draw a breakline* through this point to the desired depth of the
collar. Fold your paper back along the breakline and trace the shape of
your collar. |
|
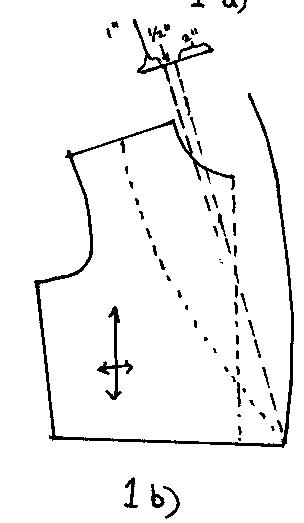
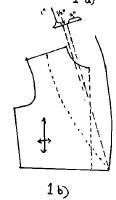 b)
Extend the breakline upwards from the shoulder, by 1/2 back neck
measurement +1/4" for seam allowances. b)
Extend the breakline upwards from the shoulder, by 1/2 back neck
measurement +1/4" for seam allowances.
Measure 1/2" back from the breakline at C.B. and rule a line from
that point to the termination point (where the collar ends).
Draw a line at right angles to this new breakline, about 1" to the
back and 2" to the front. *This width can be adjusted for a wider or
narrower collar, but only towards the front of the collar.
|
|
 c)
Widen the outside edge by extending the C.B. line 1/4". Reshape the
line and connect with the traced part of the collar. c)
Widen the outside edge by extending the C.B. line 1/4". Reshape the
line and connect with the traced part of the collar.
*A breakline is the point where your collar folds back upon itself
|
2. How to cut Collar Facing and Interfacing for a Continuous
Roll Collar:
|
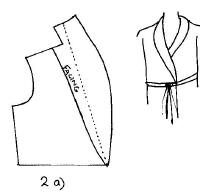 a)
Cut facing & interfacing for a closed garment or shirt just inside the
breakline tapering to a point at the termination point. a)
Cut facing & interfacing for a closed garment or shirt just inside the
breakline tapering to a point at the termination point. |
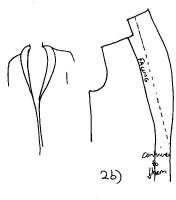 b)
Cut facing & interfacing for an open garment or robe either as above, if
garment is fully lined and you want the lining to go right to the inside
edge at the front from collar to hem. b)
Cut facing & interfacing for an open garment or robe either as above, if
garment is fully lined and you want the lining to go right to the inside
edge at the front from collar to hem.
If you want the lining to be recessed from the front edge there
are two alternatives. either cut the facing as a full-length strip,
incorporating the collar and extending to the hem
(2 b)). Or: you can self-face the front below the collar termination
point, cut collar facing separately, and overstitch. |
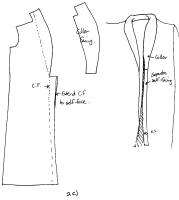 (2
c)). This is used if you want the collar facing fabric to be different
from the main garment, or if you don’t have the width in your fabric to
cut it in one piece. (2
c)). This is used if you want the collar facing fabric to be different
from the main garment, or if you don’t have the width in your fabric to
cut it in one piece. |
3. How to assemble:
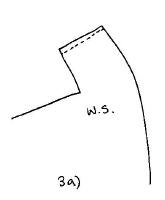 a)
Machine stitch C.B. of collar, R.S. tog., press seams open. Repeat for
collar facing and interfacing*. a)
Machine stitch C.B. of collar, R.S. tog., press seams open. Repeat for
collar facing and interfacing*.
|
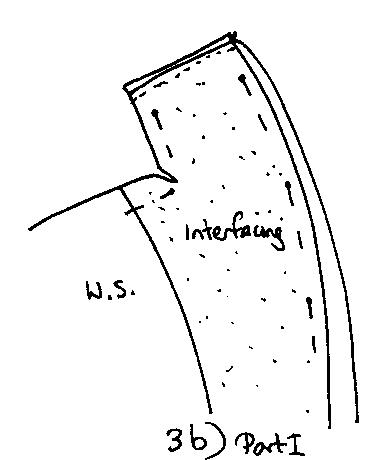
 b)
Pin or baste interfacing to inside of bodice. (W.S.) Pin bodice front
to bodice back at neck and shoulders, R.S. tog. Stitch. b)
Pin or baste interfacing to inside of bodice. (W.S.) Pin bodice front
to bodice back at neck and shoulders, R.S. tog. Stitch. |
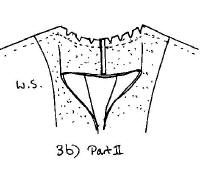 Clip
curves, trim seams and press towards collar. Press shoulder seams open. Clip
curves, trim seams and press towards collar. Press shoulder seams open. |
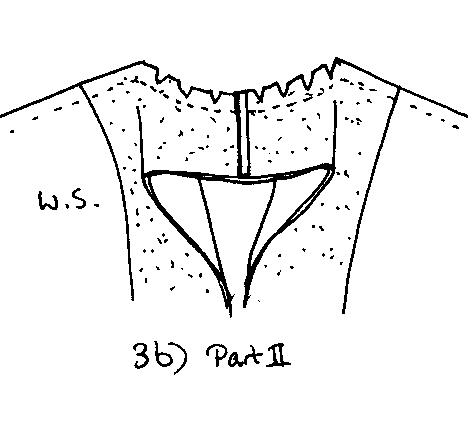
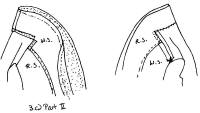 c)
Finish neck and shoulder edge of facing in a suitable way for the
fabric. (This step only applies when garment is not fully lined.) Pin
and stitch collar facing to bodice, matching C.B. seams. c)
Finish neck and shoulder edge of facing in a suitable way for the
fabric. (This step only applies when garment is not fully lined.) Pin
and stitch collar facing to bodice, matching C.B. seams.Clip curves,
finish edges if necessary and trim. Turn to inside. Slip stitch collar
facing into place along neckline seam and shoulder seams**. |
*For a soft collar like Elrond's council robes, use a softer
interfacing. Some fabrics may require none at all in a soft style. For a
stiffer, upright collar (the 'funnel' collar, like Arwen's chase dress or
Legolas silk shirt) you will need a correspondingly stiffer interfacing,
according to the degree of desired 'roll'. Arwen's dress is quite firm and
does not roll back except on the corners, so it's heavy weight, whilst
Legolas shirt appears stiff at the front, but is in a lighter fabric, use a
med. weight.
** For a professional finish, baste the collar in place first, rolling
seam slightly to the underside on the collar and slightly to the inside on
the front edge.
Note: The main reason for using this design of collar is twofold.
Firstly, and as a design feature, it gives a less rigid, more fluid feel to
the garment, in keeping with the Art Nouveau/Pre-Raphaelite theme.
Secondly, and equally valid, it minimizes fussy seams, and reduces the
number of pieces per garment, which, when you're working with unforgiving
materials like silk velvet, brocade and leathers, is the only reason you
need!
v ----- Advertisement -----v
^ -----Advertisement ----- ^
LOTR Home | Pattern Modification & Tips | Fabric Techniques | Fabric Embellishment | All About Armor | Leather Working | Vambraces to Gloves | Weapon Tips | Shoe Tips | Metalwork and Crowns | Working with Clay | Casting Belt Buckle | Casting Small Props | Pipe Making Tips
Up | Make a Muslin | After the Muslin | Fabric Nap | Estimate Fabric | Modify Necklines | Sizing Up a Pattern | Pattern Fitting Issues | Rolled Collar Pattern | Modify Sleeves | Making a Doll Muslin
|