Making a Doll Muslin
by Dale Rae
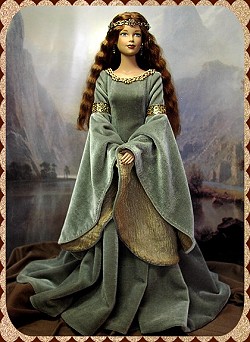
To make the elgent elven gown flow on a doll body I began with a pattern from the book "Patterns for Theatrical Costumes"
by Katherine Strand Holkeboer (This book has actual costume patterns for
both men and women ranging from the ancient Egypt time period to 1915). The
patterns are on 8-1/2" x 11" pages so they must be enlarged - even for most
doll sizes. The book contains full instructions on how to enlarge the
patterns for human (or elf, hobbit, wizard, etc.!) size using a grid system
- as well as some basic fitting information and other very useful costume
stuff. I highly recommend it.
For
a doll size pattern I scanned the page and saved it on my hard drive - then
enlarged it to the size I wanted using a photo editing program.
Note: There are several non-princess seam Medieval-type gown patterns in
this book. I chose a Kirtle gown pattern from the late 15th Century (pg.
156-57 in the book) and I changed the neckline from a square one to a
rounded one.
This is a princess seamed gown and I chose to use it for several personal
reasons........
1) I like the fit that I can get from a princess seamed garment
(especially around the bust line and waist). People who buy fashion
dolls/outfits desire close-fitting garments and even though the "real"
Arwen's gowns fall close to her body without princess seams, this won't
necessarily happen on a doll using a pattern similar to what was used for
Liv Tyler because.... There just isn't enough fabric weight in the garment
(due to the small size) to create the draping that happens on a human.
(This is why I like to use the stretch velvet - the knit has more weight
than
woven velvet so it creates a nice draping around the doll's body).
2) Along with the close fit around the waist, I like lots of fabric
around the bottom of the costume so that I can drape the hem in such a way
to create the illusion of movement (to me part of the beauty of the LOTR
female costumes is the way they move - in the wind, when walking, etc. When
a garment is placed on a doll it remains static.) And since I knew I was
going to be using velvet for 3 of the costumes, I wanted to have
pattern pieces that would follow a straight grainline. I also did not want
each piece to have such a huge flare at the bottom. When there is too much
breadth at the bottom of the garment (e.g., if a full circle is cut all in
one piece) there are areas where the velvet nap doesn't look as "rich"
because the nap actually ends up going in various directions.
After enlarging the pattern to fit the doll, I cut out a "mock-up" of a
knit fabric that had a stretch and draping quality closely matching the
stretch velvet I was using for the actual garment.
Note: Whenever I do a mock-up garment I try to use a fabric that will
react closely to the actual fabric I will be using for the final garment
(e.g. an inexpensive knit if I'm going to be using a knit velvet, an
inexpensive satin/taffeta if I am going to be making the final garment out
of a satin or taffeta, etc.). I do this instead of using muslin - purely a
personal preference as I have had problems using muslin for the mock-up when
it doesn't have the same qualities as the fabric I am going to use for the
final item. I knew I would be using a knit for all of these costumes - and
knit fabrics require a different fit than a woven. When working on doll
clothes, the tolerances for error or a mis-fit are very small - 1/16" off on
each seam can cause the garment to fit very poorly. Once the mock-up was
fitted to the doll I marked all of the seam lines and took it apart to
create a pattern.
Check out her scrapbook entry
for more pictures
Check out more tips and info on her
website
LOTR Home | Up | Make a Muslin | After the Muslin | Fabric Nap | Estimate Fabric | Modify Necklines | Sizing Up a Pattern | Pattern Fitting Issues | Rolled Collar Pattern | Modify Sleeves | Making a Doll Muslin
LOTR Home | Pattern Modification & Tips | Fabric Techniques | Fabric Embellishment | All About Armor | Leather Working | Vambraces to Gloves | Weapon Tips | Shoe Tips | Metalwork and Crowns | Working with Clay | Casting Belt Buckle | Casting Small Props | Pipe Making Tips
This page was last updated
04/22/08
|