Making Arwen's Chase Belt Buckle - creating it from Sculpey
by ArtistGirl
V1.0 (January, 2003)
Index of Tips
- About 2-3 blocks of polymer clay in a light color.
- I used Primo Sculpey Clay in the color pearl white
- 1 double-ended stylus tool
- It has a tiny knob on one end and a bit larger knob on the other
end
- can get these at any craft store, in the clay sections
- A ruler
- One small rolling tool, or a small craft rolling pin
- 1 bottle each of craft paint in metallic shiny silver, and
shimmering pearl white.
- 1-2 small paintbrushes
- 1 bottle Sculpey Glaze in GLOSS (for a shinier finish)
- Parchment paper, brown paper bag, or craft paper to cover your
work surface
- An oven
- If you aren't an adult, PLEASE make this project with your
parents
- A flat baking sheet
|

Two headed Stylus and Rolling tool. |
Note: When I was making the Evenstar pendants I was using silver colored
clay. I have discovered it is a lot easier to use the light pearlescent
white clay and paint it silver. You do not need as many coats to get the
nice shiny silver look, and therefore less risk of peeling on the paint, so
to all of you considering this get yourself the lighter color in clay. It is
always easier to make something that is light, appear darker; than it is to
make something dark appear lighter! =0)
First I laid down some parchment paper on my table, because that's what
I had on hand, but you could use a brown paper bag or craft paper to cover
your work surface.
Then I pulled off three portions of clay and kneaded them until soft and
pliable in my hands. I used three out of the four portions; so one package
of clay makes one belt buckle.
Then I pressed the clay flat on my work surface, first with my hands
then with the rolling tool my husband just happened to have on hand (I think
ours is for putting screening material into screen doors and windows).
 I
assessed the piece first. What I mean by that is, I studied the drawing of
the buckle. I saved the images to my hard drive, and printed out the
drawings that you see in the drawing here. I was able to look at the
buckle in detail. I
assessed the piece first. What I mean by that is, I studied the drawing of
the buckle. I saved the images to my hard drive, and printed out the
drawings that you see in the drawing here. I was able to look at the
buckle in detail.
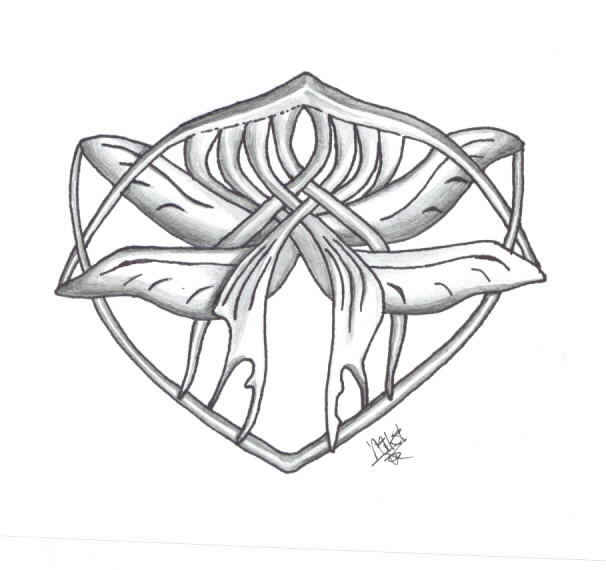
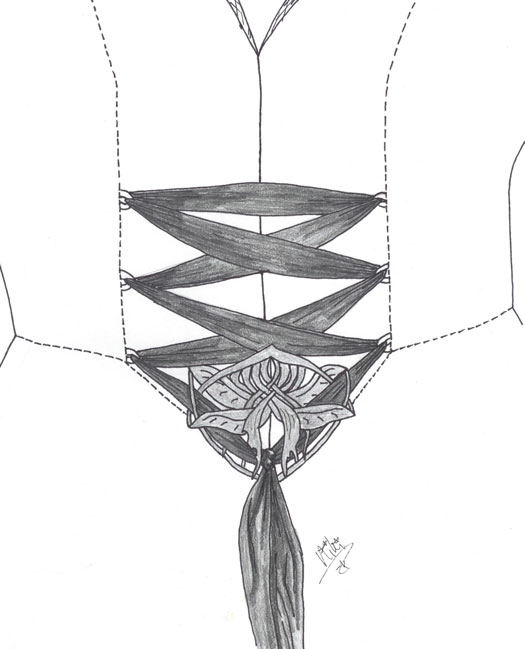
At first glance, it seems like the buckle is a bunch of crazy crossed lines.
But if you examine the picture, you will find the pattern of ins and outs,
over and under. I noticed that there was 8 "stems" lets call them at the
top. I didn't figure that there would be "stems" coming from out of no
where, so I counted the large main pieces that you see, the "wings" and
"leaves" lets call those. There are 4 "wings" and 2 "leaves". That would
make 6 "stems". Then I noticed that there is a set of "stems" alone in there
too. This makes 8 pieces. That means that each piece I make intertwines
either over or under in some way.
It's easier to look at the picture and follow the pieces with your fingers,
or perhaps you could break out a set of colored pens or pencils and follow
the lines each in a different color. It's really easier than I can explain
it. It's allot harder to say, or type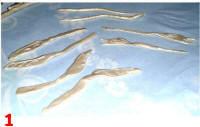 than to do.
Then I made the main pieces.
- 4 "wings"
- 2 "leaves"
- 2 "stems"
(see pic #1)
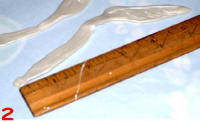 I
wanted to keep every piece in the right scale, so that as I was going along
everything would be about the same size in the end. I measured each piece I
made when I was done, making sure they were all about 5 1/2 inches in length
(see pic #2). I
wanted to keep every piece in the right scale, so that as I was going along
everything would be about the same size in the end. I measured each piece I
made when I was done, making sure they were all about 5 1/2 inches in length
(see pic #2).
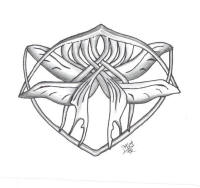
I hand molded the shapes, and used the stylus tool to create the detail on
the "wings" and "leaves" that I saw in the black and white drawing.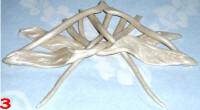
Then I began to trace the ins and outs, over and under pattern on the
drawing with the pieces (see pic #3).
I created the long top "arch" lets call that piece. It connects all the
"stems" at the top. I wove the long "stems" of the "leaves" and "wings" and
tucked them under the top arch. Don't press anything into the top arch at
this point because there is a lot of moving things around and adjusting to
do. You'd only have to pull it apart, so keep it loose just tucked under at
this point. I then made the lower "arch" that attached to the "leaves" and 2
"stems".
 Once
I was ok with the weave, and the alignment of all the pieces, THEN I secured
each piece into the arch for support using the larger end of the stylus
tool. This makes little indentations if you use it to gently press one piece
of clay into the other and makes them stay together permanently once baked.
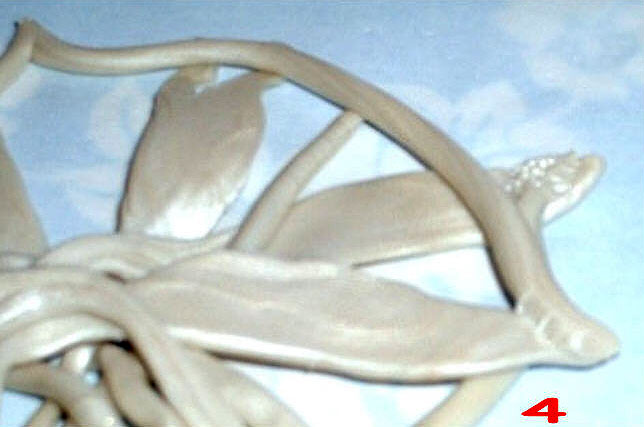
I tried to get a close up of this but it came out kinda blurry (see pic #4). Once
I was ok with the weave, and the alignment of all the pieces, THEN I secured
each piece into the arch for support using the larger end of the stylus
tool. This makes little indentations if you use it to gently press one piece
of clay into the other and makes them stay together permanently once baked.
I tried to get a close up of this but it came out kinda blurry (see pic #4).
You won't see these marks, because they are on the backside. Always make
your seams on the back of something so the front looks great! =0)
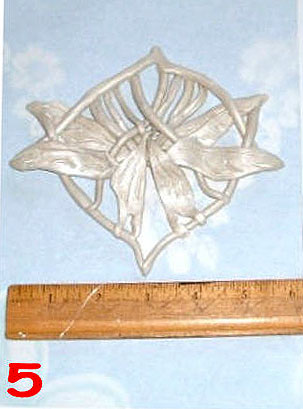
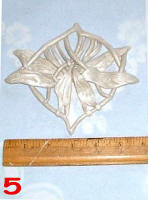
The finished project prior to baking was about 6 inches from top to bottom
and 6 inches wide (see pic #5). I wanted something substantial, something
that wouldn't get lost in my costume, but I am sure if you wanted to make
this smaller you could.
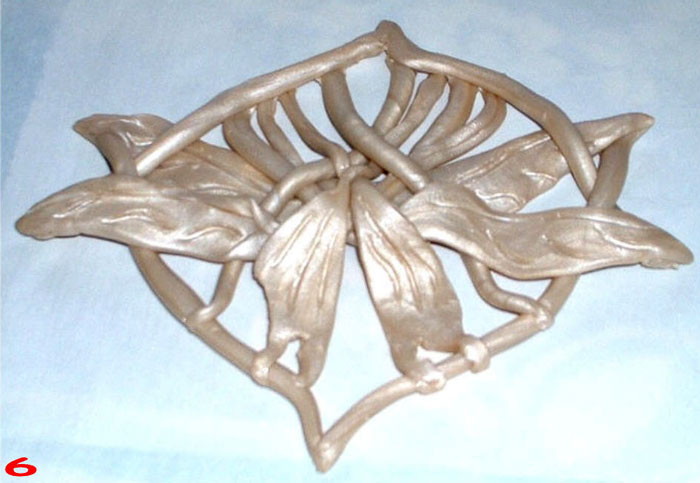
The finished project prior to paint, after baking (pic #6), and the finished
project after the paint and gloss were added (pic #7).
 |
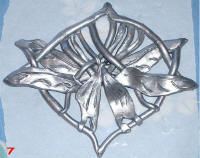 |
| Unpainted perlessent clay |
Painted and glazed |
All in all, it took me about 30 minutes to sculpt. The cost for the
project was nil since I already had most items on hand from making the
Evenstar and Fellowship Brooch. The only item I needed to purchase was the
brick of clay. You can get a better idea of cost total if you examine my
Evenstar "how-to" because I think I give a total cost there. It is only a
few dollars for the brick of clay.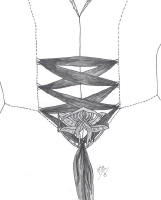
I will be wearing this belt buckle with my "chase dress/coat" that I am
planning on making; details will be posted on my site when that is
completed. Obviously, you do NOT want to roughhouse with this on, or yank
the ribbons too tightly through it because it will break. So just wear it
gently. =0)
More tips from
ArtistGirl's web site
LOTR Home | Up | Gloves & Boots | Sword & Kit | Making the Chase Outfit | Making the Buckle | Altering 9891 Pattern | Making the Chase Collar Lace
Angel Dress | Chase Outfit | Bridge Dress | Farewell Dress | Dream Gown | Hope Dress | Requiem Outfit | Mourning Gown | Cranberry Gown | Blood Red Dress | Coronation Gown | Midnight Cloak | Arch Dress | Lavender Bead Dress | Rose Dress | Battle Outfit | White Weta Gown | Arwen's Things
This page was last updated
04/22/08
|