

|
|
|
|
|
|
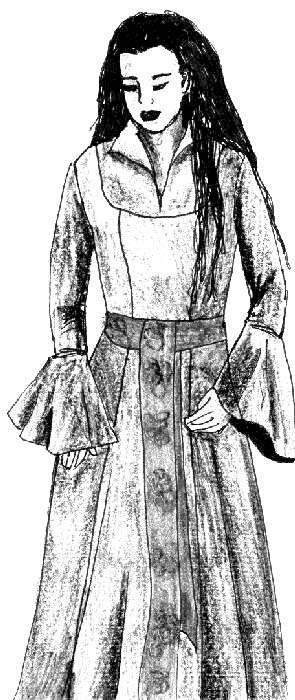
Complete steps for altering Simplicity pattern #9891 to
|
|
|
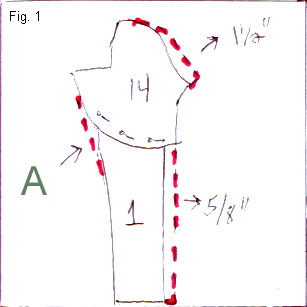
Fig 1 A: Bend pieces so there is a smooth line |
On piece 2, likewise, smooth in corner with hip curve. You do not need to retrace this piece*, but “walk” the piece to the traced off 14/1 piece. Just make sure that the new smoothed out curves of both pieces fit and there will not be excessive ease. Do not add any new seam allowance. It is already there.
On traced out 14/1 piece, mark a 2” extension on collar edge by marking off with measuring tape and blend into back curve of collar. Smooth out to finish new large rolled collar. Do not add seam allowance to collar, it is already there. Fig. 1With hip curve, scallop in on CF bottom of piece 1 to achieve front petal.
Add 5/8” seam allowance to CF and scalloped curve at bottom of piece 1, blending into bottom hem so CF seam allowance matches pc. 14. Fig. 2|
|
Fig 2 B: Scallop modification on bottom of skirt |
*If you wish to separate the bodice from skirt and to blend princess lines on skirt, cut all panel pieces at waistline mark (on original tissue), making sure seams match. Pin together skirt pieces 1 and 2, and likewise with pieces 3 and 4. Fold seam allowances toward CF or CB. Add 5/8” seam allowance to new bodice bottom and skirt top. Do not add seam allowances anywhere else. Trace new panels 1/2 and 3/4 on pattern paper. Cut out. Set aside. Fig. 3
|
|
Fig 3 C: Cut piece 1 and 2 apart at your natural waist. |
Note: to make the dress closer to the real dress... you will need to add a downward point to piece 1 and adjust the skirt (combo piece 1 & 2) as well. About 2 inches. Concentrate point on piece 1.
On new pattern paper, trace off pc. 14 to create a facing. Add extension, but make it 1/8” longer (2 1/8”). When the pattern is sewn, the seam will be rolled over and hidden from view.
On bodice, pieces one and two, mark above waistline where cord loops for sash will go. There are six loops, three on each side. Mark first loop ½" from waistline mark (waistline mark is 5/8” from bottom). Mark all other loops 1 ¾” from first loop in sequence.
Note: in original we do not have a belt that surrounds the whole dress. Study the pictures and make adjustments... but recognize that you need to make sure the waist is finished very cleanly.
Front is done. Set aside all pieces.On back, pin back yoke and CB panel. Dress will have CB zipper closure.
Note, you may move this to center front but we do not give instructions here. If you do center front... it must be an invisible zipper or hidden hook and eye tape.
On pieces 3 and 4, mark where back sash will go. Mark ¾” from waistline mark up.Back is done. Set aside all pieces.
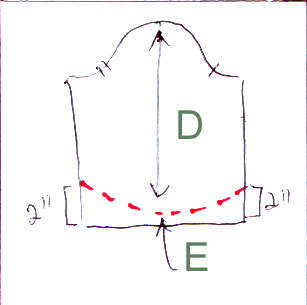
Trace top sleeve pattern onto pattern paper. Mark all notches and dots. From sleeve cap, measure down for first measurement. Mark off. Measure from that mark to bottom of pattern. With new measurement, mark off the whole bottom of the pattern. This is the new bottom of the pattern.
On sides of pattern, mark off 2” for inside seam. With hip curve, blend from center of sleeve (the longest, outside elbow), to new marks. Add seam allowance (5/8”) to bottom. This is the new top sleeve. Fig. 4|
|
Fig 4 D: New Measurement E: Outside elbow |
With hip curve, blend out from side of sleeve to extend the curve of the sleeve. This new mark should look like a curved line going up and towards the right side of the paper. Measure this line with measuring tape from the side of sleeve 4”. This line is now the top of the lower petal sleeve.
Remove top sleeve. Take slower sleeve measurement and cross mark on fold of paper. Using your discretion, shape out sleeve. Add seam allowance to entire bottom petal sleeve. Set aside. Fig. 5|
|
Fig 5 E: Paper F: Over hang G: Lower measurement H: Notch I: Now top of arm sleeve piece |
Additional info on making Petal Wrap sleeves <here>
To create the pleated under sleeve, again, fold another piece of pattern paper and trace off bottom hem of the top sleeve. Measure from elbow to knuckle. Cross mark measurement going from traced off mark to left side of paper. Using hip curve, create slight curve from this cross mark to make bottom under sleeve hem. Make as wide as you wish. At end of mark, draw a straight line with L square to the top of the traced off mark. This line is the underarm seam of under sleeve. Cut out piece. Cut off half of piece and work with left hand side (back) of sleeve).
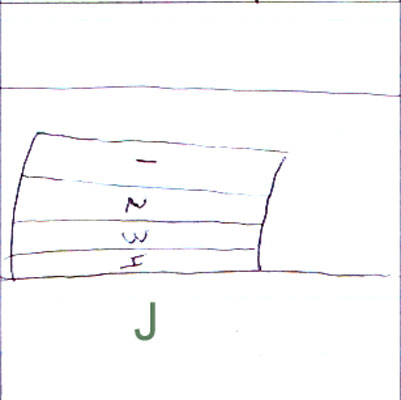
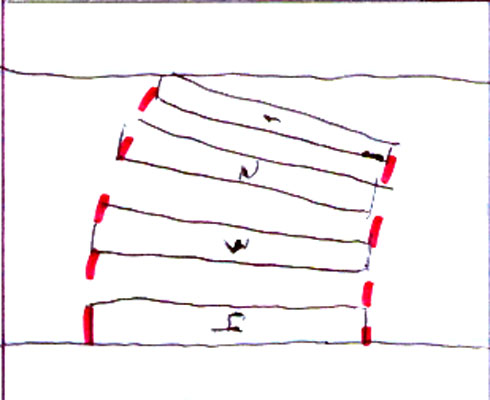
Divide this piece into equal fourths and mark lines. Mark these sections from left to right 1-4. Cut pieces. Take a new piece of pattern paper and fold in half. Tape piece 4 (center) onto the fold line. Fig. 6|
|
Fig 6 J: The undersleeve, pattern before it is separated |
|
|
Fig 7 Pieces spread to form flared undersleeve. |
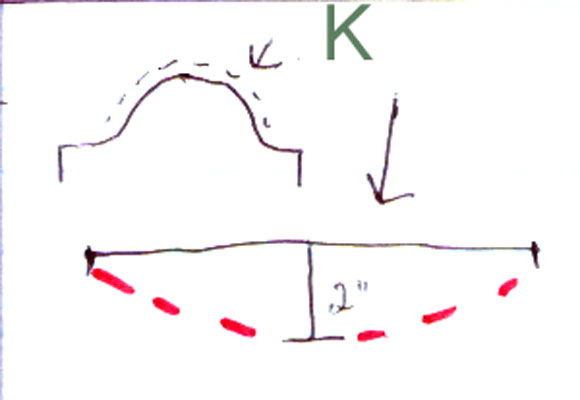
To create sleeve cap overhang, measure sleeve cap of top sleeve pattern piece with measuring tape. On new pattern paper, draw this measurement in straight line. At center of line, square down a line 2” in length. With hip curve, curve a line from ends of the cap measurement line to the end of the 2” line. Add seam allowance to the curved line, not the cap measurement line. Fig. 8
|
|
Fig 8 K: Dotted line is the same measurement on both the sleeve and the sleeve cap |
Note: you can line the entire gown by cutting double of bodice panels, top sleeves, and top skirts with either Self or interfacing to stiffen fabric.
Looking for more on altering the chase dress, check <here>
This page was last updated 04/22/08


