
![]()
![]()
|
|
|
|
|
|
Amy - Virginia, USAEowyn's White Wool dress This
is my Eowyn White Wool dress. I really like this dress because I think
of it as her trademark gown. In the books she is described as the
White Lady of Rohan, and Nilja Dickson once again pulls off an
extraordinarily accurate and beautiful costume. This
is my Eowyn White Wool dress. I really like this dress because I think
of it as her trademark gown. In the books she is described as the
White Lady of Rohan, and Nilja Dickson once again pulls off an
extraordinarily accurate and beautiful costume.
My reproduction of this gown is actually made out of a cotton knit. I like
the freedom that stretchy fabrics give, and there would be no way for me
to make this gown for my shape with a non-stretch fabric without putting
in darts or princess seams. (The real dress does not have either darts or
princess seams.) So, after doing my initial research, I began to look for
a white cotton knit. No luck. The only white knit I could find was
polyester, and I did not like the feel of it. It did not exactly have
"Rohan" written all over it. So, I did what I do when I am in the lurch: I
took a trip to the thrift store. I did not expect to find what I was
looking for in the fabrics that were donated, as there are only a few in
at a time and they are usually only small, 1-3 yard chunks. So, I headed
over to the sheets and bedding rack. Low and behold, right there in front
of me was a white king-size flat sheet, and it was made from a cotton
knit! So I snatched it up and that's when I saw the best part -- it was
only going to cost me $.99! Needless to say, I bought it without a second
thought and headed home to start sewing!
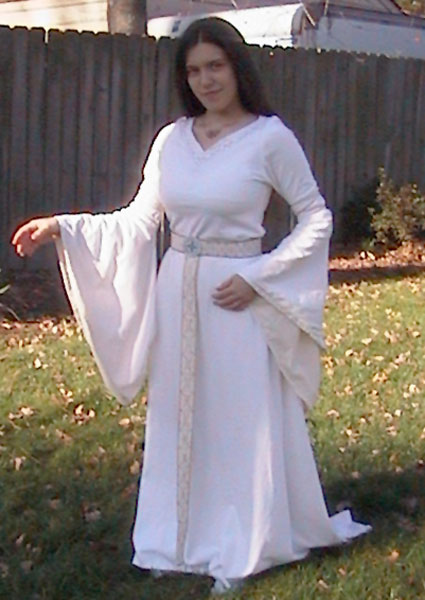
I made a simple pattern for it, with a shirt separate from the skirt part.
(I like doing it this way so that, if someday I need a white skirt to go
with another costume I can mix and match.) The skirt is very full with a
1-foot train and has an elastic waistband. The top is a simple two panels
sewn together with a set in sleeve. I used up the ENTIRE sheet with this
project, I think I have a small scrap roughly 6" in length and that is all
that survived. I was squeezing and pushing to fit all the pieces on, but
it worked. The bell part of the sleeve is lined with a cream muslin that I
already had in my stash. The only problem with it is that it makes the
lower sleeve heavier than the rest of the shirt. I was concerned that the
upper sleeves would get stretched out. But I was worrying for nothing!
Eowyn has the lovely cord lacing up her arms and that was the solution! I
took some string (the kind you can find in an office supply store) and
dyed it in coffee. What a great effect! The string has a nice fuzzy feel
to it so it matched the rest of the dress perfectly and took the coffee
dye without a problem. Now it has kind of an antique brown/gold color to
it that is perfect for Rohan. I strung the string through the lining and
top part of the lower sleeve and both ends come out in the seam. I then
simply criss-cross the strings up my arm and tie! It gives a great look
and holds the lower sleeve up without too much stress for the upper
sleeve. The edges of the bells were then top-stitched with gold thread.
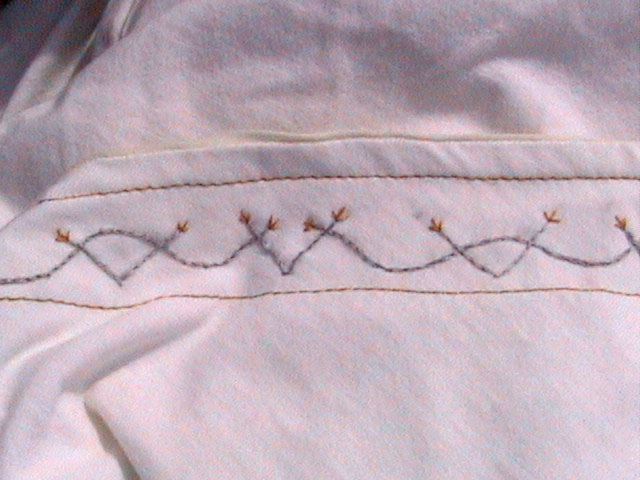 The
hardest part of the the outfit was really not that hard, just time
consuming. The embroidery at the neckline was my own design and I really
like how it came out. And considering I could not use my sewing machine
for a few days (the power was out due to a visit from Hurricane Isabel), I
had plenty of time to kick back with an oil lamp and stitch. The
hardest part of the the outfit was really not that hard, just time
consuming. The embroidery at the neckline was my own design and I really
like how it came out. And considering I could not use my sewing machine
for a few days (the power was out due to a visit from Hurricane Isabel), I
had plenty of time to kick back with an oil lamp and stitch.
I fortunately had made the shell of my belt before Isabel came, and was
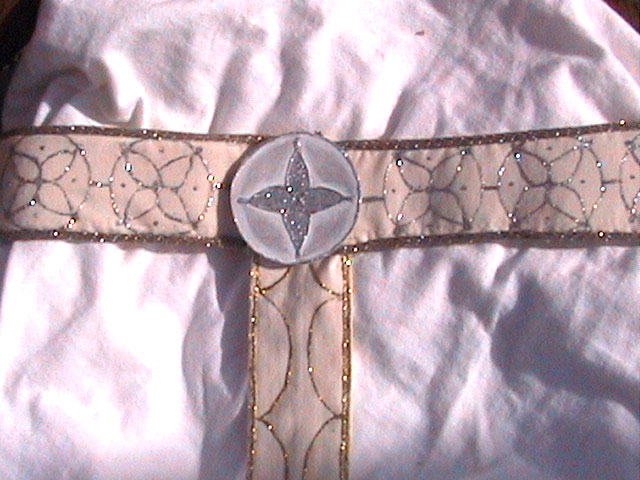 all ready to decorate it. I played around with several ideas before I
decided to use gold and silver fabric paint to achieve the look I wanted.
It is not totally accurate, but I still like it a lot. The belt is made
from the same cream muslin that was used for the sleeve lining and it is
strengthened around the waist with a canvas-type fabric that I stumbled
upon while braving my closet looking for the muslin. Another success! I
sewed the waist into a tube and inserted a strip of the canvas. The waist
part is very sturdy now and fits great. For the part that hangs down, I
simply sewed another tube of muslin and sewed it onto the waist part,
making an L shape. It closes with a patch of velcro. I then started to use
the fabric paint. The design I used was as close to the original as I
could come: a circle with a star-type thing in the middle. Also on the
waist band I sewed some silver cord around the edges for a final touch.
The medallion thing closing it is simply two pieces of cardboard glued
together for strength and then painted silver. I then went back with my
silver fabric paint and put a border on it and a another star shape. It is
glued onto the belt with fabric glue.
all ready to decorate it. I played around with several ideas before I
decided to use gold and silver fabric paint to achieve the look I wanted.
It is not totally accurate, but I still like it a lot. The belt is made
from the same cream muslin that was used for the sleeve lining and it is
strengthened around the waist with a canvas-type fabric that I stumbled
upon while braving my closet looking for the muslin. Another success! I
sewed the waist into a tube and inserted a strip of the canvas. The waist
part is very sturdy now and fits great. For the part that hangs down, I
simply sewed another tube of muslin and sewed it onto the waist part,
making an L shape. It closes with a patch of velcro. I then started to use
the fabric paint. The design I used was as close to the original as I
could come: a circle with a star-type thing in the middle. Also on the
waist band I sewed some silver cord around the edges for a final touch.
The medallion thing closing it is simply two pieces of cardboard glued
together for strength and then painted silver. I then went back with my
silver fabric paint and put a border on it and a another star shape. It is
glued onto the belt with fabric glue.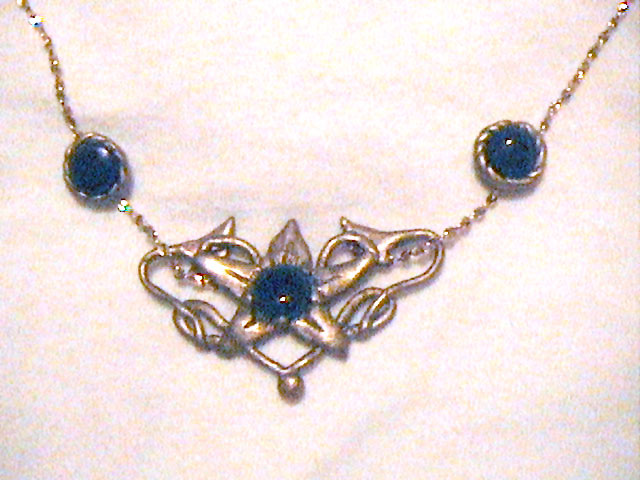 The
necklace is made out of super flex Sculpey clay. There is no trick to
making this apart from just sitting down with some pictures of it and
working the evening away sculpting. It took me a few hours, but I love the
finished project; it came out better than I thought it would! The
necklace is made out of super flex Sculpey clay. There is no trick to
making this apart from just sitting down with some pictures of it and
working the evening away sculpting. It took me a few hours, but I love the
finished project; it came out better than I thought it would!
All in all, this dress took about 3 evenings to make and only cost me
$.99! All the other supplies I already had. But if I did not have them
all, the price tag on it would probably have been only $5-$7 (including
the fabric paint, muslin, velcro, and embroidery floss).
I hope this has helped anyone who wants to make this dress, and has
entertained everyone else.
Also check out Amy's other outfits
This page was last updated 11/21/09
|