Amy - Virginia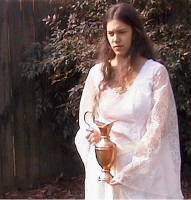
Galadriel's Mirror Dress
My version of Galadriel's Mirror Dress was a complete surprise.
Usually, I see a costume I want to make, and then spend a few months
gathering supplies as I see them and finally get started. But this
one was made for a friend of mine who said she would really like to
have a Galadriel gown. After a strategy meeting at my house where she
decided on Galadriel's Mirror dress, we went shopping and I was sewing
within 3 days of deciding on the project.
I am rather confident in my ability to make something for myself without
a pattern and I have only made one costume with a store-bought pattern, but
I was not confident at all in making a dress for someone else without a
pattern that was already tried and tested. Since Simplicity 9891 is used so
widely in the Elven costume world, I figured I would give it a try. I stuck
to it for the bodice except for a change at the neckline, and I made a new
pattern for the sleeves.
The fabric is actually several layers of fabrics, all put together to
form a brocade-like looking fabric. The under layer is made from 2 bed
sheets purchased for $1.98 each at the local thrift shop. This was a great
money saver and the cotton was a nice subtle base for the beautiful bridal
lace that was sewn over it. I cut the bodice pattern out of both the sheets
and the lace and I pinned the lace over top the cotton before sewing. No
problems at all.
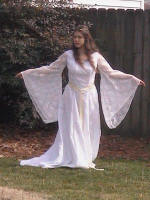 The
sleeves are a pattern of my own. Galadriel has sleeves on her dress that
look a lot like flags. They are not the gentle bell shape, but they are
tight at the top and suddenly veer down into a square shape. I made them out
of just the lace.
The
sleeves are a pattern of my own. Galadriel has sleeves on her dress that
look a lot like flags. They are not the gentle bell shape, but they are
tight at the top and suddenly veer down into a square shape. I made them out
of just the lace.
After putting the whole thing together, it was looking very nice. The
true test would lie in the hemming. I first looked at the neck edge.
WARNING: Simplicity 9891 has a VERY low neckline (at least when I wore it,
it did!). I realized that if I were to sew in the neck lining included in
the pattern, then the dress would defeat the purpose of clothing and not
conceal much. So I ended up buying some 1 7/8” bias tape to put around the
edge. I had to square it off at the lower points of the neckline, but all in
all it came out well.
I fretted for a week trying to figure out how to hem the sleeves. Since
it was only lace without another fabric for reinforcement I did not think I
could do a rolled hem. Turns out I was wrong. Lace actually takes a rolled
hem quite well. At least this lace did. I did not even have to iron it
before putting it thought the machine. The hem of the skirt is a rolled hem
done on my serger.
The last thing that needed to be done to the body of the dress was to
make it glow. Since we did not have a crew of gaffers to follow her around
shining an elven glow off her skin, and we did not quite now how to make her
bioluminescent, we decided glitter would be the best way to go. I used two
bottles of iridescent glitter fabric paint and simply spent an evening
dabbing it on the dress and then literally smearing it around with my palms.
I, along with the dress, glowed that evening.
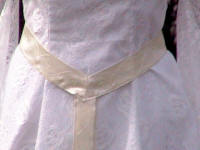 After
I finished washing my clothes from the fabric paint incident, I began work
on the belt. The belt is made from a very light yellow satin. I sewed 4
strips of it into tubes and stitched the two smaller tubes together into a V
and put hooks and eyes on the back to close. I then attached the two longer
tubes for the forked tails of the belt. After all this was complete I went
over the whole thing with a continuous 8 pattern with pearl fabric paint and
put glittering crosses on the middle of each one.
After
I finished washing my clothes from the fabric paint incident, I began work
on the belt. The belt is made from a very light yellow satin. I sewed 4
strips of it into tubes and stitched the two smaller tubes together into a V
and put hooks and eyes on the back to close. I then attached the two longer
tubes for the forked tails of the belt. After all this was complete I went
over the whole thing with a continuous 8 pattern with pearl fabric paint and
put glittering crosses on the middle of each one.
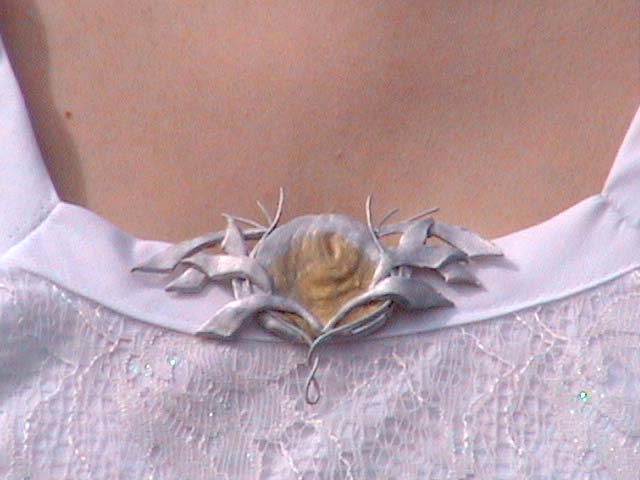
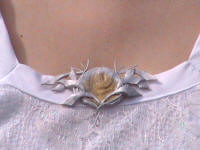 The
brooch is made from super flex Sculpey clay with wire added in places. The
back has two wire hooks that latch to the dress's neck line. I painted the
whole thing white and then went over the inside with a gold wash and the
rest with a silver wash.
The
brooch is made from super flex Sculpey clay with wire added in places. The
back has two wire hooks that latch to the dress's neck line. I painted the
whole thing white and then went over the inside with a gold wash and the
rest with a silver wash.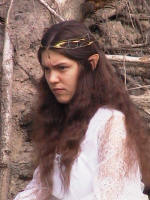
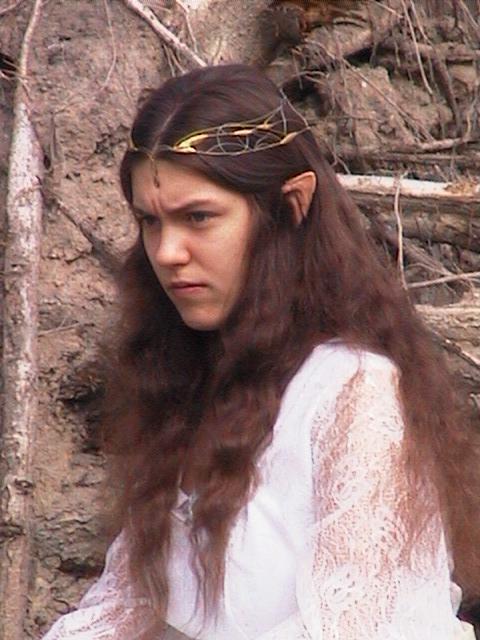
The crown was a 3 day battle of wire sculpting. I sat down with pictures
and did my best. I think it came out pretty well in the end! I used two
gauges of craft wire and Sculpey for the leaves. After I had baked the
entire thing so the Sculpey could set, I painted it gold and silver and
finished with a sealant of clear nail polish.
It was ready for the test! My friend came over to try the dress on. It
looked great! Except for the fact that it did not fit. Fortunately, it was
too big on her as opposed to too small. After about an hour of bringing the
back and shoulder seams in, it fit perfectly, and I had a very happy friend
All in all, the dress came out great through all the perils. I would
recommend this dress to advanced sewers only. A beginner might want to start
with something a bit easer.
And I still do not have all of that fabric paint out of my PJ’s..............
;)

Elf 1 | Elf 2 | Elf 3 | Elf 4 | Elf 5 | Elf 6 | Elf 7 | Elf 8 | Elf 9 | Elf 10 | Elf 11 | Elf 12 | Elf 13 | Elf 14 | Elf 15
Home | Up | Amy | Naira's BR
This page was last updated
11/21/09