How To Build A Fabric Steamer For Cheap
by SunnyJim
Some dye projects need to be set by steaming. You do not have to
do this by hand. Here's a great easy-to-build tool you can create for yourself.
Supplies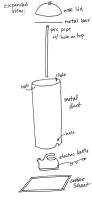
- 5' piece of metal venting duct
- 12" in diameter (or close) from the hardware store
- 4' piece of 1" (or ¾") PVC pipe
- metal rod, (about 3/16" diameter) at least 4" longer than your duct is
wide
- A wok lid - look at thrift stores - that is slightly larger than your
duct, or an old bowl the same size
- An electric kettle (think thrift stores again, or Target, Walmart...)
- An old cookie sheet, with edges (to catch drips)
- Masking tape
- Clear newsprint
You will also need a way to drill a hole through the pvc pipe, and cut
three holes in the metal duct. A dremel works great for both of these.
Note: Since you'll only be putting water (or maybe water & vinegar) into
your kettle, you can still use it for making tea. This breaks the ironclad
rule of never using anything for eating that you use for dye - but the
kettle is the most expensive part of the steamer, and I couldn't afford a
dedicated kettle, even though I do this a lot.
Note #2 - if you're not doing very much silk ever, you can get a narrower
piece of duct. I tend to do 20 yards at a time, so I need the width.
The duct just has to be big enough to fit over the kettle.
Prepare
Drill holes big enough for the rod to slip through on opposite sides of
the duct, an inch or so below the edge. Also drill a hole through the pvc
pipe, an inch or so below the end. The rod will go through one side of the
duct, then through the pvc pipe, then through the other side of the duct, to
suspend your fabric in the middle of the steam chamber.
Cut a little "mouse hole" at the bottom of the duct for the kettle cord
to go through.
Assembly
Put the cookie sheet on the ground, near an outlet.
Place the kettle, with water in it, on the cookie sheet.
Place the duct over the kettle.
Lay our your fabric on clear newsprint. Tape one end of the newsprint to
the pvc pipe, and loosely roll the fabric & paper around the pipe (like
you're rolling up a carpet) taking care to leave the little hole free. If
your fabric is wider than will fit on the pole, it's ok to fold it in half
the long way - just put newsprint between the layers, and make the fold go
on the "up" side.
Tape up the unwieldy roll of fabric and paper. Use lots of masking tape.
Put at least one strip of tape from side to side across the top (again,
leaving the hole free) and at least two, crisscrossed, across the bottom.
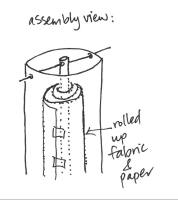
Suspend the fabric and pole in the duct, and run the rod through the duct
and pvc pipe to secure. (see illustration) I usually run some tape from the
roll of fabric up over the rod as well, just in case.
Put the wok lid on top, and turn on the kettle.
Usually, I wait until steam is seeping out the top of the steamer, then
time 20 minutes. Then, to be on the safe side, I take it all out, re-roll it
the other way, and give it another 20 minutes.
Take the fabric out and rinse it in cool water with synthropol. If you
didn't use wax, you should be able to use the paper a few times.
Side benefit - if you're doing batik, the steam will take a lot of the
wax out, and soak it into the paper. Less ironing!
The Hobbit | News 'n' Exhibits | Characters | Quick Costumes | Making 'Em | Buy It | Resources | Community | Search Us | Contact Us
LOTR Home | Up | Distressing Fabric | Fabric Dyeing | Building a Steamer | Crushing Silk
This page was last updated
04/22/08
|


