|
|
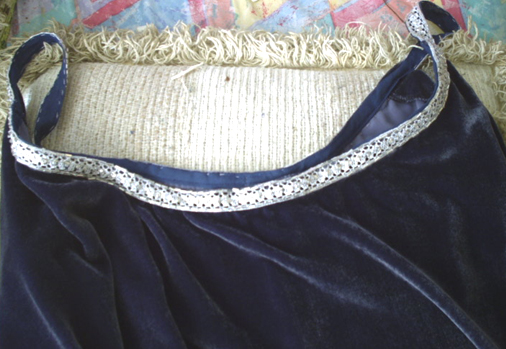
Making Arwen's Requiem OutfitIndexRequiem DressV2.0 - July 2004 Notes on making the OverdressThe dress is held up by only a thin 3/4 inch strap. The velvet can be a little bulky to use as a strap... Your trim will not hold support the dress by itself. You must reinforce the neckline. Listed here is one example. Tammy is using double fold bias tape for the strip.
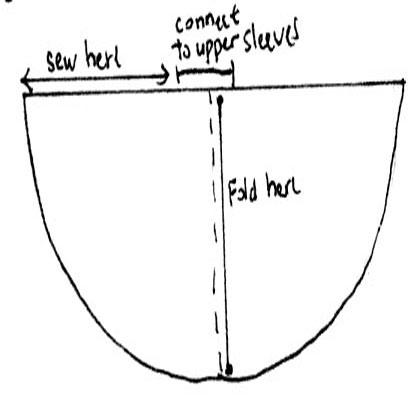
Upper Sleeve DetailsThe upper sleeve is multiple layers.
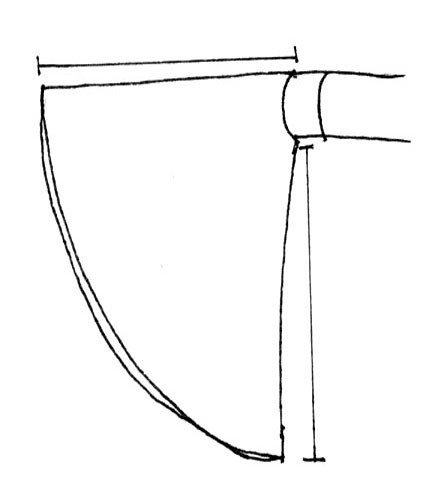
The same trim that is used on the neck, is used on the sleeve Lower Sleeve DetailsThe lower sleeve is attached under the top sleeve The pattern is simple. Just a half circle. The edge is a rolled hem
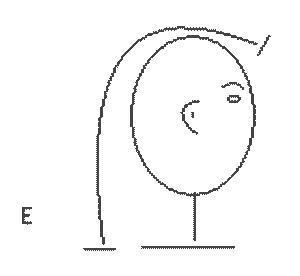
Note: there has been a debate as if this is not open, but gathered... we're researched... Exhibit answered it - stitched closed but wrinkled at upper sleeve. Requiem CloakV1.5 Nov 2004 This is very preliminary... the descriptions are based on observation. We need a guinea pig to work up a muslin on the hood and report back to the group. This cloak actually closes in front, which is different from most of
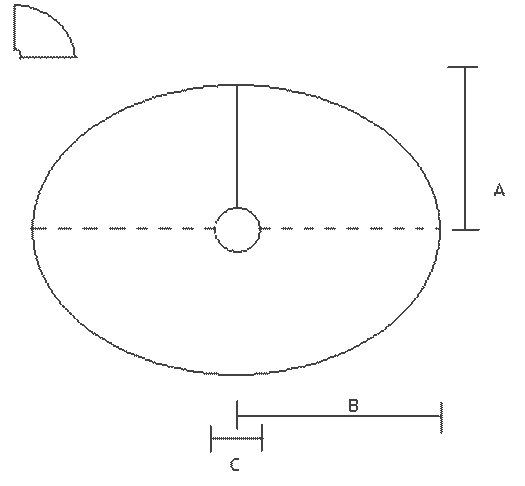
the LOTR cloaks. This may be a rectangle with a gore... we're working on figuring it out again Could have a wide gore in the back. It is longer in back than in front... for the draping on the horse. MeasurementsClick on pics to expand the patterns
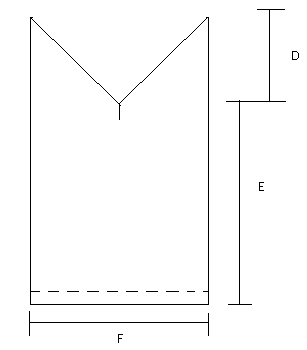
If you are going to have a narrower hem than 2 inches, adjust the length accordingly. The 3 inches gives a bit of turn under for the first hem edge and for the seam allowance. PatternApply measurements from above, plus...
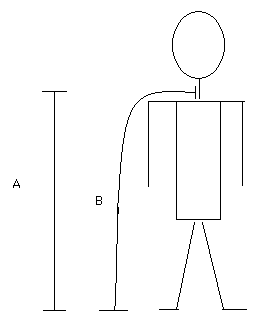
More comments about the circle shape: http://armag.free.fr/Costumes/mantcirc.htm Basic InstructionsInstruction are for both lined and unlined cloak. The hood of the Requiem cloak is unlined. Fabric:this should be made out of very soft fabric. The original is printed silk velvet. Stretch velvet would also work to give the ultra soft drape the hood requires. If you want something that is not as warm, use a jersey or something else with a very soft drape. Get a 60" wide fabric for a full length cloak. Pattern:The cloak is circle cloak, but because of a personal shoulder's the final hemmed version will be oral. It's best to worry about that once it it being hemmed. The easiest way to draw the big circle is to tie a long string to a chalk pencil. Measure out the distances of your biggest circle edge (B). Have a friend hold one end at the neck edge of the fabric, pull the string tight and you draw the outer edge.... just like a big compass. For the cloak and lining, cut out two half circle's each. The front piece will be cut into quarters. For the hood, cut one fabric and one lining. Making the CloakYou really only need to draw one quarter of the circle. The front and the back will be two different pieces of fabric. Cut the back as a complete half circle, the front can be cut as a half circle, but will need to be split up the center or can be cut in two quarters. Since the fabric is so soft, immediately stay stitch the inside of the neck for each piece... i.e., run a stitch just inside the stitch line. Stitch length should be slightly longer than your regular stitch Join the two front pieces to the back, rights sides together. Stitch from neck to hem for a cleaner stitch. (This seam is seen as a dotted line on the pattern.) Finish the front edge of the cloak by turning the fabric under twice. Stitch close to turned under edge to finish. (If you are making this line, I suggest that you only finish the area by the neck and wait to secure the lining after you have let the cloak hang.) Carefully, not stretching the neck, check and see if the neck is wide enough. Remember, there is a seam allowance in there too so a little tight is OK. If it is way too big, you can run a gather stitch and ease in the neck a bit. Making the hoodWe don't have the new shape but down line it. Sew everything together but the neck area. turn right side out. There appears to be a bit of a gather up the center of the cloak that goes back half way to the "point". We're still working on figuring that part out. Joining the hood to the cloakThe hood needs to be gathered into the neckline. Run a gathering stitch across the bottom of the hood. (The dotted line on the hood pattern.) Pin the hood evenly into the neck line, right sides together. Use a standard seam allowance on the neckline, but use 1 1/2 inch seam allowance on the hood side. Stitch. Check the fit. Run a 2nd level of stitching to anchor it in firmly. Finish the neck seam by hand. Turn the extra hood fabric under the raw seam and tack down smoothly on the cloak side. An alternative is to attach twill tape or matching fabric across this seam. If you are using a lining... after the cloak has been attached to the hood, sew the lining of the cloak (right side) to the hood (wrong side of the fabric). Add cloak clasp in front. If using a flimsy pin, hand stitch a solid clasp underneath the pin. HemmingPut the cloak on a hanger and let it hang for a week. This soft fabric is really going to stretch. (If you skip this step, you're going to have to do it all over again later.) After the cloak has hung, wear it to measure the hem. If you know that both your shoulders are the same height, you can wear it inside out to mark it easier. Wear the same shoes you will wear with the costume. Stand properly during the whole fitting. You will see the hem is quite uneven because of the shoulders, chalk out the hem at floor length or just above for your first measurement. You do not need to mark every point, but mark enough to see your curve. You will want to true up your curves. (Even them out.) Check it on you, cut. Put the cloak on right side out, it should be about two inches too long.. check it is even before the actual hemming. Options... like much of the silk velvet, there's a good chance the hem is just serged. This isn't very pretty. You could add a fine row of trim over it to hid the edge, but that is not in the movie. If you're searching, you'll need to trim another couple of inches off to get the hem right... cut carefully... and cut less than you'd think you need to do. You can always cut more... but... Finish the edge with store purchased seam binding so you only have to turn the hem under once.. Hemming a full circle is best done by hand and looks the best... but takes a while. If you are going to do it by machine, you can help turn in the edge by putting a gather stitch in where you are going to turn the cloak under, pull it up a bit to each the turn into the inside. Pin a lot. Stitch. There's no way to avoid getting a few wrinkles.
|
||||||||||||||||
This page was last updated 04/22/08