Robert - South East Asia
Aragorn in Gondor Livery
 We
had a comic/video game convention in our country last Dec 13 and 14
and I decided to go as RotK Aragorn for kicks. Since I got word of
it only recently, I only had a month to prepare (not to mention
juggle it with my school work). As a result, compromises and
shortcuts were made to beat the deadline. Nevertheless, I was quite
satisfied with the finished product.
We
had a comic/video game convention in our country last Dec 13 and 14
and I decided to go as RotK Aragorn for kicks. Since I got word of
it only recently, I only had a month to prepare (not to mention
juggle it with my school work). As a result, compromises and
shortcuts were made to beat the deadline. Nevertheless, I was quite
satisfied with the finished product.
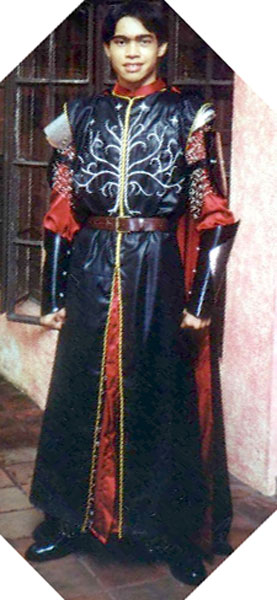
Here’s the breakdown of my costume
1. CLOAK - this was made of black leatherette and red satin .. Actually,
it was from my Vampire Hunter D Costume and I merely reused it by removing
the collar
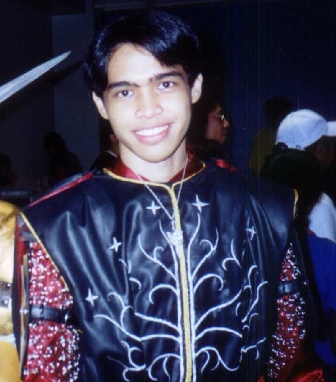
2. OUTER COAT - Also from black leatherette and silk (inner material),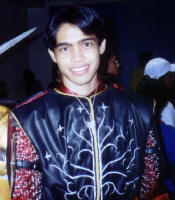 this was done like a sleeveless trenchcoat. I had it tailored though since I
don’t stitch. However, to save time, the chest area is a whole piece. It
doesn’t open, has a zipper at the back and it is worn like a shirt.
Embroidery just cost me $2 (when converted) and non-metallic silver thread
was used. The gold lining was this special (and ugh, costly) gold cord which
I bought from a lace shop. I decided to lower the slits because I don’t want
it to be flapping around too much when I walk, and consequently, I want to
keep the chainmail in place.
this was done like a sleeveless trenchcoat. I had it tailored though since I
don’t stitch. However, to save time, the chest area is a whole piece. It
doesn’t open, has a zipper at the back and it is worn like a shirt.
Embroidery just cost me $2 (when converted) and non-metallic silver thread
was used. The gold lining was this special (and ugh, costly) gold cord which
I bought from a lace shop. I decided to lower the slits because I don’t want
it to be flapping around too much when I walk, and consequently, I want to
keep the chainmail in place.
3. INNER ROBE – Made from crimson satin. It is basically a simple robe
with a stiff collar. I decided to forego the gold embroidery at the moment
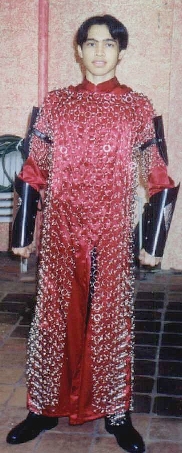 4. CHAINMAIL HAUBERK –
the hardest to do and the part where I poured most of my heart into. This
was done with 2600 key rings (those seen in the keychains we used). Yup, I
bought them by bulk. This took a long time to do but since it was the type
seen in a keychain, it was easy to link, requiring no pliers whatsoever. I
used the big rings (majority) for the body. That was a shortcut in itself
since big rings are easy to link and they would be covered by the coat
anyway. The small rings I used to make the sleeves. I found it more tedious
since they required more rings per row. I used a simple pattern of linking
(Italian method, I think) and I made it as one whole piece to facilitate
easier wearing.. It was quite heavy though and I had to sit down after long
periods of time
4. CHAINMAIL HAUBERK –
the hardest to do and the part where I poured most of my heart into. This
was done with 2600 key rings (those seen in the keychains we used). Yup, I
bought them by bulk. This took a long time to do but since it was the type
seen in a keychain, it was easy to link, requiring no pliers whatsoever. I
used the big rings (majority) for the body. That was a shortcut in itself
since big rings are easy to link and they would be covered by the coat
anyway. The small rings I used to make the sleeves. I found it more tedious
since they required more rings per row. I used a simple pattern of linking
(Italian method, I think) and I made it as one whole piece to facilitate
easier wearing.. It was quite heavy though and I had to sit down after long
periods of time
5. VAMBRACERS - I bought this glossy and hard piece of black rubber for
the armbands. I followed the curves from the action figure and translated it
into a pattern on the rubber which I promptly cut. To connect the two ends,
I overlapped it a bit and bore small holes and inserted those screw type
metal fasteners. To simulate the metal, I got this metallic silver
leatherette with etched designs. I was already rushing at this point so I
didn’t bother using real metal.
SHOULDER GUARD - same rubber plus silver and same silver leatherette. I
added leather straps (cut out from those cheap black belts) via those screw
type fasteners again. To get the illusion that it is tightly suspended from
the sleeve, I just used carefully concealed black twisty-ties and looped
them from the strap onto the rings of the sleeve
SPAULDERS - I used 6 pieces of aluminum sheets (3 on each side) which I
bent and molded to my shoulders, then layered and connected with paper
fasteners (those single paper fasteners you see around) which I substituted
for rivets. I then connected them to the sleeves of my chainmail
BOOTS - a pair of black leather boots. For the metal plates, I imitated
what I did with the vambracers
ARWEN’S PENDANT - no construction here since it is the replica I used
Stuff that I lack / need to work on:
- Belt - didn’t have enough time to have one custom
made .. so I got a brown belt I had in the closet .. to bad it also wasn’t
long enough for a knightly knot
- Cloak clasps - I wasn’t able to construct those
little silver triangles lined with gold since I had no idea how to attach
them to the fabric
- 2 Outer coat clasps (near the neck and in the
center) - I didn’t know how to fashion the clasps from steel .. also, I
didn’t know where to acquire the raw materials
- Elven dagger - since it is hidden I chose to bypass
this first
- Anduril - Sadly, I regret not attending to this very
important detail

Fellowship | Fellowship 2 | Fellowship 3 | Fellowship 4 | Fellowship 5 | Fellowship 6
Home | Up | Dave's Examples | Robert's Examples | Ithreth's Examples | Jayne & Paul's Example | Maree's Examples | Nicolas's Examples
This page was last updated
11/21/09