Eowyn in Armor - Dernhelm
Intro and background
Reference
pictures here
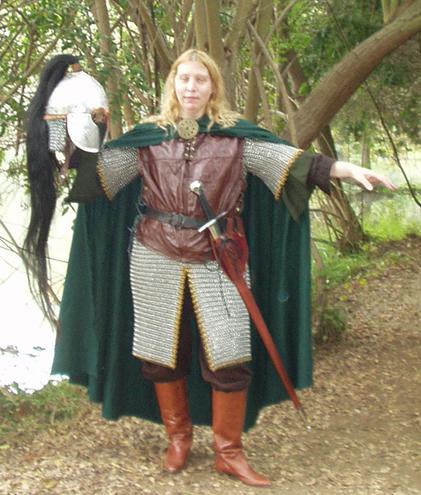
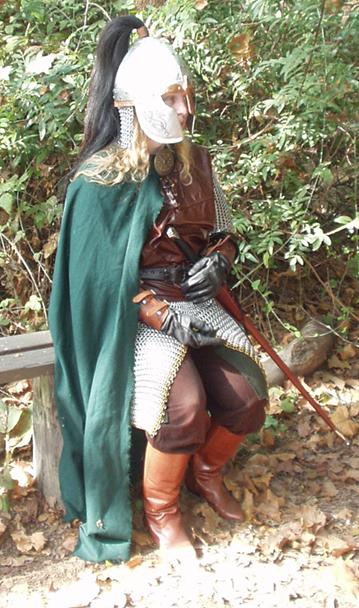
The costume I chose to do is Dernhelm, which is actually Eowyn in armor.
She is niece to King Theoden of Rohan, and she pretends to be a man so she
can join the army in it's march to aid Gondor. I knew that I was going to
have to do a lot of guesswork on the costume because we have not fully seen
her yet. In The Two Towers, she is wearing dresses and surcoats, and only
once handling a sword. Over the intervening months pictures of her action
doll, preview material on the theatrical release of the DVD and images in
the recently released trailer have hinted at what Dernhelm's armor will look
like.
To fill in the gaps of my knowledge, I used what I knew about the
character. Even though she is a member of the Royal family, she does not
want to be recognized to avoid being sent home. So, if she has decorative
armor like her uncle, King Theoden, or her brother, Eomer, she will not wear
it. She will, however, most likely use her own sword and baldric, since she
may be too small to use the larger swords the men would use. She will want
to blend in with the rest of the Riders of Rohan, so she will be clad very
much the same as the Riders seen with Eomer. She will wear a helm that will
cover as much of her face as possible, to avoid her being recognized as
Eowyn, or even as a woman.
I based these ideas on logic, what is said in the books, and what I could
find out from others who have researched Middle Earth before me. One good
source of info was the Lonely Mountain Forge website, which was a font of
detailed Tolkien info and seemed to have a very nicely put together list of
the history of armor and weapons for Middle Earth. I recommend it to anyone
researching some of the more obscure cultures or personas of Middle Earth.
The text I most
closely paid attention to were: "Theoden, Eomer, Eowyn, and many (if not
all) the Riders of Rohan: Mail Coat, helm, shield, spear and sword. Some
riders would be armed with short bows instead of spears. Much of the
equipment was supplied by Gondor." and "A sampling of Rohirric
heraldry is given in The Lord of the Rings. A white horse on a green field
was a symbol of the House of Eorl. The sun on a green field was the symbol
borne on the shields of Theoden's household warriors. Erkenbrand of Westfold
is said to carry a red shield. It also seems that green gems were popular in
Rohan. Green gems decorate the sword hilts of Theoden's guards before
his doors, and the sheath of his sword, Herugrim, is decorated with such
gems."
So, to now get on with describing what I found and what I made to put
together my Dernhelm costume.
Broach,
cloak and helm pictures here
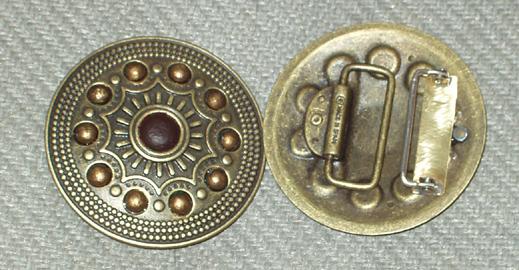
1) Brooch - I started with two brass belt buckles, only they both had
orange stones in them. I figured I could take the stones out, replace the
center stone with another of my choice, and then use something like sculpy
or something like that to fill in the others, and change the design to what
I wanted. Instead, I went with the idea to just paint the stones green , and
used a metallic green enamel paint, which went on beautifully. Once the
Theoden brooch became available at Noble Collections, I altered my color
scheme a bit and went with a dark chocolate brown for the center stone and
bronze on the outer stones that I aged a bit with a black aging solution.
As you can see from Theoden's brooch as shown on the Noble Collections
site, these belt buckles, on their own, were a very near match in design. It
turns out that the symbol of the house of Theoden was a sun or sunburst
design, hence the banners in the great hall, and that the color stone
associated with the family was green, even though they used a darker color
for Theoden himself. This info I found on the Lonely Mountain Forge website,
and was quite happy to learn those little tidbits of info. I was tempted to
just order Theoden's brooch and use that, but when I saw it in person at a
convention, it turned out to be half the size it is in reality. You can tell
the one Bernard Hill wears is at least 2 inches wide, or more, but the one
they sell is closer to one and a half inches, much too small to look
effective.
 For
the back, you can see the belt buckle design, with the metal loop that is
hinged, and the pointy bit that goes into the holes on the belt. I figured
I'd be able to use the loop to attach one side of the cloak, meaning I'd
just have to find a way to make the other side of the buckle usable to
attach the rest of the cloak. I took one of the buckles to a jeweler, had
them saw off the pointy bit, and then solder on a similar hinged metal loop.
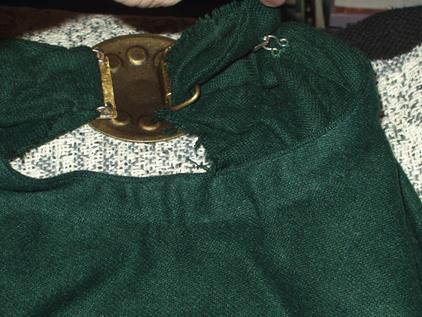
Thus, I ended up with two metal loops that were hinged. It is attached to
the cloak in the following manner. One end of the part of the cloak the fits
around the neck is looped through the loop and sewn shut. The other end has
a hook and eye attachment sewn on, so that the end fits through the second
loop, and then the hook is put onto the eye and it holds nicely. It's very
easy to put on and take off, and the brooch is permanently in place on the
neck of the cloak.
For
the back, you can see the belt buckle design, with the metal loop that is
hinged, and the pointy bit that goes into the holes on the belt. I figured
I'd be able to use the loop to attach one side of the cloak, meaning I'd
just have to find a way to make the other side of the buckle usable to
attach the rest of the cloak. I took one of the buckles to a jeweler, had
them saw off the pointy bit, and then solder on a similar hinged metal loop.
Thus, I ended up with two metal loops that were hinged. It is attached to
the cloak in the following manner. One end of the part of the cloak the fits
around the neck is looped through the loop and sewn shut. The other end has
a hook and eye attachment sewn on, so that the end fits through the second
loop, and then the hook is put onto the eye and it holds nicely. It's very
easy to put on and take off, and the brooch is permanently in place on the
neck of the cloak.
I've also found a second belt buckle to use as brooch, should I discover
that Miranda Otto's portrayal of Dernhelm wears a silver brooch instead of a
gold toned brooch. If so, I may just use this buckle unchanged, except to do
the same to this backing as I did to the other backing. Namely, that was to
saw off the pointy bit, and solder onto it a second metal loop thingy.
(Sorry, no exact words come to mind to describe it, but you get the idea by
looking at the pictures of the brooches, front and back.)
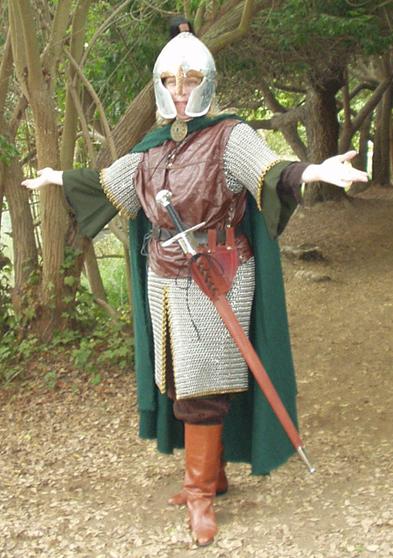
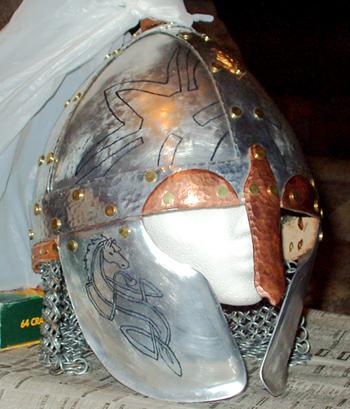
2) Helmut - For my current Helmut, I scanned all over Ebay for something
I'd like. When I started this in November of 2002, I did not think I'd even
want to attempt to make a helmet, metal, paper mache, plastic, whatever.
Now, I may change that, but a few months ago, I was trying to find the real
thing to make life simpler. I was looking at just about every armor maker
who sold on Ebay, and some who didn't, until I found what proved to be a
fairly good match. The Roseland artisans (
http://www.roselandartisans.com/
) had some nice, and decidedly different, helmets up for auction. So, I
emailed and inquired and asked loads of questions about all sorts of armor
issues, and one day, got an email with photos of this helmet in it. Did I
want it? Heck yeah, it was quite perfect for what I needed, and I felt
confident that I'd be able to detail it a bit, if I wanted to, but that on
it's own, it would work admirably. At the time I ordered it, I wanted
something that resembled a cross between the royals of Rohan and the common
Rohirrim, which it gives me.
I've now added some decoration to the helmet, with as thin a painted line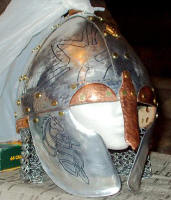 as I could achieve, and put a Celtic horse symbol on the cheek guards and
instead of a sunburst, I put the flower symbol associated with Eowyn on the
front of the helm, split in two. The symbol is a cross between a flower and
a sunburst, and I found it on the Eowyn long sleeve t-shirt. The paint job
is not completely symmetrical, but since the designs are on the side, you
won't usually be able to see them together at the same time, you can see
that the horse is a little plumper on the left side. The overall look is
actually supposed to be that it's etched in, so you actually have to look at
it from a bit of a distance to get that effect.
as I could achieve, and put a Celtic horse symbol on the cheek guards and
instead of a sunburst, I put the flower symbol associated with Eowyn on the
front of the helm, split in two. The symbol is a cross between a flower and
a sunburst, and I found it on the Eowyn long sleeve t-shirt. The paint job
is not completely symmetrical, but since the designs are on the side, you
won't usually be able to see them together at the same time, you can see
that the horse is a little plumper on the left side. The overall look is
actually supposed to be that it's etched in, so you actually have to look at
it from a bit of a distance to get that effect.
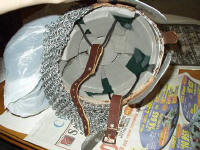 The
helm padding is a very firm, closed cell pad that appears to be similar to
what might be used in martial arts padding. A very thick foam or rubber that
came in a bit of a rectangle and was fairly easy to cut and shape inside the
helm. I used glue to attach bits and pieces until the inside was fairly well
lined, and then put a double layer at the top of the helm, and on either
side, to keep the helm from wobbling sideways.
The
helm padding is a very firm, closed cell pad that appears to be similar to
what might be used in martial arts padding. A very thick foam or rubber that
came in a bit of a rectangle and was fairly easy to cut and shape inside the
helm. I used glue to attach bits and pieces until the inside was fairly well
lined, and then put a double layer at the top of the helm, and on either
side, to keep the helm from wobbling sideways.
Halfway through this process, I realized I should have straps to attach
the helm under my chin. Since it's so heavy, and the horsetail plume makes
it tend to fall to the back, I needed to make sure that the helm was
attached firmly to my head. I had some leather straps that came with a Sword
Frog I bought, and therefore had loops in them. I cut one strap so that it
was the loop and the buckle portion, and a second strap that was the loop
and the longer section with the holes for the buckle. I then took thick
cord, looped it onto a square of spare cloth and first glued it into place,
and then stitched it in place and folded the cloth over so that the looped
cord was firmly in place with one of the Leather strap halves on it. I did
the same with the second leather strap loop and put it on a thick cord and
stitched and glued that into a square of clothe. I then glued this square of
clothe into the side of the helm so that the leather straps would hang down
in front of my ears.
The second layer of padding was then put over this square of clothe so
that the loops with the leather straps were now firmly attached to the helm.
Once all dried, the helm fits very snugly now, the leather straps are
adjustable due to several holes in the strap and fit just fine under my
chin. The helm now looks completely presentable, and I think I can safely
say it's done. I may add a spray of sealant to the painted design on the
helm, but that's just to protect the design from washing off with it's
future handling. The only adjustments might be in the design on the helm, or
to make a second helm now that images of Dernhelm are slowly being let out.
If I do decide to try for something more exact to what she appears to be
wearing, I may actually try to build it from the beginning, and will archive
that info as well.
3) Armor - I have recently discovered that it appears Eowyn will not be
wearing all that much armor, and it won't be decorated too much either.
Instead, she's going to have that pieced together look you saw with so many
of the warriors before the battle of Helm's Deep. In fact, she'll have very
little armor on at all, no greaves, no scale maille armor and possibly no
spaulders. I don't care, I have spaulders and I like them, so I'm going to
use them until I know for sure what she's got on. I've got gauntlets and
bracers as well, and just need to work on a proper belt and a shoulder belt
and frog for the sword, as well as changing the color of the wooden sheath
for the sword to match the redder color her armor appears to be. She'll have
a simple leather chest armor on, with tassets on the bottom, and a chain
maille shirt to her knees, split up the sides and center for easier use
walking and riding a horse.
For the Guantlets, I found a simple black pair on Ebay, and they fit
fairly well, if a bit big on the fingers. They come up a goodly distance on
my forearm, which is fine as they'd add more protection to my arms if I was
really going into battle. I also found two different Vambraces I like, one
with the design of a Selpy (Celtic Seahorse) and one with a simple Celtic
Knot design. Until I can see some detail of what her bracers look like, I
can go with these pre-made designs. If nothing else, I've noticed that to
make life easier on set, they used alternative hookups for things like
bracers, giving them laces, or hook and eye, or something similar to attach,
instead of a much more traditional type of leather straps and buckles.
My bracers are both brown, the one of the Selpy is fairly light, while
the Celtic Knot is almost reddish brown. The spaulders I bought on Ebay as
well. They are actually replicas of the Legolas worn Spaulders. Since he got
them at Helm's Deep, they are Rohan designed. You can see these items at
http://www.vikingleathercrafts.com
For chest armor, I sort of winged it. I was not confident in my ability
to sew thick pieces of leather together to make chest armor, so I made some
out of a thinner leather jacket. The thinness means that when I wear it, and
put the belt on, it gathers just like any fabric would, instead of being
firm, like thick leather would, especially if it's purpose was to be armor.
Anyhow, I took a very large brown leather jacket, removed the sleeves, tore
out the lining, and cut off the buttons and pockets. I reversed the jacket,
and used leather glue to close the jacket up my back. I then slit both
sides, used glue to hem the edges, then punched holes in each part of each
side, putting eyelets in. These brass eyelets then allowed me to use leather
cords to lace up the sides. One side is laced and tied off, effectively
closing it, while the other side I cut several individual laces for. This
way, I can pull the now leather vest over my head, with one side closed, and
the other side open, and then lace each pair of holes individually. I also
cut a slit in the front, from the center of the neck to about 5 inches down,
and put in brass eyelets as well, with leather laces. I open this up when I
want to put it on or take it off over my head. With the leather lacing and
the brass eyelets, the vest has the look of armor, but is still a bit on the
thin side, meaning it bunches up when belted. I have not painted this yet,
as I don't really intend to keep this version of the leather vest.
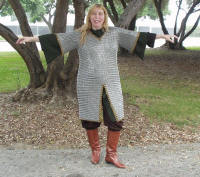 The
chain maille was interesting. I chose not to try and learn how to make my
own chain maille and thus avoided what could have been months of work. I
found one chain maille shirt on ebay, and got that for the initial look,
even though it was a shirt and therefore too short for what was needed. I
really needed a hauberk, and got that later on. So, I currently have two
chain maille shirts, one short and one much longer.
The
chain maille was interesting. I chose not to try and learn how to make my
own chain maille and thus avoided what could have been months of work. I
found one chain maille shirt on ebay, and got that for the initial look,
even though it was a shirt and therefore too short for what was needed. I
really needed a hauberk, and got that later on. So, I currently have two
chain maille shirts, one short and one much longer.
 The
first shirt was either 12 or 16 guage steel, but I no longer can remember
which. I just know it's heavy as all heck, and was not the right size. The
sleeves were pretty good, coming to well below my elbow, but just above the
wrists. Eowyn is supposed to look like she's wearing a bigger man's outfit,
including the maille, so the sleeve length is good. On the other hand, the
shirt only went to a few inches below belt level, and is therefore too
short. The fact that it is steel also didn't help, as it is way too heavy
for any length of time to be worn. I'm not going to fight in any SCA events,
so I don't really need battle ready armor. So, I went looking for something
closer to the look I needed and more comfortable to wear.
The
first shirt was either 12 or 16 guage steel, but I no longer can remember
which. I just know it's heavy as all heck, and was not the right size. The
sleeves were pretty good, coming to well below my elbow, but just above the
wrists. Eowyn is supposed to look like she's wearing a bigger man's outfit,
including the maille, so the sleeve length is good. On the other hand, the
shirt only went to a few inches below belt level, and is therefore too
short. The fact that it is steel also didn't help, as it is way too heavy
for any length of time to be worn. I'm not going to fight in any SCA events,
so I don't really need battle ready armor. So, I went looking for something
closer to the look I needed and more comfortable to wear.
In came http://www.dcwireworks.com/.
This was one of many chain maille sites I looked at, but one of the few that
offered costume weight aluminum chain maille. This is not made for SCA
fighting, or any kind of fighting, and is just for looks. Perfect for me,
since I had no intention of using it for fighting. A few emails and phone
calls, and I'd arranged to purchase something much more inline with what you
see all the riders wearing. A hauberk of maille coming to just above the
knees, splits up the front and back to allow for walking, and slightly
shorter sleeves (mine might be too short). I even added a little bit of
vanity by having the sleeves, neck and bottom lined with gold links. As it
stands now, the shirt is not any heavier than the previous one, but is
nearly a foot longer. The only drawback to the aluminum is that it oxidizes,
leaving a silvery grey residue on my hands and arms and clothing and gloves,
etc. Not too bad a deal, since it will make the costume look appropriately
dirty.
Building the Shield
See pics
on a step-by-step guild to modifying a Snow Disk to a shield
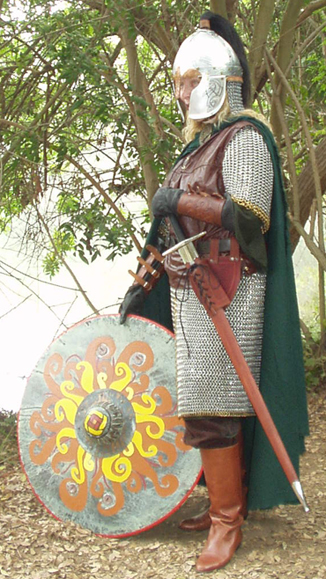
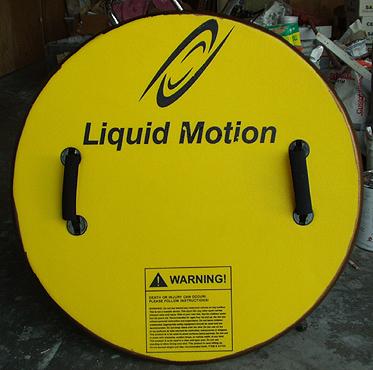
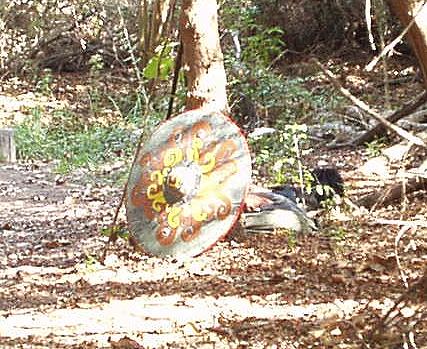
4) Shield - The Riders of Rohan have round shields, so I thought possibly
to use some plywood cut round, attach straps and paint, but I'm not into
sawing. So,my next idea was to use a Snow Disk sled, which I ordered
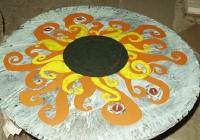
from Toys R'Us. I've got the perfect design for the shield, which is a
wonderful celtic sun design, which can be seen in in one of the pictures.
I'll most likely go for that color scheme, and use something like sculpty
on the bowl being used as the boss to give the center celtic knot some
texture.
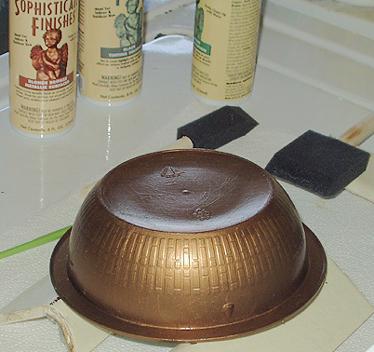
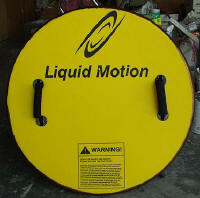 I
received the Snow Disk sled shortly after ordering it and immediately set to
work on it. Pics of the concave side show the part of the sled that kids sit
on, which is a yellow firm foamy type plastic, with two black handles on
either side. I did not get a picture of the bottom, which was a hard, white
plastic, before I started painting. I was too eager to get underway to
remember to document it. Anyhow, the white bottom was painted with Blonde
Bronze Metallic Surfacer, and came out rather nice.
I
received the Snow Disk sled shortly after ordering it and immediately set to
work on it. Pics of the concave side show the part of the sled that kids sit
on, which is a yellow firm foamy type plastic, with two black handles on
either side. I did not get a picture of the bottom, which was a hard, white
plastic, before I started painting. I was too eager to get underway to
remember to document it. Anyhow, the white bottom was painted with Blonde
Bronze Metallic Surfacer, and came out rather nice.
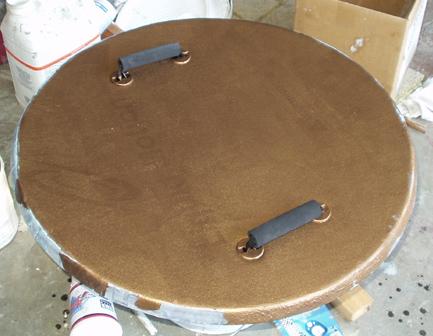
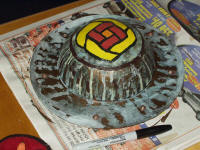
There are two pair of black plastic screws on the underside of the sled
that are how the handles are attached on the topside. I was not sure how to
cover those up, which is why I was originally thinking of going with
material with a grainy feel to it. There is a picture to show the bronze
layer, including the screws painted bronze. As it turns out, they look good
as metallic screws, so I left them. Once painted bronze, I set to put down a
layer or two of green patina on the shield, with a bit of black and red. The
red was particularly for the screws, to give them a feel of a different
metal from the rest. The black was used mostly near the edge of the shield.
In the pics, you can see the bronze begin to change colors with the use of
the Patina.
 I
then moved onto the underside of the shield, by painting it Bronze as well.
The original Patina level did not hold, as the foamy plastic had texture and
just didn't want to hold the paint, or the patina levels too well. It
started flaking, so I had to laquer it and then laid a layer of the Metallic
Surfacer base coat/sealant. This allowed me to lay another coat of bronze
down, and then to Patina it.
I
then moved onto the underside of the shield, by painting it Bronze as well.
The original Patina level did not hold, as the foamy plastic had texture and
just didn't want to hold the paint, or the patina levels too well. It
started flaking, so I had to laquer it and then laid a layer of the Metallic
Surfacer base coat/sealant. This allowed me to lay another coat of bronze
down, and then to Patina it.
 I'm
still in the process of seeing if this will hold on the topside of the sled,
which will turn out to be the back of the shield. I wouldn't normally do too
much work to it, but since it began as a bright yellow surface, the chances
of that side being seen as yellow instead of something appropriate to the
rest of the old armor look is too great a chance to take. So, hopefully, the
topside will have held well, not be flaky, and be ready to start attaching
other straps to. Since painting and patina coating the shield, there have
been minor issues with it still flaking, but it's not too bad. There are
bits and pieces where the yellow shows through, so I will need to touch up
the shield paint job soon.
I'm
still in the process of seeing if this will hold on the topside of the sled,
which will turn out to be the back of the shield. I wouldn't normally do too
much work to it, but since it began as a bright yellow surface, the chances
of that side being seen as yellow instead of something appropriate to the
rest of the old armor look is too great a chance to take. So, hopefully, the
topside will have held well, not be flaky, and be ready to start attaching
other straps to. Since painting and patina coating the shield, there have
been minor issues with it still flaking, but it's not too bad. There are
bits and pieces where the yellow shows through, so I will need to touch up
the shield paint job soon.
While waiting for the topside to set up and not peel, I started working
on the design I want for the front of the shield. It will be a sun, with a
Celtic Knot in the center, on the boss. I have pictures that show the
progress of the initial sunburst design. I painted the center, which will
mostly be covered with a boss, made from a bowl, but needed to know where
the center was to do the rest. I had to put down several layers of the
Acrylic Enamel, since the pen I used to mark out the design could be seen
through the paint. The sunburst design isn't exactly like the artwork image,
but it's close enough, and the color scheme isn't too bad either.
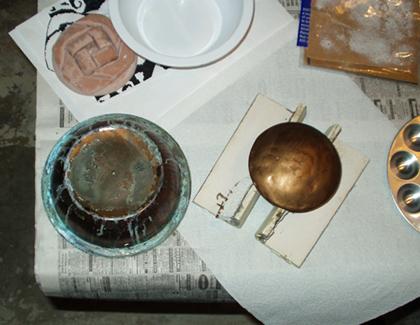
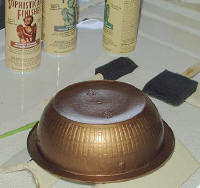 As
to the design of the Shield Boss, the idea is to have a bowl, with a flat
bottom, and then create the center arch with a design that fits the Celtic
Knot on it. This has proven rather interesting to pull off.
As
to the design of the Shield Boss, the idea is to have a bowl, with a flat
bottom, and then create the center arch with a design that fits the Celtic
Knot on it. This has proven rather interesting to pull off.
The Celtic Knot is rather simple, but trying to recreate it in Sculpey
has been most annoying. I tried for a 3D look to the knot, but that just
wouldn't work out for me. The second idea worked better, and that was to
create a simple dome out of the sculpey, made to fit the bowl, and then
paint over that.
 The
pictures show various stages of making the bowl and sculpey dome and then
bronzing, patina coating and then painting it. I've since finished the
shield, except it's going to receive a few more coats of sealant just to be
safe.
The
pictures show various stages of making the bowl and sculpey dome and then
bronzing, patina coating and then painting it. I've since finished the
shield, except it's going to receive a few more coats of sealant just to be
safe.
I attached the finished boss and glued it in real tight. In fact, I
had to make a wide circle from cardboard to fit around the bowl, which gives
the impression of a band of bronze attaching the shield boss in place.
 I
then used little sticky gemstones on the boss rim, painted them bronze to
look like rivets holding the whole thing in place. I then found some decent
cord or rope or whatever it was, and attached that to the back.
I
then used little sticky gemstones on the boss rim, painted them bronze to
look like rivets holding the whole thing in place. I then found some decent
cord or rope or whatever it was, and attached that to the back.
 I
made a long loop that stretches between the two handles and acts as a
shoulder harness to carry the shield. I then took two smaller hoops and
attached that to the top and bottom of the left handle. These I can then
loop my left arm through up to the elbow, then grab the right handle with my
left hand. This gives both sides fairly equal support, and I can now hold
the shield and maneuver it with one arm, or hang it on my back or even over
my head.
I
made a long loop that stretches between the two handles and acts as a
shoulder harness to carry the shield. I then took two smaller hoops and
attached that to the top and bottom of the left handle. These I can then
loop my left arm through up to the elbow, then grab the right handle with my
left hand. This gives both sides fairly equal support, and I can now hold
the shield and maneuver it with one arm, or hang it on my back or even over
my head.
See more
pictures of the clothing layers and finished costume here
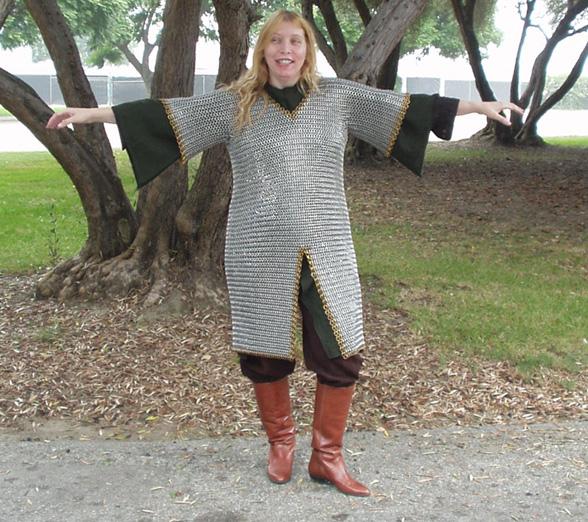
5)
Clothing - I have an olive green tunic, that comes below the knees, and is
split front and back and on both sides. The sleeves are 3/4 length, but too
flared and baggy at the ends to stay inside the gauntlets. I need to cut the
sleeves off and put a long sleeve shirt with tapered sleeves on under it.
Have not found that yet.
For pants, I just used my martial arts pants, which were white, and dyed
them dark brown. They keep fading, so I need to alter this plan a bit, but I
really like the durability of the martial arts pants. If I can find a black,
or ideally a brown pair, I will buy those. I have a back up pair of pants
that are a faux suede, but they have some tears in them, and at the moment,
they have a fake lacing system on the sides of the legs. If I can remove the
lacing, and patch up the tears, these should be fine, and much more tapered
at the ankle to fit in my boot tops better.
I have since mended the faux suede pants and used those for the first
time. I took the fake lacing off, and mended the tears and holes. I then cut
off the bottom a bit and hemmed the pants, and then attached an elastic band
on each pant bottom to act as a stirrup. This will hold the pants in my
boots when I put them on, and help tremendously to avoid bunching in the
boot tops. The darker brown color is much better for this costume, and so I
think I'll be keeping this pants for the long haul.
The boots are simple riding boots, but may be a bit too shiny and new
looking. Since I don't think I'll ever use them for anything else, I may try
and scuff them up and darken them a bit.
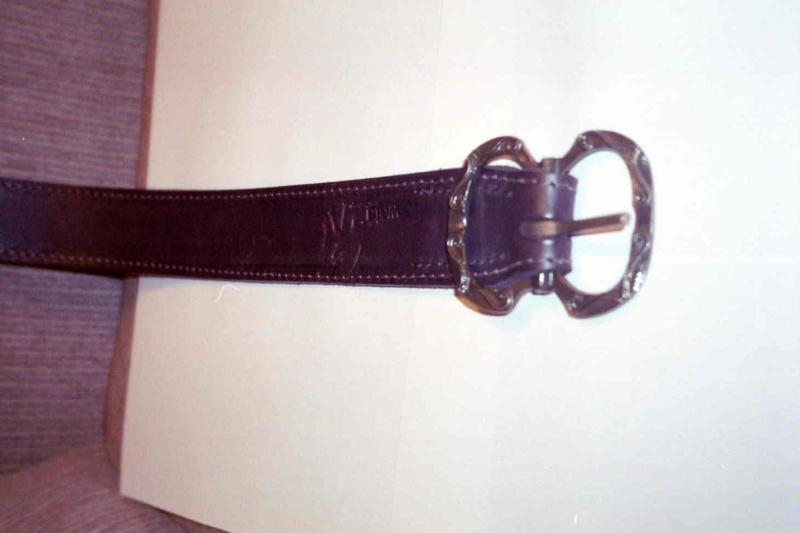
 My
current belt is actually from WETA studio, and includes an actual buckle
worn by the royal guards of Rohan in the film. I got this from Richard
Taylor at San Diego Comic Con 2002.
My
current belt is actually from WETA studio, and includes an actual buckle
worn by the royal guards of Rohan in the film. I got this from Richard
Taylor at San Diego Comic Con 2002.
I got a few sword frogs, but I like the one I have that laces up the
front, allowing it to tighten or open up, depending on the width of the
sword scabbard it is holding. The sword I have been using is a Viking
Practical by Paul Chen, which I bought at a Xena convention. The scabbard is
wooden, but is close to the color I need it to be. I was thinking of making
a new sword, scabbard and all, but I may just alter this one. I need to find
or make a Baldric, with chains holding the frog that the sword is inserted
into. Also, the sword needs to have two horses heads in a heart shape on the
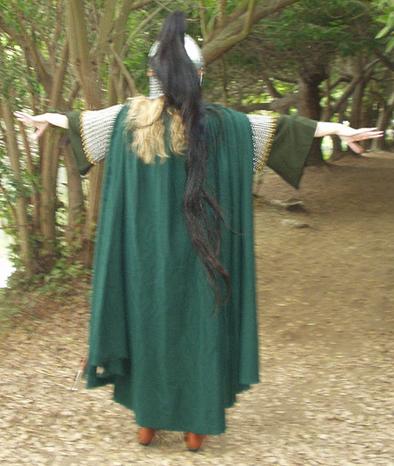
base of the hilt, as can be seen with Theoden's sword. The cloak was simply
made of a really light, wool blend material in forest green. It's a simple
circle cut, but with the front edges adjusted to make sure it opens and
shows the costume, instead of naturally falling in a closed manner. The
edges were all frayed, giving it a very worn out look. You have already seen
how the brooch is attached.