


v ----- Advertisement -----v
^ -----Advertisement ----- ^
|
|
Debi - Northern California, USA
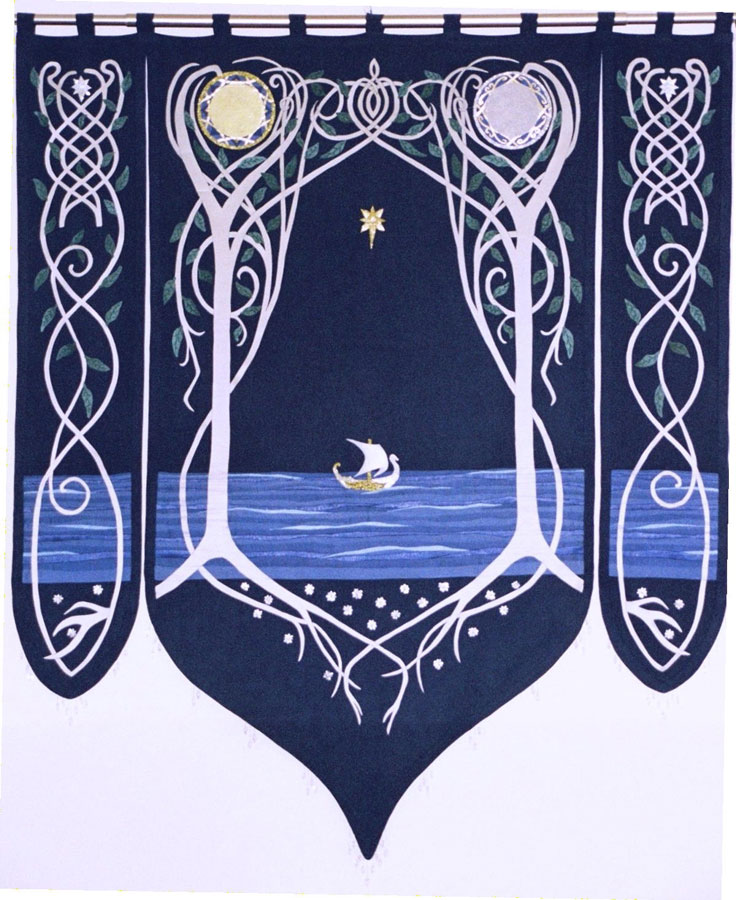
Into the West
 Building:
In the now far distant past, I made some of my own clothing. I have
not sewn for many years but I did find my long ago experience helped.
This was my first time using Wonder Under and planning my own project
(no pre-made pattern or directions). Building:
In the now far distant past, I made some of my own clothing. I have
not sewn for many years but I did find my long ago experience helped.
This was my first time using Wonder Under and planning my own project
(no pre-made pattern or directions).
Patterns: Started with pattern by Jessalyn found on this site. Used my
computer to break it into sections, which I then enlarged to print out to
pattern size. Because sections were very pixilated from enlarging, I traced
the printouts onto shelf paper, cleared up enlargement problems, and made a
few small changes.
I also used the photos of the banner at Neiman Marcus to make patterns
for sun/moon, boat, and stars.
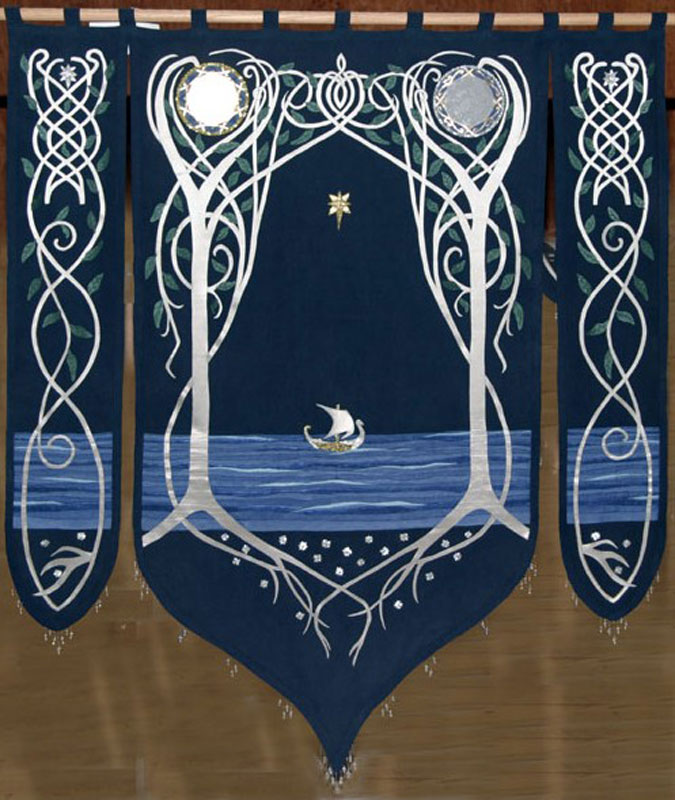
Size: Finished size is 40x48 inches
 |
 |
 |
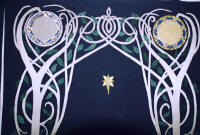
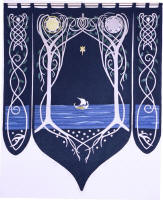
| Top half of Arwen's banner, with leaves |
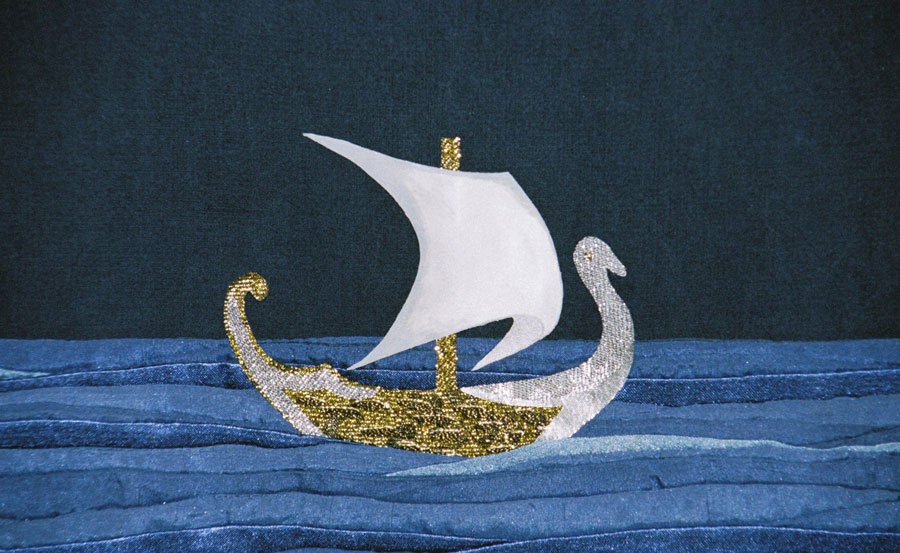
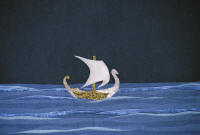
Sea and boat detail |
Boat detail |
 |
 |
 |
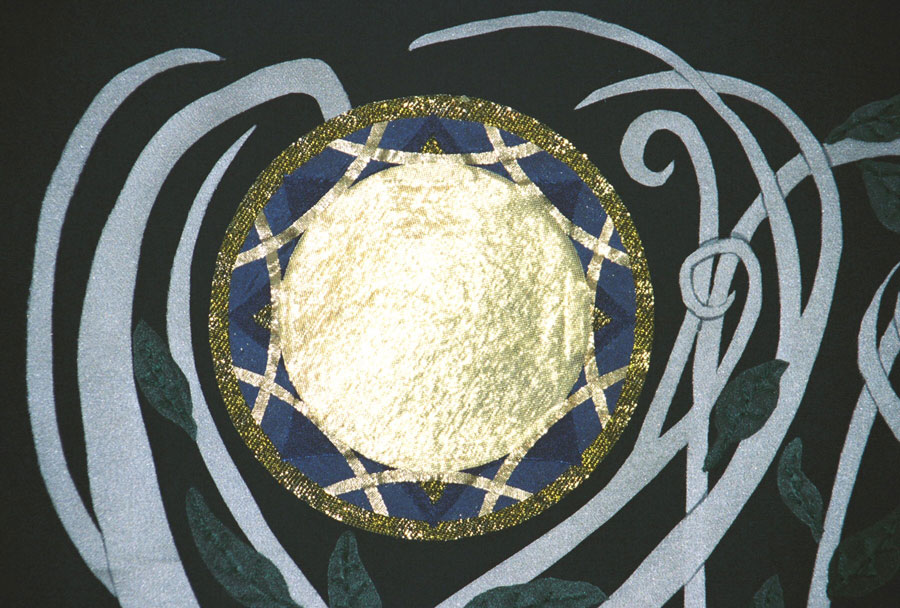
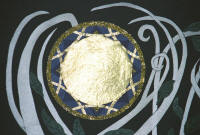
| Sun detail |
The star |
Moon detail |
Fabrics/Materials: Wonder Under, indigo blue sueded silk; china
silk in silver, green, white, light blue, and 2 medium shades of blue; lame
in gold and silver, brocade in gold and silver; also need gold and silver
metallic thread, green embroidery floss, 3 round crystal beads, 22 silver
beads, 65 crystal beads with lame thread to hand them
I used the same type of fabric (ex. brocades, lame, china silks) in
different colors, and repeated the use of a fabric in various places (ex.
Gold brocade on ship, star, bottom layer of sun/moon) in order to pull it
all together.
 | Banner – indigo blue sueded silk (VERY difficult to work with) |
| Trees – silver china silk |
| Leaves – green china silk, matching green embroidery floss for leaf
veins |
| Water – 4 shades of blue; 3 are china silk, darkest is rayon. Having a
different type fabric for one shade made the water much more interesting.
I wish I could say I planned it but since I was unable to find a dark blue
matching silk I went with the rayon that was a similar weight and went
well with the silks. |
| Boat – gold brocade, gold and antique gold metallic embroidery floss,
silver brocade, silver lame |
| Sail – white and silver china silk, grey paint |
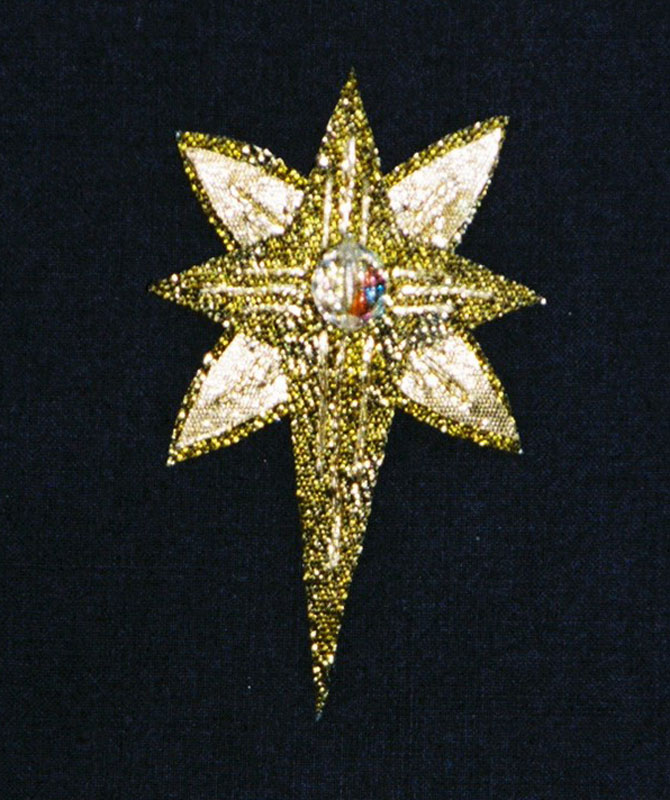
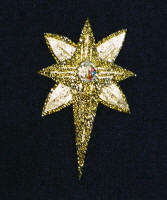
| Star (center) – gold brocade, gold lame, gold metallic embroidery
floss, 8mm crystal bead |
| Stars (side) – silver brocade, silver lame, silver metallic embroidery
floss, 6mm crystal beads |
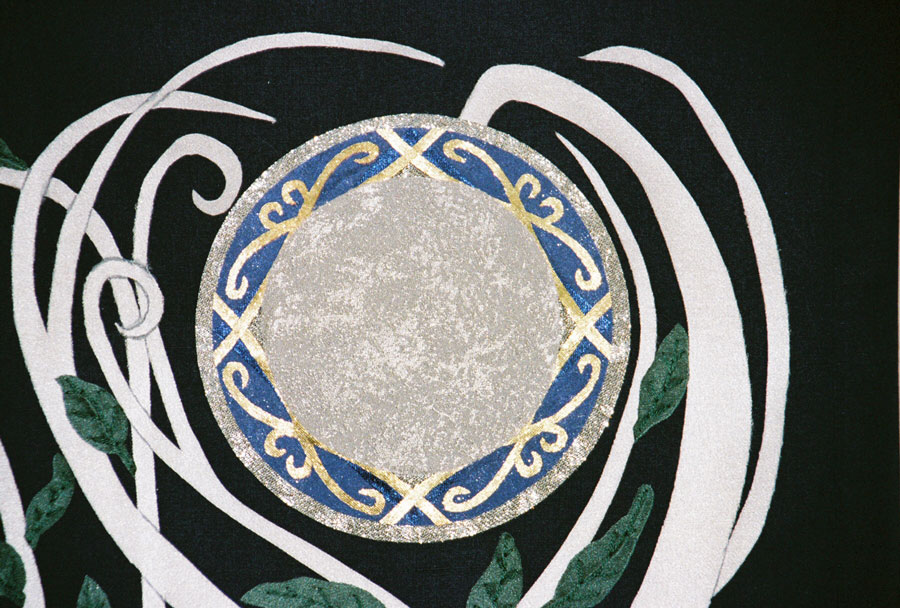
| Sun – gold brocade, medium blue china silk from water, dark blue rayon
from water, gold lame, whitish/gold polyester for center |
| Moon – other shade of medium blue china silk from water, dark blue
rayon from water, silver lame, grey mottled looking polyester for center. |
Tricks that helped:
| Brocade – coat well with Fray Check before cutting out |
| Lame – use Wonder Under to stick two layers together. It makes it MUCH
easier to work with and it doesn’t fray. |
Construction:
| Water – made of 20 individual rows of “waves”. Smallest is ⅛ inch
wide. Each row increases slightly in size. Largest is ½ inch. Rows are
made by sewing two long narrow strips together along one long edge and
then turning raw edges inside. Stitch line should be slightly wavy. Use
all 4 shades of blue mixed throughout the water. Sew each completed row to
the row above it. Completed water was attached using Wonder Under. Panel
bindings put on after the water to enclose raw edges. |
| Trees/vines – iron Wonder Under to silver silk. Transfer pattern to
paper on back. I tried several ways. The one that worked best was using
carbon paper between the Wonder Under paper and my pattern and then
applying pressure along the appropriate pattern lines. I used a rotary
cutter and a precision point X-Acto knife to cut it out. Fabric spray
adhesive was very helpful when placing pieces on the background in order
to have proper position before/during ironing. I completed ALL bindings
and made sure the panels hung down nicely BEFORE attaching trees/vines. If
I hadn’t, my entire project would have been ruined due to the
temperamental nature of the sueded silk! |
| Sun and Moon – These are made from circular layers of different
fabrics fused together with Wonder Under. |
| Sun: gold brocade, darker medium blue china silk from water, then
whitish/gold polyester for center. |
| Moon: silver brocade, lighter shade of medium blue china silk from
water, then grey mottled looking polyester for center. Add details with 2
layers gold lame fused together. |
| Ship with sail – Iron Wonder Under to fabrics. Sail is white China
silk with silver silk from trees under it (the white was to bright without
it). Shading was added to the edge with grey fabric paint. Mast and main
part of boat are gold brocade. To prevent brocade threads from “flaking
off” the edges I coated them with Fray Check and it worked very well. Gold
and antique gold metallic embroidery floss was used to add horizontal
lines. Silver brocade and lame were used for the front and back details. I
used fabric glue to add details until I could iron the boat to make the
Wonder Under adhere. |
| Stars – Larger rays are brocade with Fray Check on all edges. Smaller
rays are two layers of lame fused together with Wonder Under. Using two
layers made it easier to work with and prevented fraying. Metallic thread
was used to add stitches radiating from center. Crystal bead in center
holds both layers together. I left long strings after sewing on the beads
and used them to tie the stars on to the background silk. |
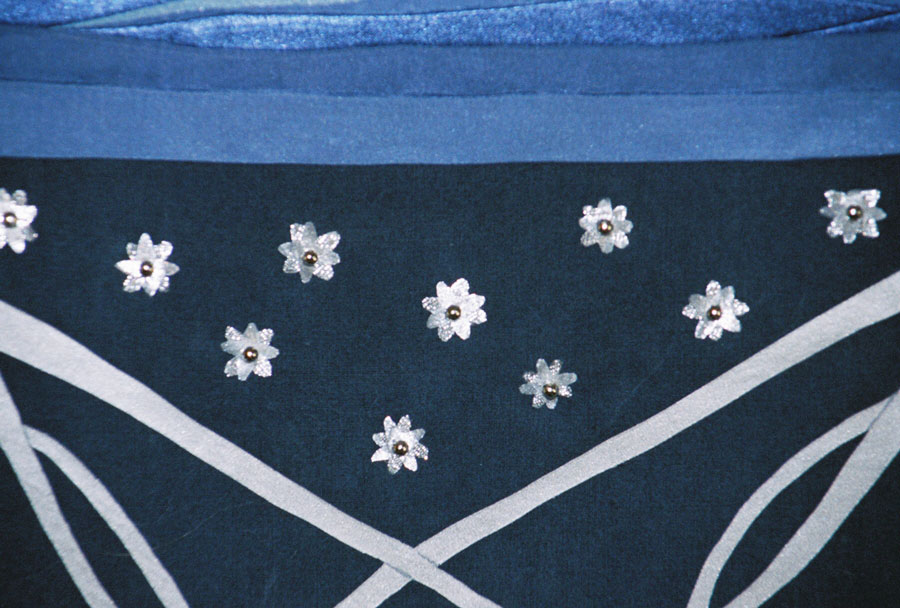
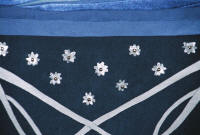
| Flowers – Lower section with four petals is brocade with Fray Check on
edges. Top is same shape out of two layers of lame fused together with
Wonder Under. The two sections are held together with a silver bead. I
left long strings after sewing on the beads and used them to tie the
flowers on to the background silk. |
| Leaves – Started with Wonder Under on green silk. Traced leaf shapes
on the Wonder Under paper and then drew in veins.
 | There are approx 8 different styles that vary in size and shape. I
used simple straight stitches in matching green floss to put in veins.
Cut out leaves and removed ALL paper. |
| Because the sueded silk was so temperamental, I applied the leaves
(also sun, moon, stars, and ship) while the banner was hanging. I pinned
them on and then attached with glue stick. Once in place the Wonder
Under could be ironed to finish securing them. I did it this way because
the dark blue fabric had to be exactly where it wanted to be when
anything was attached. Otherwise, it messed up the way the panels hung
and did not look right. |
|
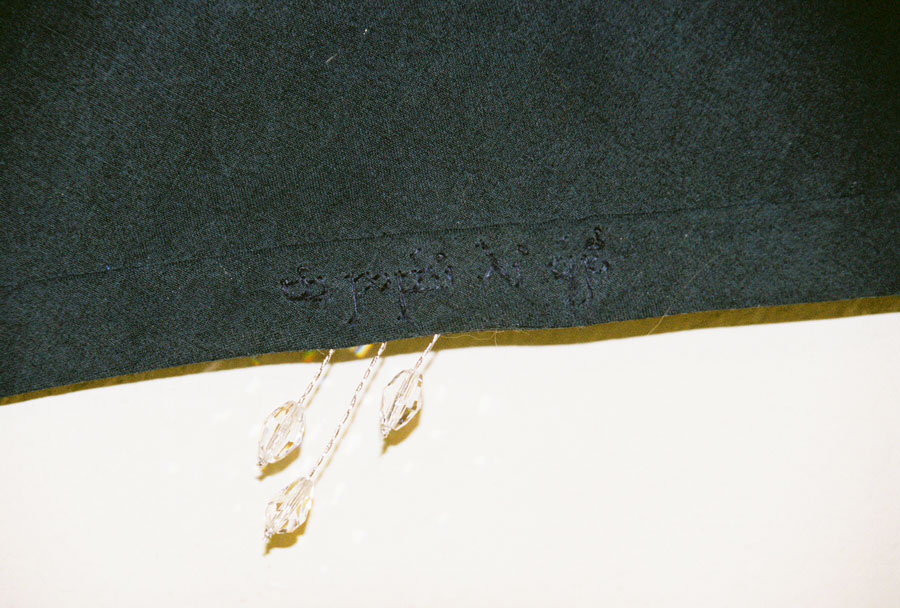
Signature in Elvish – I signed the lower center binding by embroidering
what I hope is “I Debi this made” in Elvish words with Tengwar letters.
Obviously, I got a bit carried away!
For my current level of ability and lack of recent experience the
project was huge and detailed. It took me approximately 9 months to
complete.
 |
 |
 |
| Arwen's bedroom banner |
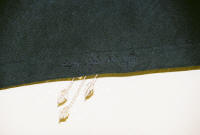
Top edge detail |
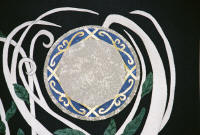
Edge detail with crystal |

v ----- Advertisement -----v
^ -----Advertisement ----- ^
Our Cloak Closet | Cloak Closet 2 | Banners | Banners 2 | Dolls 'n' More | Dolls 'n' More 2
Home | Up | Ashley | Debi | Eruvyreth | Pam
This page was last updated
11/21/09
|