|
|
|
|
|
v ----- Advertisement -----v
^ -----Advertisement ----- ^
|
Quick Ideas for Fellowship PinsHere are some quick shortcuts from our folks on how to fake the Fellowship pin Check out Casting small props in Resin for a more detailed resin pin Quick Pin Index
Craft Foam
|
 |
 |
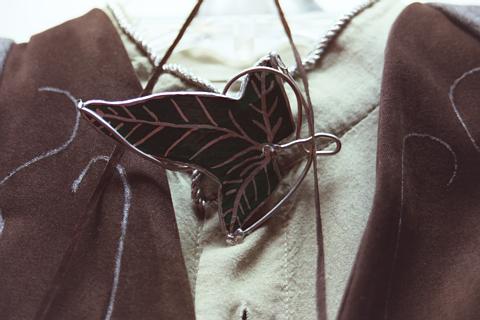
After making a cloak from the marvelous fellowship cloak
pattern I used my machine to make a leaf pin. I ironed a piece of freezer
paper (shiny side to the fabric) to a 5" by 5" piece of silk-like polyester
and placed a tracing of my leaf on the freezer paper then stitched over the
drawing with grey thread. Then I placed another green fabric -freezer paper
"sandwich" on the bottom (Green side out) and stitched over my grey
stitching with a close, narrow zig zag stitch with Sulky silver metallic
145-800 (a mylar like thread). Finally, I trimmed close to the outline
and stitched a wider zig zag around the leaf again. I hand wound the mylar
on my bobbin and I think the bobbin side looks better than the top.
I basted the pin to the cloak over the hook .
== Mum Swinney
Find your favorite pic of the pin, enlarge it to the size you want (my frame of reference is that it looks to be about the length of one's mouth! At least that's the closest frame of reference I've noticed since it's right under them)
Cut out the paper pattern and trace it onto something you want to use for the actual pin. Make sure you can fix a pinback to the back side.
People have been very creative: I think the simplest was just a cardboard shape using marking and glitter pens. A while back someone else made one out of the plastic lid from a butter tub!
If you have a color ink jet printer, enlarge the picture to the size you want and just glue that onto the cardboard or plastic. If you ink is waterproof, you can coat it with nail polish to give it a more shiny look. Use silver pen on the veins for a more metallic glow.
==Judy & Cat
Check out our whole page on doing Clay leaves <here>
If you need a pin quickly and don't have any specialized tool. You can get something called Friendly Plastic at bigger hobby stores. This stuff is heat sensitive plastic that can be shaped after dunking it in hot water. Now a days it comes in 1 1/2 wide strips that have wonderful metallic marbling.
Create the pin pattern on paper. Check it against the size of the Friendly Plastic strip. It is probably a bit biter than the strip... size down you pattern a tad for the widest point. You will be able to pull and twist the plastic when it's hot to shape it a bit to get the whole thing to fit.
If the pattern will not fit without the twist... put the whole strip in hot water for about 15-30 seconds. So as you see it start to bend, yank it out. to work on it. Lay the plastic face down. Stretch and bend it leaving as few finger prints as possible.
If you need to heat it lightly again, pop it back in the water.
Lay the plastic decorative side face down on the wax paper. Lay the pattern on top, Prick the pattern out.
Reheat, this time a bit more. Lay face down. Cut the pattern out, probably just need the pointy nail file since the clay is soft. Cut from the center out. If you can't do the nail file, switch to the exacto knife. Small errors can be blended back together by melting and blending.
Once it's shaped, reheat and flip it face up. Edges need to be smoothed. You can use a popsicle stick, the Emory board, the toothpick, whatever.
After a re-heat, you can also carve in some veins,
Shape the wire. Re heat the plastic. Carefully push and shape together. Here is where you can give the leaf a bit of 3-D ness. BUT, be careful of finger prints at this last time. The wire will not stay... don't try and push it that fast. Let the leaf cool.
Glue the pin back and the wire to the pin. (Remember, you want a glue that does plastic... In doubt? Test on a piece. Not only confirm it sticks, but that it doesn't melt it.)
Paint the wire silver and paint in the veins.
One caution... do not leave this pin in a hot car!!! IT will melt, but it will stand up though anything else.
== Cat
Lutris wrote this up specifically for making a "Metal Leaf Broach from an Incense Holder". However, this technique will work well with any metal shaped leaf.
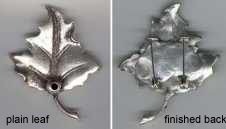
Buy a leaf metal incense holder, then with a metal filer (the one that usually comes in toolboxes) take out the incense supporter by slowly corroding it (especially when close to the leaf surface, to not spoil it).
Then, after the supporter is gone, paint with green acrylics or oil painting - I chose the last one - and let dry. Apply a layer of varnish to protect the painting.
Finally, add the pins (I suggest two) as in the picture with epoxy. As an optional you can paint the epoxy in silver, so it seems metal too.
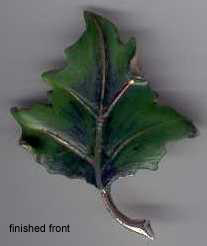
== Lutris, Buenos Aires, Argentina
Pictures and details on Matt's site here: http://www.larp.com/orcs/misc.html
==Matt A
v ----- Advertisement -----v
^ -----Advertisement ----- ^
This page was last updated 04/22/08