|
|
Gilded Leather Carvings
Originally published in the Rawhide Gazette, October 1999, Vol 5, Iss 8 Editors note: This is an intermediate technique. Use it when you want to move on from using a gold pen on vambraces and leather armor.
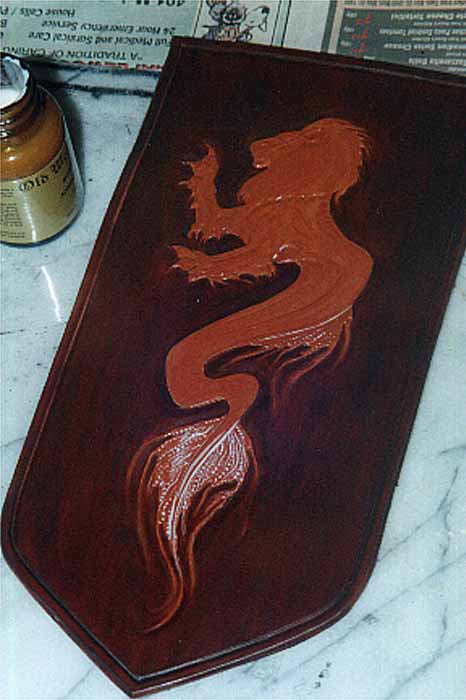
I had toyed with the idea of gilded leather for some time. The idea of a layer of gold over a carving so thin as to be able to discern the pores and grain of the leather itself was intriguing. It wasn't until I was killing time in the hotel while on vacation watching Martha Stewart on TV doing a segment on gilding something (I think it was a mirror frame) that I thought it could be done.. heck, it looked downright easy! The purchase of a good book with somewhat more detail further convinced me; this was a finishing technique perfectly suitable for finely-detailed carved leather.
Materials required:· Gold (or alloy) leaf. This is sold by a "book", which is twenty-five sheets of approximately five-inch by five-inch leaf. It is available in pure gold (24 karat), silver, copper, or a variety of alloys that give the appearance of gold, bronze, etc. Some of the oxidized leafs add a unique vari-coloured look. While the thought of using pure gold may seem expensive, the leaves are tissue-thin, and a book that may cover 625 sq. inches will cost around 25 to 30 dollars. Gold's greatest quality is that it will never tarnish in its pure form. The non-gold alloys and silver books are far cheaper (less than $10 a book), but will tarnish with time, and require a top-finish of some sort like lacquer (or even SuperSheen).· · Antique underfinish (optional). This is a matter of taste, but gaps will appear in the leaf as it's applied, either by nature of the material or deliberately. An opaque antiqued-coloured base coat will add to the character of the finished piece, as shown further down. This is available in a limited number of colours, but an antique red is fairly standard when using gold or gold-coloured leaf. It doesn't contrast a great deal with the leaf colour, which would distract from the surface design, but is different enough to display a nice accent through the gaps or distressed areas (more on the latter later). "Size". This is the adhesive or glue that holds the leaf to the surface being gilded. There is much written regarding water sizes or oil sizes and their compositions, which were guild secrets for centuries (anything from egg yolk and water in careful proportions to linseed oil, alcohol and blood), but commercial water-based sizes will suffice here. Cheesecloth or other lint-free cloth and a stiff artists' paint brush for the application of the leaf. Q-tips can be useful as well, for sweeping aside excess leaf after application. · Tweezers can be useful for moving pieces of leaf, large or small. Try to avoid the sharper, jeweller-style tweezers, as the points can tear leaf far too easily. · An antiquing finish (optional). Much like Leather Glow or Fiebing's Antique finish, this adds a bit of dark luster and detail contrast to the gilded carving. If used, I'd recommend one specifically designed for gilding, as most others are solvent based and depend on some solvent absorption from the surface it is applied to. That won't work with gilding; the leaf pretty much creates a perfected sealed surface, making such finishes messy, uneven, and even unsightly. On smaller carvings the gold or gold-coloured leaf may look extremely bright and too shiny against a dark background without some sort of antique finish to darken it somewhat. · The carved leather top-finish of your choice; Super Sheen, Leather Balm/Atom Wax, lacquer, etc… as long as it doesn't necessarily depend on penetration into the leather to protect it. · A piece of tooled leather that you're willing to possibly sacrifice to an experiment….
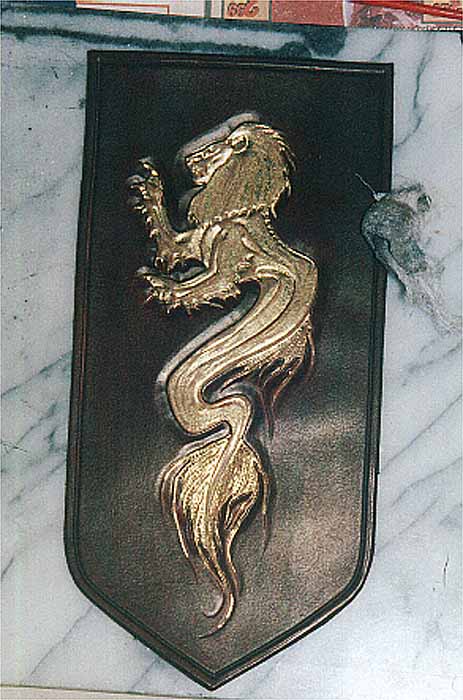
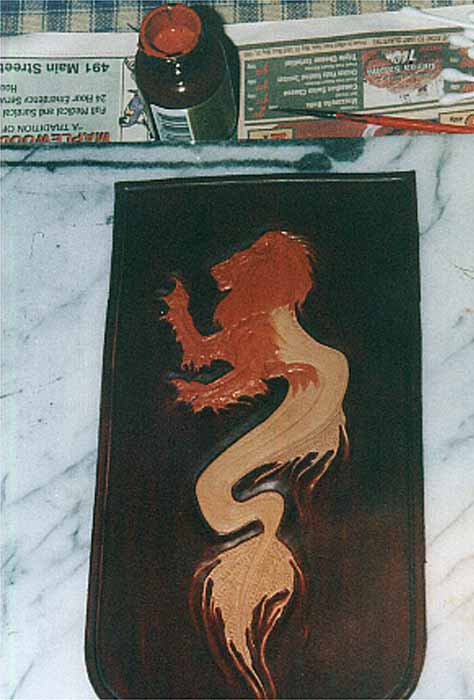
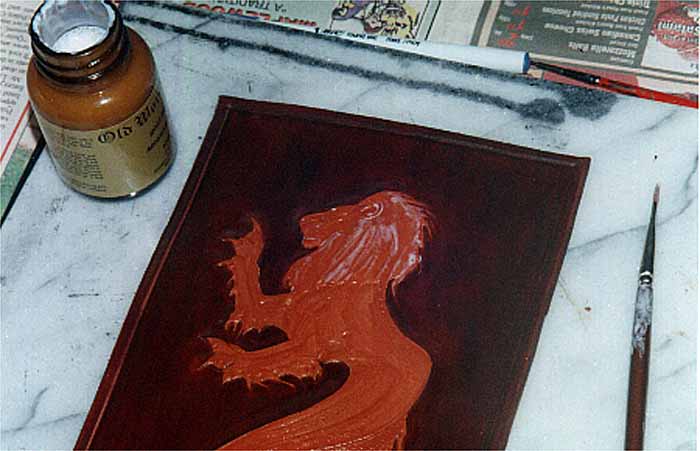
Preparing the CarvingMost gilding books or kits generally concern themselves with applying leaf to nonporous surfaces. Porous surfaces are generally sealed first so the size can get a good adhesion between the surface and the leaf. I've tried applying size directly to a dyed carving, and wasn't happy with the results. Varying degrees of moisture absorption across the carving resulted in a wide range of size tackiness across the piece. The result was that some leaf stuck fast instantly, and other portions didn't have enough tack to hold the leaf to the surface during top finishing. Pieces of leaf would lift up as a result, requiring reapplication of size and leaf, adding a large number of hours to the finishing time. I've had better luck when I've used an underfinish to seal the pores of the leather first. The antique red one specifically sold for gilding that I've used so far appears to be a thin water-based acrylic paint, very similar to Cova dyes, in that it dries very thin and preserves fine surface detail without filling it in. I suspect Cova dyes could be used just as easily. Dye the background of the carving with a standard leather dye before applying the underfinish. The underfinish (like Cova dye) is largely opaque, and will cover dye on the carving itself, if you want to save some time and dye the whole piece one colour at once. But it is slightly translucent and the underlying colour of the dye will affect colour of the underfinish slightly, depending how heavy it is applied. I've experimented with carefully dying the background only, using fine brushes to follow the edge of the carving, and dying the entire piece, and have found advantages to both, depending on the effect I want. Dying only the background seems to work best when I want to preserve as much very fine detail (as you might get with a fine hairing tool) as possible. The latter worked well when I had larger areas of the carved piece that were uncarved and unburnished, and the extra wetting of the leather that resulted from being dyed raised the natural texture and grain of the leather very slightly, which shows through the leaf once it was applied. Try both, and see how the like the effect… it's a subtle difference, but it may be an important one for you. Use a fine artists' brush to apply the underfinish only the to areas that will eventually be gilded. Take some care and time here. This layer of finish is the foundation of the gilding… a close eye to detail now will cause fewer headaches in the final stages. A blob of underfinish off the side of a beveled line won't get covered with leaf and will stick out like a sore thumb along a border between a gilded surface and dark-dyed background. Keeping the underfinish coat even is not especially important, as only a small portion of it will be visible in the finished piece. If a small mis-stroke of a paint brush results in underfinish where you don't want it, wait until t has tacked-up and half dry. A small drop can probably be carefully scrapped or lifted off the leather with a fine-point X-acto knife at this point before it completely dries. Touch up the background dye afterwards if necessary. Allow the underfinish to dry completely before moving to the next step. No shortcuts… there's going to be a lot of hours between start and finish, even on a small piece.
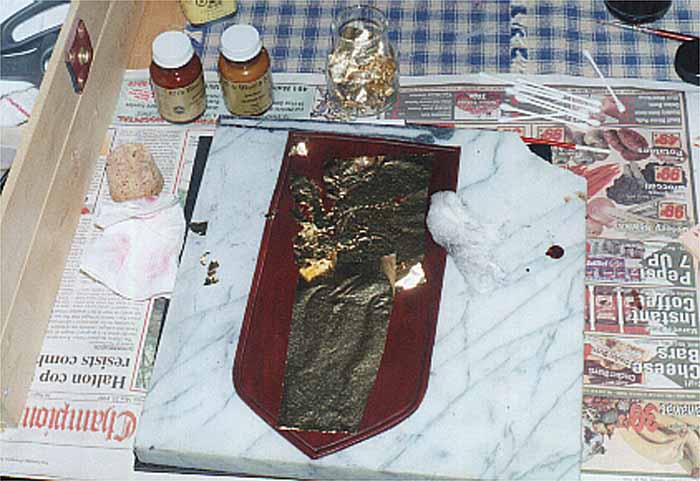
Applying the SizeGilding size can take typically anywhere from one hour to 24 hours to reach just the right amount of tackiness on an impervious surface (like glass) to hold the leaf. Look for labels referring to "minute size" (about an hour to reach tack and workable up to another twenty minutes), "quick size" (reaches tack in two to six hours and workable up to another four) or "slow size" (reaches tack over 24 hours and workable for another eight or twelve). Some sizes are workable up to 24 hours after they've reached tack. These very slow sizes are best suited for very large surfaces or items, where you need a lot of time to apply the leaf, like furniture items or large custom pieces of signage. I can't think of any leather applications that would require them, unless you plan on gilding an entire hide. For the piece shown in the photographs I used a "minute size" that had a stated tack time of at least an hour, but I found was suitably tacky on leather sealed with an underfinish in about forty-five minutes, with mixed results. On the plus side, it was obviously a latex-based adhesive (notable for its texture, milky colour and ammonia smell), and the colour went from milky-white to clear as it dried, signaling a good level of tack. On the down side, I found it didn't dry very evenly on deeply detailed sections of tooling, nor to a consistent thickness, which I found important and irritating when gilding a finely detailed carving. The brand names may differ in these characteristics, but I haven't had the budget to try them all. I'm currently experimenting with a "fast size" with a considerably slower tack time, but the jury's still out on that one: the fast and slow sizes tend to be clear solutions, and estimates of a proper tack time on leather are a little trickier…. I'll keep you posted on the results. Apply the size with a fine brush only to the areas covered by the underfinish. Remember that every surface you touch with size will have some leaf stuck to it in the end, so take care. Overlapping blobs of size over the bevel cut line will be unforgivable and unrecoverable at this point. Treat it like a superglue that you can't remove from the surface of the carving if you make a mistake… you won't be able to without damaging the surface of the leather and marring the carving. You're painting glue on here, and you don't want to damage or destroy twenty-odd hours of carving. Now is the opportunity to cover underfinish mistakes, if they were ones of missing certain spots… the leaf will stick to it regardless of the presence of an underfinish coat or not. Allow the size the dry to a good tack level. This might take a bit of experimentation, as I've found that the stated minimum tack time on the label of the size jar is longer than necessary than is needed on leather, even with an underfinish. This probably isn't a problem with fast or slow sizes, as they have a working time measured in hours, but the "minute" sizes may be less forgiving. To be safe, knock 10 to 15 percent off the tack time stated on the label (for example; about fifty minutes instead of an hour). With a bit of experimenting and experience you'll find that air humidity will affect the tack time to a huge extent. While working outdoors demonstrating at the local renaissance festival over past summer I found my minute size getting to a good tack anywhere from fifteen minutes (on a dry sunny day) to four hours (on a hot, rainy humid day). Chances are you won't have to worry about extreme environmental influences like these if you're sticking to working in the home.
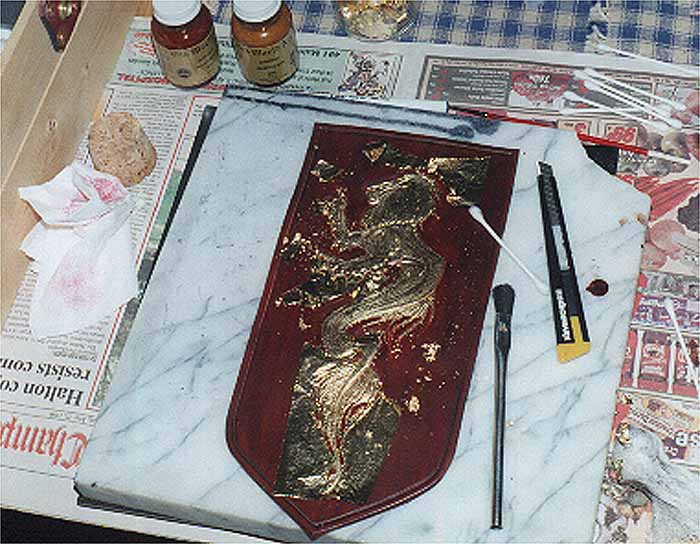
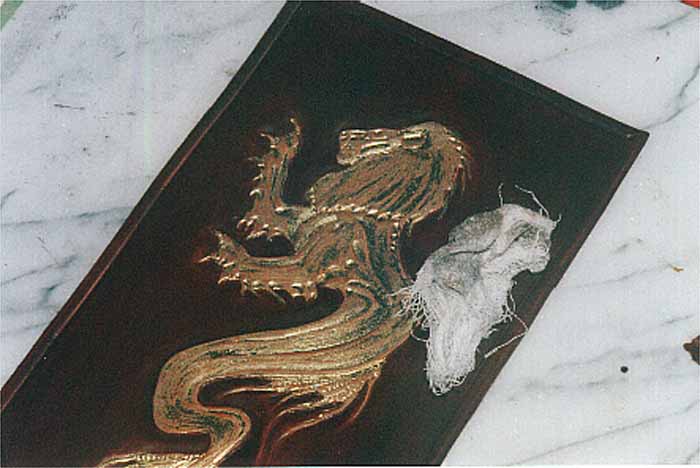
Applying the LeafThis is the fun part, when the hours of waiting for the underfinish and size to dry start looking worthwhile. In principle it's fairly simple: pull a leaf out of the book and put it over the area that's been treated with the size, and pat it down with a bundled piece of cheesecloth or soft rag. Moving the leaf from the book to the carving can be tricky however… The proper tool for lifting and moving a leaf is a leaf brush, which looks like a fine tick comb made of long brush hairs. This brush is stroked on your clothes to gather static electricity, then touched to a leaf, which clings to the brush as a result of the static. It's simple to lift the leaf and move it to where you want to apply it. Given the difficulty in finding a reasonable supplier of these brushes at a reasonable price, I decided to trust the mark-one careful eye and steady hand and use my fingers and tweezers to move the leaf from the book to the leather. Just keep in mind a couple of things… natural oils from your skin will affect how well the size adheres to the leaf, so wash your hands before attempting to handle it with bare fingers. The other thing is that leaf is much thinner and lighter in weight than single-ply tissue, and will be very frustrating to move and place if there's a slight draft; it will move where you don't want it to from your breath alone. I don't recommend doing outdoors demonstrations if you can avoid it; the slightest breeze will drive you nuts. A five by five-inch square piece of leaf is seldom a convenient size or shape to apply to a carving, and its flimsiness can make trimming a sheet tricky. The leaf sheet can be trimmed a couple of ways. One is to score the leaf sheet with a fingernail and carefully splitting it by hand as you would a sheet of folded paper. This won't be especially even, and tears may occur in the sheet that you don't want, but seams in the leaf burnish down as to be nearly invisible when applied to the leather. Another method is to use a very dull knife or a butter knife (as long as it has no sharp spots or burrs) to score and cut the leaf while it rests on a thin, soft piece of elkskin or bucktan cow. The amount of wear of a firm stroke of a dull knife will thin the leaf enough that it will separate easily along the line, like a perforated piece of paper. At any rate, if a large piece of leaf is applied to a small area, the excess will be salvageable to be used on another area or saved for another application, as experience will show. If using alloy leaf, it's cheap enough to sacrifice an entire sheet applying it intact without destroying it attempting to trim it first. Move a sheet or piece of leaf over the area of carving that has been painted with size, but don't let any of it drag over the surface, as it will stick and tear. With a balled piece of cheesecloth or soft rag, start to gently pat it down to adhere to the tacky size. Slowly work the area, gradually increasing the amount of pressure used to pat the leaf down, pushing it into the detail of the carving. When the leaf is uniformly stuck down, use a stiff, wide (1/4 - 1/2 inch) artists' brush to tamp the leaf into the remaining carved detail with the ends of the bristles, like using a stenciling brush. Take especial care to tamp down the leaf at the edges of the size, or there won't be a clean edge to the gilding. As the edge gets tamped down firmly, start using brush strokes to remove excess leaf from the edges of the size. It will come away easily, with a lot of bits and pieces of leaf coming free. Save the pieces in a jar for touching up areas that lose leaf while burnishing. Continue brushing along the edges of the design until all the leaf that isn't glued down by the size is removed. The leaf should stick to the edges of the design let a coat of gold paint, but variations in the application of the size and the absorption of the leather may result in some sections peeling up and refusing to stick back down. If it's too noticeable (a few flaws in the leaf are acceptable and add character to the finished piece), you should apply another coat of size and try reapplying a piece of scrap leaf to the area. Rubbing the applied leaf gently with a soft cloth at this point will burnish the metal, bringing out a bright shine and smoothing the odd wrinkle. The gilding can be finished as is at this stage with a clear spray or brush lacquer. If you choose to do so, be sure to let the size dry completely first (it will dry under the leaf). You may also want to try an antiquing finish first, used much the same way as you would use Leather Glow on a carving. However, I find the gilding to be far too bright (to the point of gaudiness) and hides much of the detail of the carving with reflected light. Some damage to the leaf surface adds character to the finished piece, and I like to damage and distress it further. Wait under the size has completely dried and is tack free (this may take 24 to 72 hours, depending on the type of size used). Using a piece of balled cheesecloth or denim (something with a bit more "bite" than a soft cotton cloth), rub the gilded areas with somewhat more pressure than was used to burnish the leaf, going over the highest spots of the carving. The leaf, being as thin as it is, will wear away under rubbing with a cloth, exposing the clear size and the painted antique underfinish, creating accents in the finish that will accentuate the design. The contrast will bring a lot more life to the carving underneath the gilding, as well as give it a nice "worn" antique look. More rubbing will reveal more underfinish… don't overdo it! Also take a care to watch the direction of the rubbing. Rubbing in the same direction as a number of nearly parallel ridges in the carving will probably reveal more underfinish between the ridges than is desirable… rub in a line across linear high points and ridges to only remove leaf on the highest points. An antique finish can be used after this, to further accentuate fine lines as created with a hair tool. Top finish the piece with a clear finish or lacquer to protect the remaining leaf from wear and tarnishing. It's a time consuming process, but there's a lot of "sitting around and waiting" time while the various liquid applications dry, but it's a great finish to work on and set aside for intermittent drying while you're working on another piece. And it can really bring a unique amount of life to an otherwise ordinary carving. The materials themselves are becoming more widely available now, appearing in many crafts and artists' supply stores, and are reasonably priced enough for any beginner to give it a try. Go for it!
Web search keywords and phrases:
Check the Puget Sound Leather Artisans Co-Op links page for a gilding supplier. To see more of Adam Smith's costumes and his web page (Sword in the Stone Crafts), click <here>.
This page was last updated 04/22/08 |
|||||||||||||||||||||