|
v ----- Advertisement -----v
^ -----Advertisement ----- ^
|
Hobbit Pipe Prop TipsPipe Tips Index
Thrift storeHey, in this day and age, why go for a functioning pipe, make something that just has the look. Here we present techniques for different levels. Check antique stores, might cost more than the thrift store, but you might have a better chance of actually finding a Church Warden style. AND IF YOU DON'T SMOKE IT (large hint), it doesn't matter if the pipe is cracked... and again... cheaper than buying a new one. == Kayta Making a (non-functioning) Hobbit Pipe from Sculpy and mini blind rodTake the plastic rod piece of from an old mini-blind (you know, the little pole that you turn to open/close the blinds), and bent it into the desired shape. (If all else fails, anything long can be covered by sculpy,) I made mine to look rather like a Hobbit pipe, curved in a slight "S"
shape. It bent easily, and stayed rather strong, though if bent too far it
does crack a little, but if doing a Hobbit pipe, the cracking may be a
necessary evil. Because the pole that is used for the pipe is so long, it
should be cut to the desired size. Mine is about one foot long (after it's
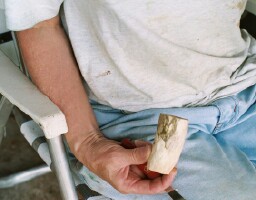
bent), and that is about the length of the one's from the movie. == Sunni Making Gandalf's Pipe from Wood== by Janice Note, this is intermediate level project and requires special tools and supervision. Also, this is not a rush project since steps include wood curing. This is how I made my Gandalf pipe – note that this is just a prop pipe, not a smokeable one. I used branches from my maple trees and whittled out the bowl; then painted it to look like it was made of clay. I recommend that you make a “prototype” pipe first, if you can. My second pipe was much better when I applied what I learned from the first one. You will need some tools (these are pretty basic, if you don’t have them yourself, you probably have a friend or a relative who does). Tools:
Materials:
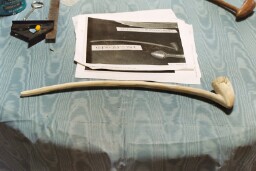
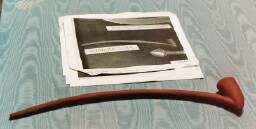
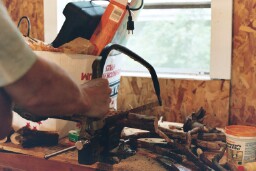
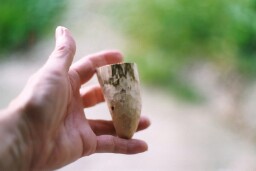
Assembling Your PipePrint out a picture of the pipe you want to make for reference; I used the one from ACS from the “Gandalf the Grey” character section. Find some suitable tree branches for your pipe. First, get a green branch for the pipe stem – try to find one that is as close as possible to the curve you want for the stem. Find a dead branch large enough for the bowl – I used a branch about 2” in diameter. Note that dead wood tends to split, so look over your branches carefully and find one that has some solid places to use for the bowl. Also make sure the wood is not rotten or too full of insect holes. Try to find a branch that has an unsplit area that is curved similar to your bowl shape if you can to save yourself some carving later. Using the pocket knife, strip the bark off the green branch you are using for the stem, and clamp it to a table edge or something similar, bending it into the curve you want for your pipe stem; you will need to clamp it at each end. Let it cure like that for a couple of months. When your stem has cured, get the branch you will use for the bowl and saw a piece just a tad longer than your finished bowl. I recommend that you saw several bowl pieces, in case you mess up one or two when you are drilling the hole in it (I did). I used a piece about 4” long
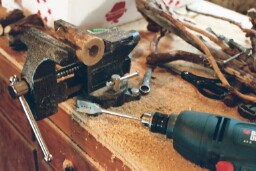
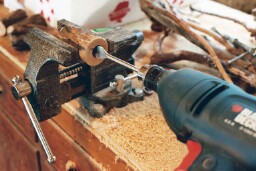
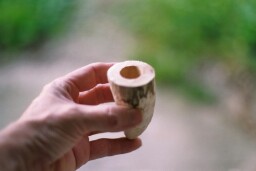
Now clamp your bowl block very firmly in the vise so you can hollow out the pipe bowl with your wood borer drill bit. Select the size of bit for the hole you want – here is where you may have to experiment with drilling a couple of blocks to get the size you want. (I found that if you drill the hole too small, it doesn’t work to try and use a bigger drill bit in the same hole; at least it didn’t for me.) Just don’t try to make such a big hole you split the wood. Center the bit as best you can on your block and hold the drill as straight as you can and bore the hole. Be careful not to go all the way through your block. You need enough thickness left to shape the outside of the bowl.
Now you are ready to shape the bowl with your pocket knife. ADMONITION: Knives are dangerous. Carve away from yourself, make sure your knife is sharp and don’t walk around with an open knife in your hand. If you haven’t whittled before, practice on a couple of branches first. Curl your fingers around the knife handle to hold it and place your thumb against the back of the blade to guide it. Put the blade at an angle against the branch and press away from yourself to carve out a chip. (Don’t worry, it’s not hard; you’ll get the hang of it). Three things to remember while you are carving your bowl:
Refer to your picture and start whittling your bowl. You want to shape the sides of the bowl to the proper shape and you will probably have to taper off the bottom of the bowl. You also want to even out the rim of the bowl around the hole; your tree branch was in all probability more oval shaped, so you need to whittle down the outside of your block to make it circular to match the hole. Also make a flatter area at the lower back of the bowl to attach the pipe stem. Rough it out first.
Keep whittling and shaping the bowl; particularly when you are getting very close to the shape you want, stop every two or three knife strokes to check your work..
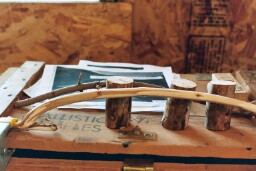
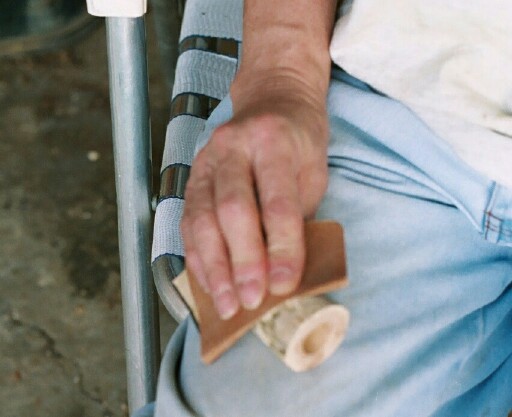
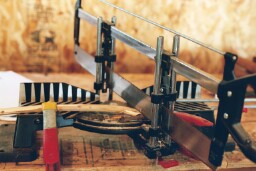
The next step is optional – you may want to leave your bowl with the knife marks so you keep the hand carved look. Take your coarse sandpaper and sand the bowl all over to get rid of the knife marks and smooth it out. Now get your stem piece so you can cut it to size. First you want to cut the end that will fit on the bowl of your pipe. This cut will probably be at an angle; look at your reference picture to see how the bowl is mounted relative to the stem. If you look at the picture of Gandalf’s pipe on ACS, the bowl is actually kind of tilted backwards. Lay the pipe stem down on a table on its side and lay the pipe bowl on its side on top of the stem at the place you think the bowl ought to go. Tilt the pipe bowl and move it around until you have it like you think you want it. Then take a pencil and mark the stem at the angle you think is right. Then use a saw to cut the stem – here is where a saw with a mitering frame can come in handy (clamp the wood to the mitering frame or put it in the vise to hold it for a hand saw). RECOMMENDATION: make your first cut further out on the stem from where you want the bowl to be when the pipe is finished. Then you can check the angle by holding the bowl up to the stem. That way you will have another chance to change the angle if it is not quite right without ruining your stem
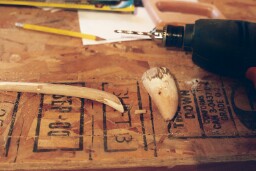
Determine how long you want the stem to be (again check your reference picture to get the right proportions) and cut the other end off straight. I whittled the top and bottom of the stem down slightly to make it look like the mouthpiece. Your stem probably has twig scars on it – you can leave the stem that way if you like the look. If you want your pipe stem to be smooth, sand it with coarse sandpaper to remove the twig scars and knife marks. Hold the stem up to the place on the bowl where you want to attach it and use a pencil to draw around the end of the stem onto the bowl. You need this to match the holes for the dowel. Clamp the stem in the vise so you can drill the hole in the bowl end of the stem for the dowel which will help hold the stem to the bowl. Now this may be an optional step, and you may be able to just glue the bowl to the stem, but since I didn’t do it that way, I can’t vouch for it. Get a drill bit slightly bigger than the diameter of the dowel (13/64”) and trying to hold the drill straight, drill a hole in the stem about ½” or so deep. Now take the stem out of the vise and put the end you have just cut over a piece of paper and draw around it – this is for a template to drill the matching hole in the bowl. Cut the shape out of the paper and put it over the end of the stem and use the pencil to punch a hole thru it into the hole you just drilled. Then fit the punched paper over the bowl to where you drew around the stem and make a mark on the bowl thru the punched hole to mark where to drill the bowl. Now drill the hole in the pipe bowl.
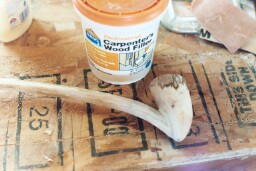
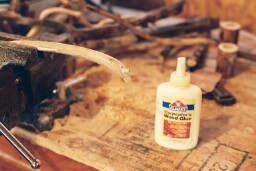
Use a toothpick , thin sliver of wood or even the dowel itself to figure out how long you need to cut the dowel. Insert the toothpick into the stem hole and mark with a pencil how deep it went in. Then do the same for the bowl hole and add the two lengths together. Then cut your dowel to that length. The dowels are plenty long, so you can try again if you make a mistake. Glue the dowel into the stem end of the pipe with the carpenter’s glue. Now put some glue over the bowl end of the dowel and push the bowl over it up to the stem. If you haven’t got the holes quite straight to match, you can bend the dowel a little with pliers. You won’t get an exact fit, but the wood filler will take care of that. Wipe off any excess glue. Clamp the stem vertically in the vise so that the bowl is on top. Be careful not to clamp it too hard or you will dent the wood. Let the glue dry overnight.
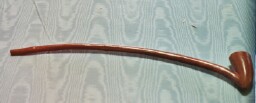
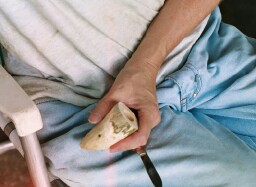
When the pipe is dry, get out your wood filler. Wood filler tends to separate, so when you open it, you will probably need to stir it to blend it again. This is messy, but I found the best way was just to put the filler on with my fingers. Fill the crack between the stem and bowl and try to smooth it out so the stem blends nicely into the bowl. I found that dipping my finger into a little water and using that to smooth out the filler helped. Put the lid back on the filler tightly or it will dry out. Let the pipe dry. Now use the fine sandpaper to sand the filler smooth. If you want your pipe to be smooth, sand the entire pipe. Finishing the pipeThere are different ways you could finish your pipe. I wanted mine to look like pottery, so I used acrylic craft paints to paint it. Gandalf’s pipe is one of those items that is a different color depending on which scene you are looking at. In the scenes where Gandalf is driving the cart, his pipe looks very deep brown. In most of the rest of the scenes, it looks reddish brown and I believe in at least one scene it looks light tan. You could also just varnish the pipe (I prefer acrylic type varnishes so I can clean up with water.) Or you can stain the pipe and then varnish it (Min Wax has a combined stain and varnish if you want to save steps.) Here is how I painted mine:Materials:
It is difficult to paint the entire pipe at once – I left a couple of places on the stem bare where I could hold on to it and let it dry, then finished the bare spots. Paint on the burnt sienna base coat and let it dry about 10 to 20 seconds. Paint the pipe in sections as acrylic paint dries to the touch pretty fast.
I wanted a subtle effect, so I did this while the base coat was still tacky. Pour a little of the burnt umber paint on the paper plate. Take the dry sponge and dab it in the paint. Then dab the sponge on the paper plate or some newspaper to remove the excess paint. Then pat the sponge on the pipe to create a mottled effect. I did the same with the beige paint on the bottom of the bowl and at the mouthpiece to give them a slightly worn look. NOTE: Don’t worry if you don’t like what you did. Let the paint dry, then paint over it again until you get what you want. You can also practice on a piece of paper before you do the pipe. Let the paint dry. I wanted the inside of the bowl to look charred, so I got a stiff bristle brush and streaked it with black. Apply the clear coat to give the pipe a nice sheen.
Notes on other pipes: Aragorn’s pipe has a kind of little knob on the bottom of the bowl. You might want to try getting a wooden button, gluing it on the bottom on the bowl and filling the thread holes with wood filler. I have only seen one picture of Bilbo’s pipe, but the bowl seems a little shorter and wider than Gandalf’s and it seems set more straight up and down relative to the stem.
If you are confused by any of my instructions or have suggestions for better ways to do any of the steps, you can email me at jbennett@remember.com. Good luck with your pipe. v ----- Advertisement -----v
^ -----Advertisement ----- ^
This page was last updated 04/22/08 |
|||||||||||||||||||||||||||||||||||||||
%20small.jpg)