Dwarf Beard Crimps
To Get that properly styles Dwarf Beard Look
(and we hear it works for Princess Amidala's Hair as well)
by Emily D.
've been working with some scrap sheet metal, trying to make some
costume-y type stuff. I was going for the Amidala look in Episode
2...the first scene where her decoy is blown up and Amidala is wearing
the helmet and that low pony tail with the little metal clamps in her
hair.-The "pilot" costume. I realized that Gimli's beard also had these
metal claps that were very similar to Amidala's. Gimli the dwarf, has a
long red beard with several braids that are held in place by metal hair
fastenings. Here is a make-shift way to make those kinds of
clamps/fastenings. It's not perfected yet, so play around with these as
a starting point, and have fun!
Materials:
- Cheap aluminum sheet metal
- (I bought mine at Loews and it has a silver side and a gold side
that can be cut with regular scissors.)
- ALSO...You might use empty soda cans! Cut 'em up had have fun with
the different colors. (Note. Soda cans will be softer, more pliable, and
much easier to get cut with then the sheet metal.)
- Pliers or needle-nose pliers
- Scissors
- (make sure you don't use your mom's good sewing scissors to
cut metal...your costuming career could instantly be grounded. :-)
Dat's about it! All you need.
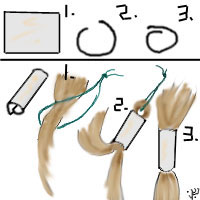
Step 1.
You've bought your metal (or found it in the garage), and you're ready to
cut! Watch out for those sharp edges! These clamps can be very sharp....I
haven't perfected how to perfect this yet.
Now, take the scissors and cut an even strip of the sheet metal. I'd say,
for Gimli or Amidala, you'd cut about a four inch long by a half inch wide
strip.
You might make many of these strips before moving to the next step.
Step 2. 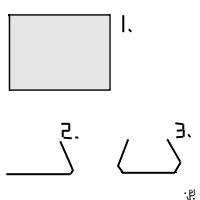
Cut your four inch metal strip into one inch little segments. (they make
a pretty sound when you have a bunch of 'em made! :-)
Now, you might want to round the sharp little edges a bit, or just leave
'em like I did.
To finish them, file the edges with a fine file... or an emery board
you're not planning on using on nails any more.
Step 3.
Two ways to finish these, depending on what you want.
 A. Take the pliers and
bend the one inch long metal piece. Bend them gold side in or silver side
in, depending on which color you like. Band them to make them kinda look
like a staple for a stapling gun.-equal thirds of the piece. A. Take the pliers and
bend the one inch long metal piece. Bend them gold side in or silver side
in, depending on which color you like. Band them to make them kinda look
like a staple for a stapling gun.-equal thirds of the piece.
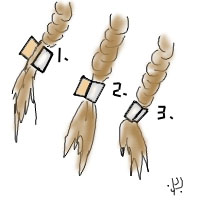
1. Clamp these on your hair or beard. Take a strip of hair (not too
much, just enough to fill the clamp) and start to press the clamp closed
with your fingers. Then, take up the pliers and clamp down.-Dat's it! Do
as many as you want!
B. Turn the clamps into "beads". Not all of you may be willing to keep a
pair of pliers in your bathroom and stand there in front of the mirror and
clamp them to your hair.-they stay better this way: (...but it might be nice
to make beads out of them.) You'll have to kinda roll the metal piece into a
bead. -Play around with different pliers techniques till you get it to the
point that you want to string it on your hair or beard.
1. Stringing the bead on your hair/beard. Take some dental floss, take
a strip of hair. Catch the hair in the loop of the string/floss and string
the "bead" onto the string. Your hair will be doubled through the bead as
you pull it through. Be gentle so as not to rip your hair on the sharp
edges of the bead. If you make the bead form of these clamps, you might
like to try using clear nail polish to blunt and seal the edges of the
bead before you string it on your hair.
(Note. If you are using these on a wig... I would suggest not using the
"bead" form of these for your wigs. Take one of those seamless rubber bands
for hair, and put that were you want it on the wig. Bend the clamps over the
rubber band. Then you can un-pry them when you want to change the wig.)
Go a head and try a bunch of different sizes and different ways to make
these! You could also use these for fabric clamps...maybe on braided/macramé
belts on a Ren costume! Or braid you hair in corn rows and fasten the end
with these! And...an other Amidala look could be achieved by taking the
sheet metal and making her arm bands she wears with the white outfit for the
area sequence! (Just make sure your
edges are finished so you don't cut yourself.)
Have fun guys! Hope you enjoyed these "ideas" rather then real
instructions. If you guys make these up, or find better ways to do them, let
me know! This is great fun sharing costume-y tips!:-)
Pattern Modification & Tips | Fabric Techniques | Fabric Embellishment | All About Armor | Leather Working | Vambraces to Gloves | Weapon Tips | Shoe Tips | Metalwork and Crowns | Working with Clay | Casting Belt Buckle | Casting Small Props | Pipe Making Tips
LOTR Home | Up | Wire Intro | Joining Tips | Wire Circlets | Crown Tips | Making It Real | Galadriel's Circlet Pattern | Butterfly Crown - Tin | Butterfly Crown - Clay | Copper Foil Arwen Crown | Dwarf Beard Crimps | Cleaning Silver Jewlry | Weta Techniques
This page was last updated
04/22/08
|

