


|
|
How to make Hobbit Skirts
Hobbit skirts are simple straight gathered tube skirts.
There are about as many ways to make these are there are people who sew.
This is just one way.
We are not going to list all the instructions here....
because you probably have the details at home sitting in your pattern box.
Use the instructions for any skirt (or pants) that have a waist band with
the fabric gathered in to fit.
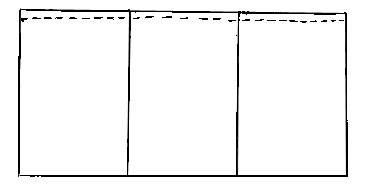
A simple gathered skirt
- How many fabric panels:
- For a nice full skirt, use 3 widths of 45' fabric or 2 of 60'.
If you are really thin, you can use two widths. If you are a
bit larger, use 3 of 60'. (Use as many widths as you do to
make a ren-faire skirt.). And, yes, if the fabric is even on
the weave, you can just turn it sideways and use one piece of
fabric with the fabric selvage (edge) at the waist.
- The length of each fabric panel:
- Measure from your "waist sewing line" (ie where stuff sits on
your waist) to below the knee or mid-calf; +3 1/2 " for hem
and a half inch for the waist. If you're not sure of
your measurements, or have wide hips in comparison to your waist,
add a few more inches. (It's much easier to cut off the
extra later.)
- The waist band:
- Use the waist band from any pattern, but add an extra couple
of inches to the tab... just in case. (We're gathering more
fabric here, so the thickness *may* increase the waist size just a
tad.)
- Cut interfacing to match. (sew on works better than
press in... but either will do.)
- If you're doing the waist band from scratch, it looks like the
waist band is about 1 1/2 inches.... so 1 1/2 * 2 plus your seam
allowances... 4 to 4 1/2 inches. Length... measure the waist
band on any pair of jeans... add about 4 inches for seam
allowances and the tab.
|
 |
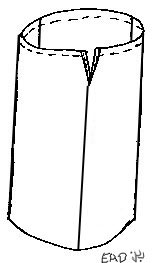
- Stitch your skirt panels together
- Mark your front, back and sides with chalk.
- On your waist band, fold it in half, see where it sits on your
waist. Chalk in where they would come together... mark your
front, back and sides. (Here's where you determine if
you want a side opening or a back opening... neither is right or
wrong.)
- To hand gather:
- Using embroidery floss or carpet thread (and a big needle).
Cut thread double the length you want. It needs to be quite
a bit longer than your waist band... but doesn't need to be as
long as your skirt laid flat.
- Knot one end into a piece of cardboard or knot it around a
washer. (This is so the knot doesn't fall though, sew a long
running stitch across the top of the skirt. You don't need
to be neat, just kinda even. Stitches should be 1/4 to 1/3
an inch... just in 'n' out, in 'n' out with the big needle.
- To machine gather:
- Set your sewing machine on it's widest stitch and stitch
across just above your seam line.
- Note: you can choose either method to gather, but the more
fabric you are getting into a smaller space, the better hand
gathering works and saves you time in the long run.
|
|
|
- Note on gathering: Don't run a gather stitch at 1/2 inch
on either side of the opening.
- Close the last seam. Leave 6" or so open at the top.
- Finish the opening edges by turning the fabric under twice.
Hand or machine stitch it down.
|
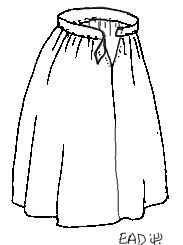
- Add the skirt to the waist band:
- Match up your chalk marks for center front, center back and
sides.
- Pin everything down. (Yes, you will use a lot of pins and bend
more than a few.)
- Run one row of stitching ( big stitches) down all the way
across to attach the skirt to the waist band. (Sew waist
band side down on your machine.)
- Take the pins out and check your fit.
- If all the extra fabric doesn't let the waist band close,
just pick out the last two inches and spread out the gathers.
- If your waist band is way too big, pick out the last two
inches and tighten the gather strings. (A small overlap
doesn't show, and helps keep it closed.)
- Adjust your sewing machine to it's regular stitch and run
another line of stitching.
- If your gathering threads are showing, pick them out,
else leave them.
|
|
|
- Finishing the waist band is easy.
- Cut off any extra you don't need for the tab. (Remember to
leave your seam allowances.)
- Time to get out your simple sewing pattern with the waist band
and follow the instructions for creating the tab and finish the
waist band.
|
- If you're not using instructions, just fold the tab, stitch to
form it. Clip and turn. Fold the band in half, hand close the
band. (Yes, we left little steps out here, so use the pattern
instruction sheet if needed.)
- Note: in the few hobbit skirts where we saw a waist band, no top
stitching was evident, so finish by hand.
|
|
|
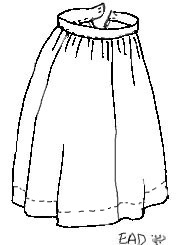
- Close the skirt with a set snaps or hook & eyes. If you
left a longer tab so the skirt can be sized more, add a 3rd hook
about 1" further down the tab as well ( to keep the tab lined up).
- Pu the skirt on and have a friend mark the hem for mid calf.
- You want a wide 3" hem to give the skirt a bit of fullness so
cut at 3 1/2 inches below the hem line. (Don't worry if the hem
is a little shorter than that, won't hurt at all. Hobbits wear
all kinds of skirts.)
- Turn the hem fabric under 1/2 inch and stitch.
- Press.
|
A Fancy gathered skirt
Some of the hobbit skirt are show with pin tucks and bits of
other decorations. If you are going to do any of these things,
you must hem and decorate your skirt before you do anything else.
Once the skirt is decorated and hemmed, you "true" the skirt to the waist
band (i.e., pin it to the waist band on a dummy until the hem is properly
balanced.) For instructions on how to do this, we recommend Jean Hunnisette's "Period Costume for the Stage and Screen" (18th/19th
century volume).
- Skirt pattern by Judy and Cat, Art by Emily |

