

|
|
|
|
|
|
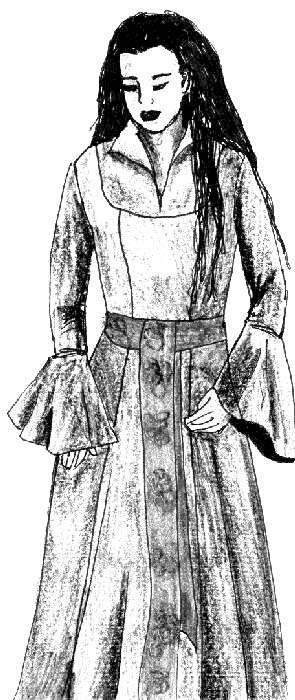
Making Arwen's Chase OutfitV2.2 (November, 2004) Here we present some basic information for making one of our favorite outfits. Besides these bits, go on over to the Elven Grove section of our scrapbook and read up on the solutions folks chose. Index of Tips
Drafting the Rolled Collar
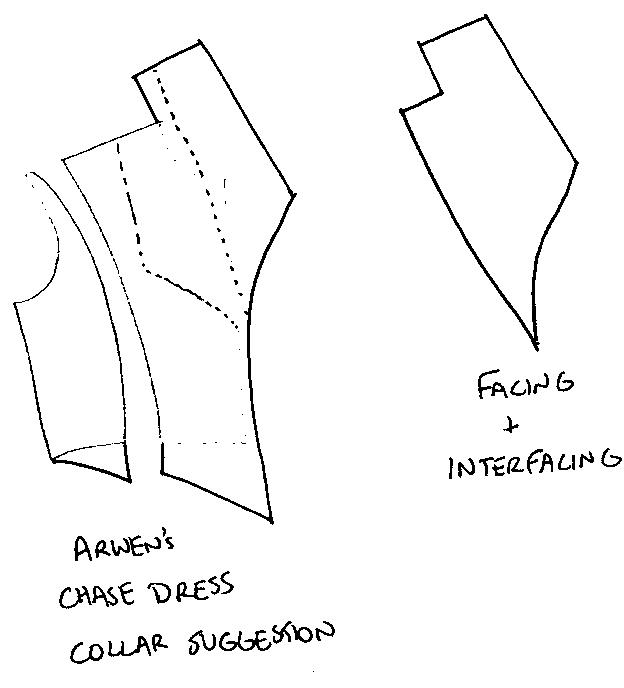
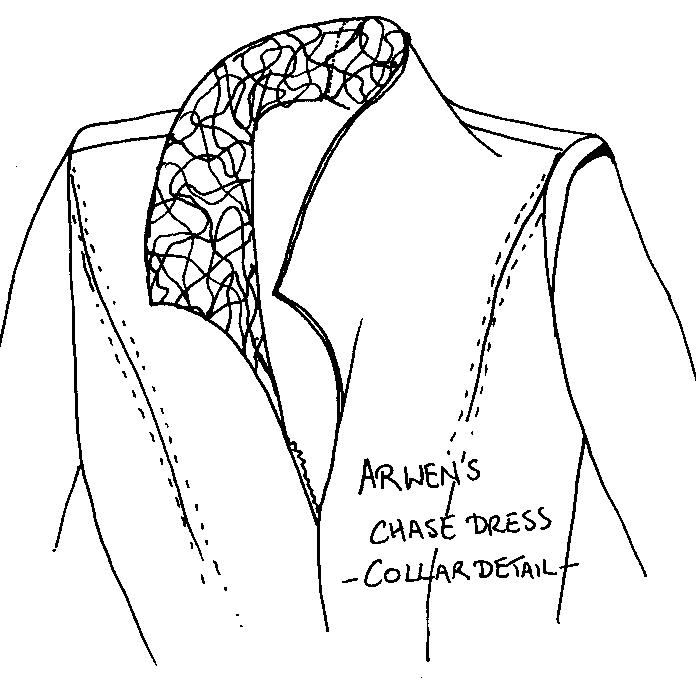
Arwen's collar is very high, coming up at least to the nape of the neck, and stiffly interfaced, so it curls back and frames her face. The corners are not, as the toy shows, rounded, but are in fact squared off at a wide angle. The facing itself is actually a textured lace overlaid on the suede. If you cannot find the right lace, use a textured tapestry fabric, or the same leather with a very fine trapunto or corded embroidery applied. Some are using grey puff paint, but that will itch and after a while flake off. Note: the method for drafting a continuous roll collar can be a little trickier when you have to copy such a stiff collar, as you need to visualize what it would do if laid flat on the pattern. Sometimes a little good old fashioned guesswork helps! Plus, you have to know the rules in order to break them! Points of interest: The bottom of the bodice tapers to a point, front and C.B., about three inches below natural waist. The collar is high at the back and does not cross over at the front. The
degree of curve in the collar is fairly small, it has pretty straight edges,
except just where it joins the C.F. In addition, I have extended the C.F. only enough for seam allowances, because there is no buttonstand on this garment, it being a C.F. closure. The garment would definitely be fully lined in the bodice, both for comfort and to minimize topstitching. It allows fastening to be invisible, also. Use a heavy weight interfacing. Note: for full detailing check out Naomi's tips on Rolled Collar Construction. or see: Pattern 9891- Adapting for Chase Dress
1. Since the chase dress is split down the front and 9891 is not, you take the central pattern piece -#1, and instead of cutting one, on the fold, you are going to cut two, the same size as the pattern, but with a wider seam allowance to allow for a turn in if you are using a front closure. If you are having the front sewn, and the closure at the back, that's ok too, 'cause a central front seam will still give you the look of the real thing. Now, before you cut out these pieces, what you need to do is take the collar addition - #14, and pin or tape it onto the top of #1, matching notches etc. This is because a rolled collar protrudes past the centre line and therefore cannot be cut without a centre-front seam. (This is the reason we know Celeborn has a mandarin collar, not a rolled one.) 2. So, you then cut out your two pieces, and seam them down the centre, and finish the rest of the outfit as per the pattern. 3. You then make the back the same way, it's two pieces anyway, but you attach the back yoke -#15 to the top before you cut out the fabric, as before. * If you are going to change the opening to the front, then you do the opposite thing on the back pattern, and cut it as one piece on the fold after attaching the yoke. Don't worry about the extra fullness in the back waist, because the actual dress has a sash sewn into the princess seams about two or three inches above the back waist, which then gathers it in neatly. 4. When modifying the sleeves, shorten the top sleeve on the inner arm side. The lower piece of the sleeve will need to be modified a bit. The real sleeve is not as full and is wrapped. NOTE: It is even more important to muslin it when you are altering patterns, just to check everything is perfect before you cut your good fabric! Step by step flat pattern adjustments <here> Alternative Pattern ChoicesSimplicity has issued a newer LOTR pattern 4940. The altering note are very similar but you've already got things like sleeves ending on the upper arm and the armhole has been fixed. A couple of people have adapted Vogue 1290 for the Chase Dress. It is a slightly more complex pattern to work with, but it is front opening and princess seamed. To adapt you would need to draft a rolled collar, following the instructions on site, alter the sleeves by adding a petal shaped lower sleeve below the elbow, and an inner sleeve below the elbow, and add lacing and rear sash. Leave splits in the overskirt at CB and sides, and construct a separate underskirt. If you want to attach the underskirt, like the real dress, the waistline must be altered, in which case you need to treat the skirt as separate, and alter the panels so you have four instead of seven. Attach the underskirt to the bodice with the overskirt panels. Zipper moves from back to front. Use an invisible zipper, and a hook at the top. Fabric ChoicesThere have been as many different fabrics used as there have been dresses! As far as we know, no-one has actually made it from a fine grey leather suede, like the original, but as leather is a specialist material, perhaps it is best left for an experienced leatherworker to attempt. (If you're trying to estimate suede, check our estimating leather guide ) The key points of this outfit are its distinctive colour and texture. A mid-grey fabric with a suede-like texture would be ideal, but this isn't as easy as it sounds! It has also been made in dark blue and green with success. The idea of faux suede is relatively recent in comparison, and there are a thousand different types - knits, wovens, stretch, non-stretch, single-sided, double-sided, polyester/Spandex/cotton/rayon etc etc etc ! The single distinguishing characteristic of them all is that they have a 'furry' nap to them which is meant to imitate a 'sueded' or brushed leather. We came to the consensus a while ago that there is none on these fabrics! Manufacturers vary in their production methods and materials so much, worldwide, that the best suggestion is to decide how much 'authenticity' you want, in appearance only or actual same material type, versus comfort, price, ease of obtaining and ease of sewing. Most of them, even a specially designed leather substitute like Ultrasuede (TM) will be far lighter in weight than the 'real thing', and will require flat-lining with a stiffer fabric like light denim or canvas or heavy calico to get the drape of leather or suede. Another suggestion was moleskin. As far as I know, moleskin was always used to describe any closeweave fabric that had that soft velvety touch -literally like the skin of a mole! It was and is popular for riding pants/jodphurs and jean style pants, as it doesn't scratch or chafe. It would also require flatlining to add weight. The underskirt is made from a light grey silk, soft and floaty. If you can't afford silk, any soft polyester in the right color will work. There are a number of silk substitutes out there. If you're looking to just buy ribbons, the front lacing and the rear sashes could be a very wide ribbon. For more authenticity, you could make your own. Cut strips of a light silky chiffon-like fabric about 4" wide. For the front laces fold in half and stitch to make a tube. For the rear sashes, overcast or roll the edges. The ribbons appear to be a purplish tone that matches both the grey dress and the plum coloured boots and breeches. If you are making your own breeches, you can use a simple pant pattern like Butterick 6022, a stretch fabric close-fitting legging. Use any deep purplish or plum coloured stretch fabric, although probably not velvet..... To line or not to line, that is the questionA lot of folks have been asking this question. There is no right of true answer. Our guess is that the bodice was lined, but the skirt is not. Raw leather edges are fine. The silk underskirt is finished with a surged edge. So, lining is both an issue for getting the fabric to behave in a certain way and a technique to help with finishing the edge. The bodice will need to be lined if the fabric is too thin or shear. If it is too thin, it will wrinkle badly. It may also be lined for comfort. You have your choice of styles of lining the bodice. Follow the instructions for any coat for a traditional lining. You may also just flat line the bodice. That is the simplest way since once you join the pieces, you just treat the fashion fabric and the lining as one. If your skirt fabric is too thin, your best bet will be to bag line the skirt. This will finish your front petal edge with no visible line. However, some folks have just chose to go with the softer look and finished the edge by serging it. This has worked well for denims and stretch velvets. Another edge finishing technique for the skirt would be doing a double turn under. However, that could get a bit tough doing the front petal. It would best be done by hand. Tapestry Collar TreatmentsSo, you have finally found a fabric for the dress itself, now the second challenge - what to do with the collar? Again, it will be nigh on impossible to find the exact fabric. An open black lace will actually 'grey' out a bit when laid against your grey fabric. This should be your first choice if you want to be accurate. All of the members who have made the dress have chosen different collar solutions, ranging from actual found fabrics in a suitable pattern or texture, through to elaborately embroidering a plain piece of their dress fabric. If you choose to make your own, there are several variations on the theme to choose from. You can pencil a pattern on and then machine-stitch over it in a fine satin-stitch; you can use a cord or soutache braid and zig-zag over it; or you could apply a cord or braid by hand-sewing with an overcast stitch. Use a dissolvable stabilizer, like Solvie, to stabilize the "lace" you are making. You can draw it with pen. You may even choose to leave the collar untextured.
Illustrations by Naomi. Section editing by Naomi, Judy and Cat
This page was last updated 04/22/08
|